API 网关 Apache APISIX 集成 Eureka 作为服务发现
本文介绍了如何在 API 网关 Apache APISIX 中启用 Eureka 作为服务发现以及如何使用诊断工具发现链路中出现的问题。
微服务架构中,大型复杂的系统按功能或者业务需求垂直切分成更小的子系统,这些子系统以独立部署的子进程存在,它们之间通过网络调用进行通信。这些独立部署的服务如何发现对方成为了首先要解决的问题,所以在微服务架构中往往都会存在一个中心化的注册中心。
Spring 作为 Java 生态中最核心的开发框架,从 Spring MVC 到 Spring Boot 持续不断解放着 Java 开发者的生产力,而 Spring Cloud 是 Spring 面向云原生时代微服务架构给出的答案。
在 Spring Cloud 中,Eureka 就扮演了注册中心的角色。Eureka 是一款由 Netflix 开源,使用 Java 语言编写的注册中心服务,其在 Netflix 的基础设施中扮演着重要角色。
Apache APISIX 是一个动态、实时、高性能的 API 网关,提供了负载均衡、动态上游、灰度发布、服务熔断、身份认证、可观测性等丰富的流量管理功能。Apache APISIX 作为业界领先的微服务 API 网关,对 Eureka 提供了原生支持。本文将会使用 Spring Cloud 演示项目作为案例,为大家展示 Apache APISIX 对接 Eureka 服务发现的主要功能及特性。
准备阶段
本次演示使用 Spring 官方提供的 spring-cloud-netflix 教程作为示例,该教程中提供了使用 SpringBoot 启动的 Eureka Server 作为 Spring Cloud 的注册中心,我们也使用相同的方式来启动用于演示的 Eureka 服务端。该项目地址请访问 spring-cloud-samples/eureka。
接下来将为您介绍相关代码和启动方式。
Eureka Server
Spring Cloud 为 Eureka 提供了一个 EnableEurekaServer 的注解,可以直接以 Spring Boot 的方式启动一个 Eureka Server。
代码示例如下:
@SpringBootApplication
@EnableEurekaServer
public class EurekaApplication {
        public static void main(String[] args) {
                SpringApplication.run(EurekaApplication.class,args);
        }
}
启动方式可直接参考下方代码:
git clone git@github.com:spring-cloud-samples/eureka.git
# 在项目根目录执行
./gradlew bootRun
resources 目录中的 application.yml 文件定义了 Eureka Server 监听在 8761 端口。
server:
  port: 8761
接入 Eureka Client 的 HTTP 服务
与 EnableEurekaServer 对应的客户端注解是 EnableEurekaClient,使用 EnableEurekaClient 可以非常简单得将一个使用 Spring Boot 启动的 HTTP 应用注册到 Eureka 上。
以下为示例代码:
@SpringBootApplication
@EnableEurekaClient
@RestController
public class Application {

        @Value("${server.port}")
        int serverPort;

        @RequestMapping("/")
        public String home() {
                return String.format("server-%s",serverPort);
        }

        public static void main(String[] args) {
                new SpringApplicationBuilder(Application.class).web(WebApplicationType.SERVLET).run(args);
        }

}
这里我们在 / 路径上暴露一个 HTTP 服务,返回当前 Spring Boot 使用的端口,这样我们可以使用不同的配置文件,启动多个实例,来演示 APISIX 对注册到 Eureka 的服务端实例列表进行负载均衡的效果。
配置文件如下:
spring.application.name=a-bootiful-client #将会作为注册到 Eureka 中的 application name
server.port=8080 # 修改监听端口以启动多个实例
设置监听端口为 8080,8081,8082,并启动三个 Spring Boot 实例,完成后,使用浏览器访问 Eureka Server 的 8761 端口,可以查看服务注册的结果。
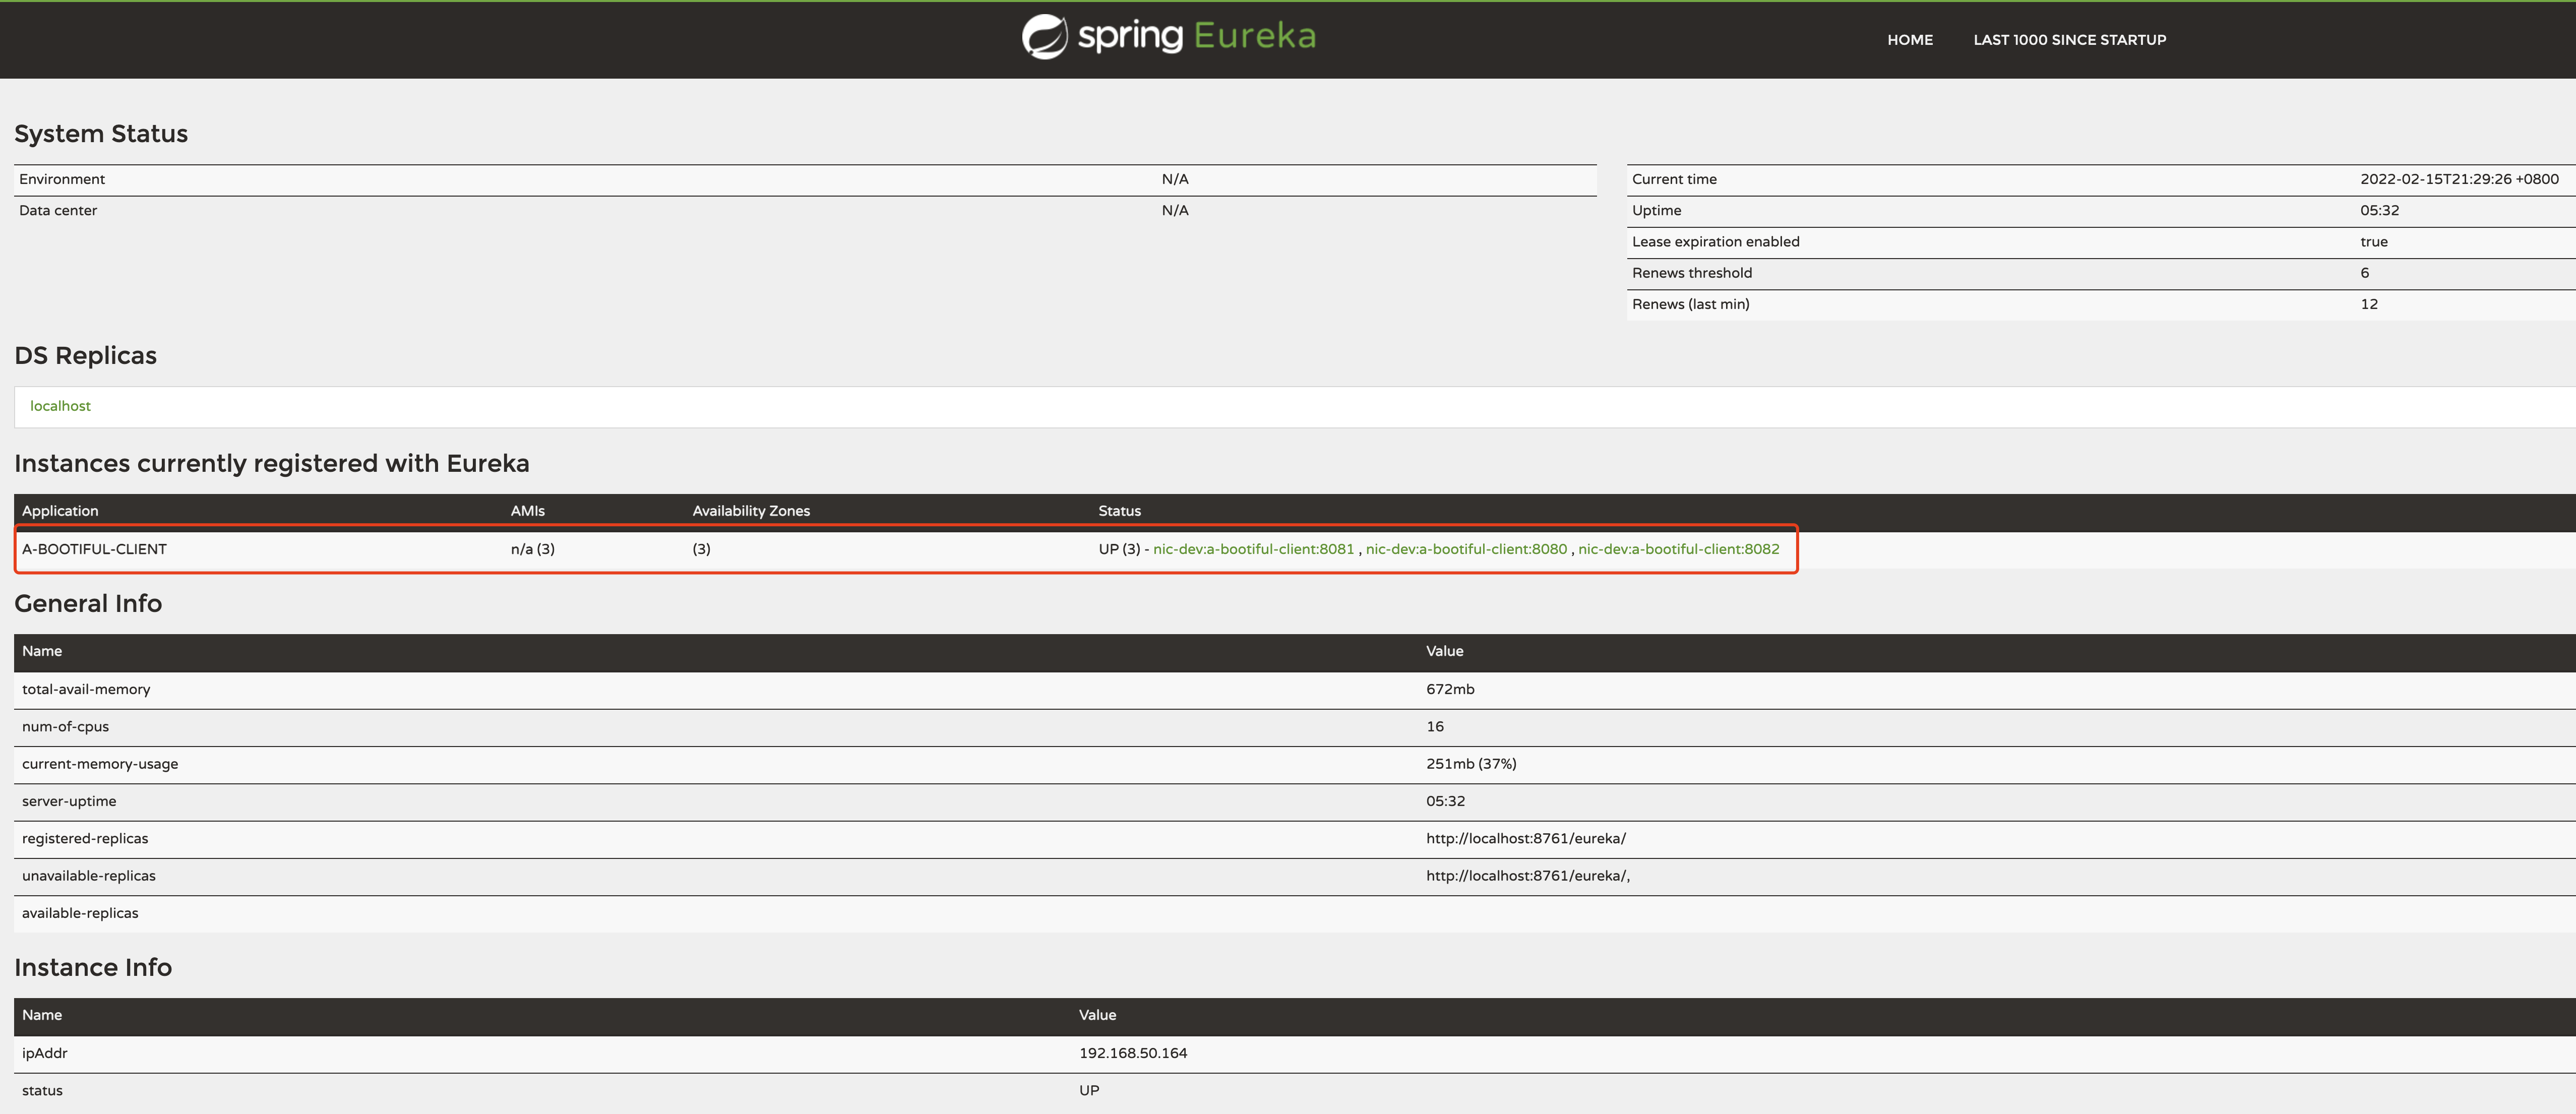
您可以看到应用 A-BOOTIFUL-CLIENT (注意:spring.application.name 被全部转为大写字符)下注册了三个实例,分别暴露了 8080,8081,8082 端口,并且均处于 UP 状态。
使用 APISIX 代理 SpringCloud 应用
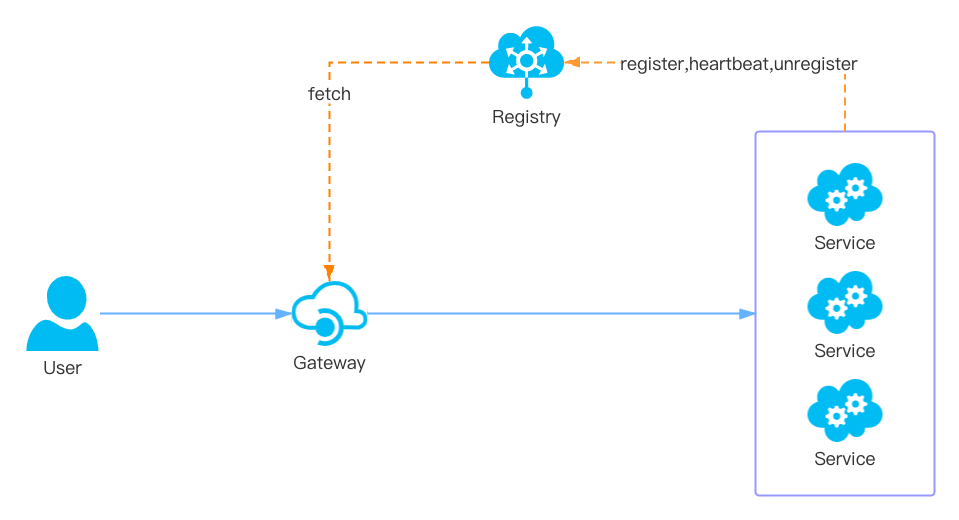
接下来,我们将会实现如下图所示的请求链路:
启动 Apache APISIX
首先,需要在 Apache APISIX 的配置文件 config.yaml 中找到 apisix.discovery,修改 Eureka Server 连接信息的相关配置,并启动 APISIX。
  discovery:                       # service discovery center
      eureka:
        host:                        # it's possible to define multiple eureka hosts addresses of the same eureka cluster.
          - "http://172.23.79.129:8761" # Access address of Eureka Server started by Spring Boot
        prefix: /eureka/
        fetch_interval: 30           # default 30s
        weight: 100                  # default weight for node
        timeout:
          connect: 2000              # default 2000ms
          send: 2000                 # default 2000ms
          read: 5000                 # default 5000ms
创建路由
创建一个 Route,并在 Upstream 中配置启用 Eureka Service Discovery 插件。
upstream.discovery_type为eureka。upstream.service_name是应用在 Eureka 中注册的应用名A-BOOTIFUL-CLIENT。
curl http://172.30.45.72:9180/apisix/admin/routes/1 \
-H 'X-API-KEY: edd1c9f034335f136f87ad84b625c8f1' -X PUT -i -d '
    "uri": "/*",
    "host": "eureka-demo",
    "upstream": {
        "service_name": "A-BOOTIFUL-CLIENT",
        "type": "roundrobin",
        "discovery_type": "eureka"
    }
}'
请求路由
使用 curl 命令进行多次请求,验证负载均衡效果。
$ curl http://172.30.45.72:9080/ -H "Host: eureka-demo"
server-8081%
$ curl http://172.30.45.72:9080/ -H "Host: eureka-demo"
server-8080%
$ curl http://172.30.45.72:9080/ -H "Host: eureka-demo"
server-8082%
$ curl http://172.30.45.72:9080/ -H "Host: eureka-demo"
server-8081%
$ curl http://172.30.45.72:9080/ -H "Host: eureka-demo"
server-8080%
$ curl http://172.30.45.72:9080/ -H "Host: eureka-demo"
server-8082%
从上述返回结果可以看到,请求被依次分配到 Eureka 中注册的三个实例上,这是因为我们使用的负载均衡算法是 roundrobin,所有的后端实例会被轮流分配请求。
模拟实例宕机
关闭其中 8081 实例,模拟实例宕机场景,观察请求效果。
$ while true; do curl http://172.30.45.72:9080/ -H "Host: eureka-demo"; echo; sleep 1; done

server-8080
server-8082
server-8081

server-8080
server-8082
server-8081

server-8080
server-8082

server-8080
server-8082
由上述结果可以看出,关闭 8081 实例后,Apache APISIX 会及时同步到 Eureka 的最新实例列表,然后将请求转发给正确的后端。
诊断工具
在微服务系统中,经常会遇到非预期转发的问题,这些问题的原因可能来自服务发现中的各个链路,例如:客户端注册异常,注册中心本身数据异常,网关读取注册数据异常等等,因此发生异常时链路中可以使用的诊断工具将会尤为重要。
所以 APISIX 在 Service Discovery 插件中提供了一个诊断接口,可以方便的查询出当前网关正在使用的服务列表,结合注册中心的控制台,我们就对网关到注册中心这一链路做出快速诊断。
诊断接口默认暴露在回环接口的 9090 端口,访问方式为 GET /v1/discovery/{discovery_type}/dump,例:
curl http://localhost:9090/v1/discovery/eureka/dump

{
  "services": {
    "A-BOOTIFUL-CLIENT": [
      {
        "weight": 100,
        "metadata": {
          "management.port": "8081"
        },
        "host": "192.168.50.164",
        "port": 8081
      },
      {
        "weight": 100,
        "metadata": {
          "management.port": "8080"
        },
        "host": "192.168.50.164",
        "port": 8080
      },
      {
        "weight": 100,
        "metadata": {
          "management.port": "8082"
        },
        "host": "192.168.50.164",
        "port": 8082
      }
    ]
  },
  "config": {
    "prefix": "\/eureka\/",
    "timeout": {
      "connect": 2000,
      "send": 2000,
      "read": 5000
    },
    "fetch_interval": 30,
    "host": [
      "http:\/\/172.23.79.129:8761"
    ],
    "weight": 100
  }
}
通过上述示例就可以查询到 APISIX 正在使用的 Eureka 数据。
总结
Spring Cloud 是一个广受用户欢迎的微服务框架,而 Apache APISIX 通过支持 Eureka Service Discovery 提供了处理 Spring Cloud 应用流量的能力,我们可以看到这两个生态的紧密结合,让微服务架构的落地变得更加简单高效,从而让业务开发可以更加的专注于业务价值。
关于 eureka 插件的更多说明和完整配置信息,可参考 Apache APISIX 官网文档。
Apache APISIX 项目目前正在开发其他插件以支持集成更多服务,如果您对此有兴趣,您可以通过 GitHub Discussions 发起讨论,或通过邮件列表进行交流.