APISIX OpenID Connect Plugin with Okta Authentication
On this page
- Introducing Apache APISIX
- Introducing Okta
- What Is Identity Authentication
- Identity Authentication Modes
- Traditional Authentication Mode
- Centralized Identity Authentication Mode
- What is OpenID Connect
- OpenID Authentication Process
- How to Configure Okta Authentication Using the Apache APISIX OpenID Connect Plug-in
- Prerequisites
- Step 1: Configuring Okta
- Step 2: Install Apache APISIX
- Step 3: Start Apache APISIX and Configure the Corresponding Route
- Step 4: Access Apache APISIX
- About Okta
- About Apache APISIX
This blog shows the procedures of using Apache APISIX OpenID Connect Plugin for Okta Centralized Authentication. This blog contains conceptual introductions of Apache APISIX and Okta Centralized Authentication, and detailed step-by-step instructions.
Introducing Apache APISIX
Apache APISIX is a dynamic, real-time, high-performance API gateway, providing rich traffic management. The project offers load balancing, dynamic upstream, canary release, circuit breaking, authentication, observability, and many useful plugins. In addition, the gateway supports dynamic plugin changes along with hot-plugging. The OpenID Connect plugin for Apache APISIX allows users to replace traditional authentication mode with centralized identity authentication mode via OpenID Connect.
Introducing Okta
Okta is a trusted platform to secure every identity. It is a customizable, secure, and drop-in solution to add authentication and authorization services to your applications. More than 10,650 organizations trust Okta’s software and APIs to sign in, authorize and manage users.
What Is Identity Authentication
Identity Authentication verifies a user’s identity by specific means. We obtain detailed user metadata from the Identity Provider (IdP) to determine whether a user has access to particular resources.
Identity Authentication Modes
There are two main categories of identity authentication: traditional mode and centralized mode.
Traditional Authentication Mode
In the traditional authentication mode, each application service needs to support authentication separately, such as accessing the login interface when the user is not logged in. The interface returns a 301 jump page. All application services need to develop the logic to maintain the session and interact with the identity provider for authentication.
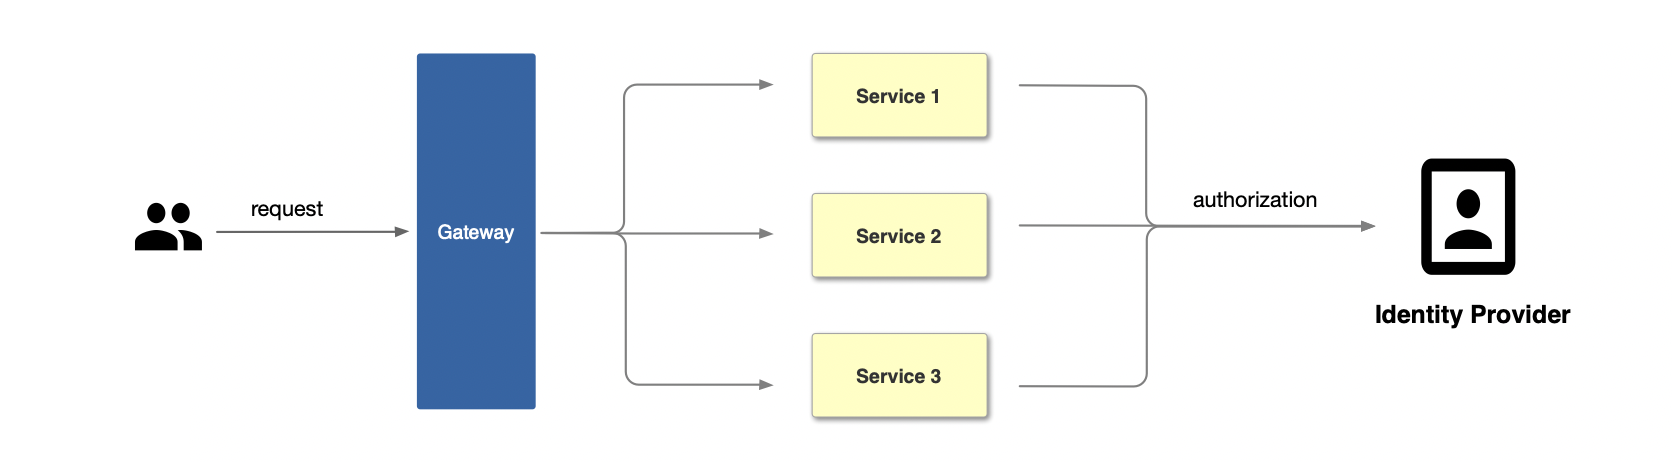
You can see the flow of traditional authentication in the figure below.
First, the user initiates a request, then the gateway receives the request and forwards it to the corresponding application services, and finally, the application services interact with the identity provider to complete the authorization.
Centralized Identity Authentication Mode
Unlike traditional authentication, the centralized identity mode removes user authentication from the application services. Take Apache APISIX as an example; you can see the centralized identity authentication process in the figure below.
First, the user initiates a request, then the gateway itself takes charge of the user authentication process, interacting with the identity provider and sending them an authorization request. The identity provider returns user identity information (user info). After the gateway identifies the user, it forwards the user identity information (user info) to the services in a request header.
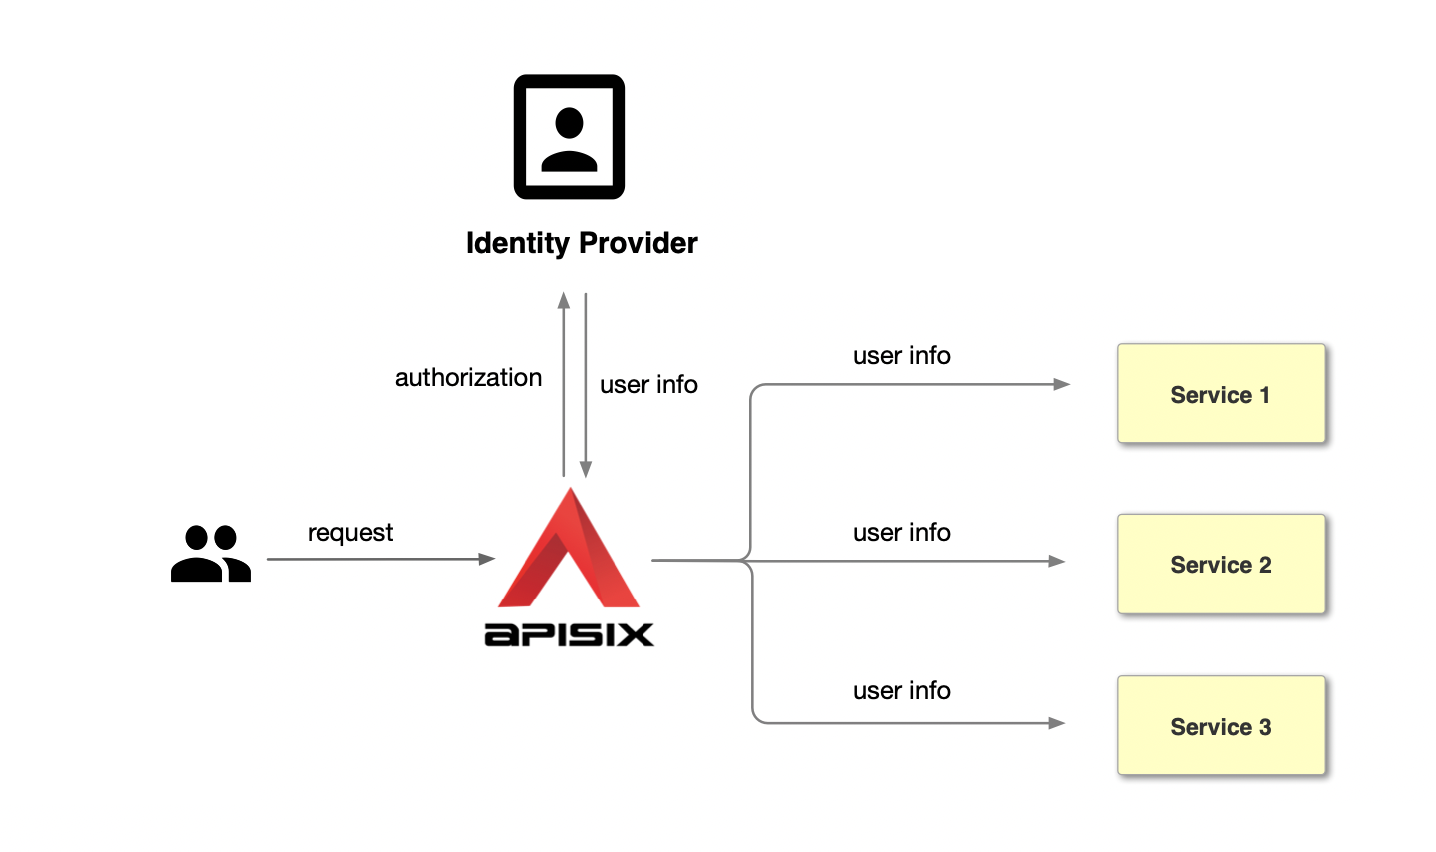
Compared with the traditional authentication mode, centralized identity mode has the following advantages:
- Centralized auth simplifies the application development process, and reduces the development application workload and maintenance costs by avoiding the need to repeat the development of authentication code for each application.
- Centralized authentication mode improves business security. At the gateway level, it can intercept unauthenticated requests in time to protect back-end applications.
What is OpenID Connect
OpenID Connect (OIDC) is a centralized identity authentication mode. The benefit of using OpenID Connect is that users only need to register and log in with one OpenID Connect identity provider’s website and use one account’s password information to access different applications. Okta is a common OpenID Connect identity provider, and the Apache APISIX OpenID Connect plugin supports OpenID. As a result, the plugin can replace traditional authentication mode with centralized identity authentication. In this case, we’re using Okta.
OpenID Authentication Process
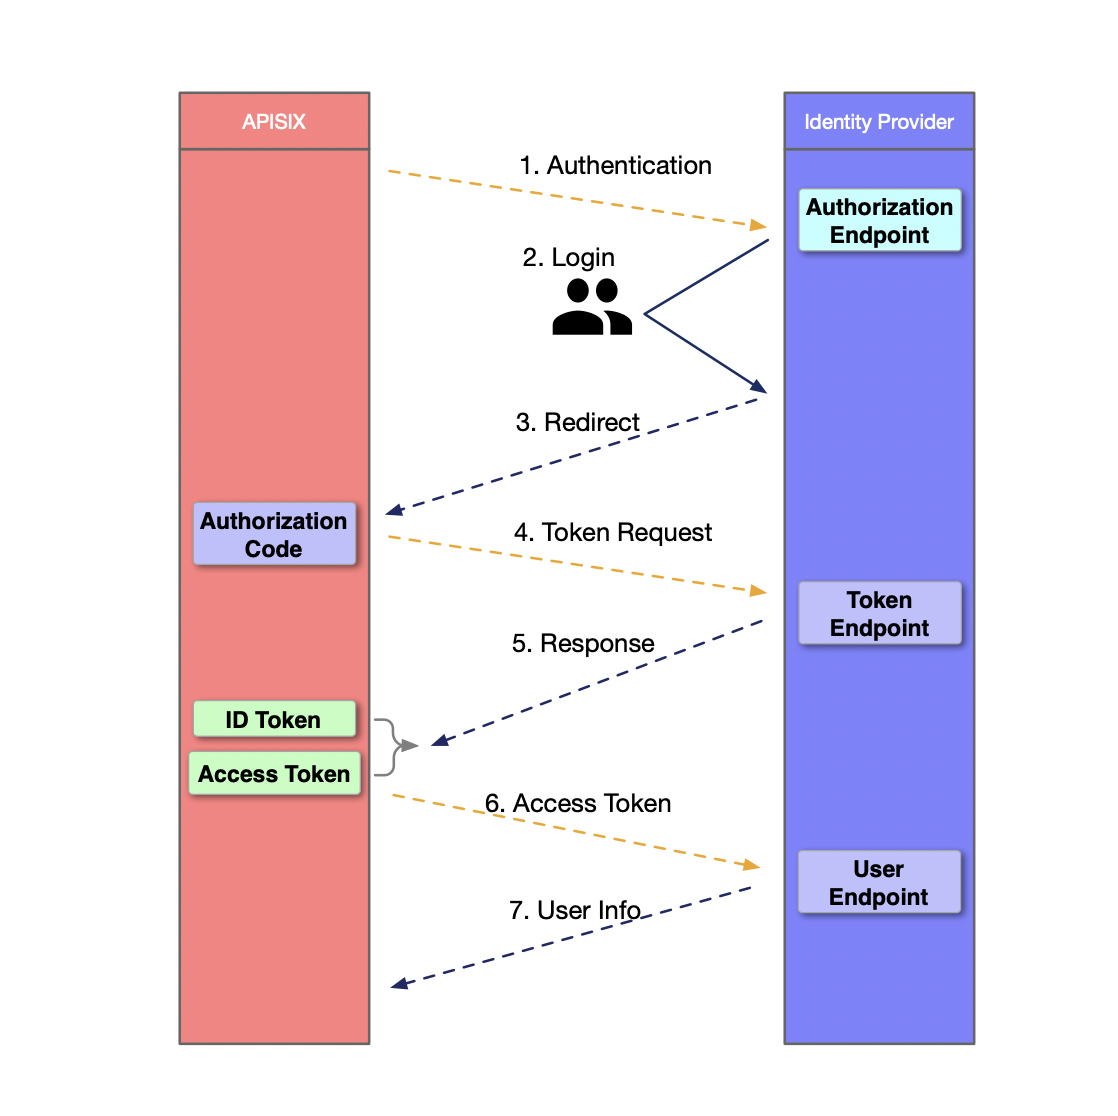
- APISIX initiates an authentication request to the Identity Provider.
- The user logs in and authenticates on the Identity Provider.
- The Identity Provider returns to APISIX with the Authorization Code.
- APISIX requests the Identity Provider with the Code extracted from the request parameters.
- The Identity Provider sends an answer message to APISIX with the ID Token and Access Token.
- APISIX sends the Access Token to the Identity Provider’s User Endpoint for authentication.
- After passing the authentication, the User Endpoint sends the User Info to APISIX to complete authentication.
How to Configure Okta Authentication Using the Apache APISIX OpenID Connect Plug-in
Configuring Okta authentication using the Apache APISIX OpenID Connect plugin is a simple three-step process that allows you to switch from traditional authentication to centralized identity authentication mode. The following sections describe the steps to configure Okta authentication using the OpenID Connect plug-in for Apache APISIX.
Prerequisites
Have an Okta account ready for use.
Step 1: Configuring Okta
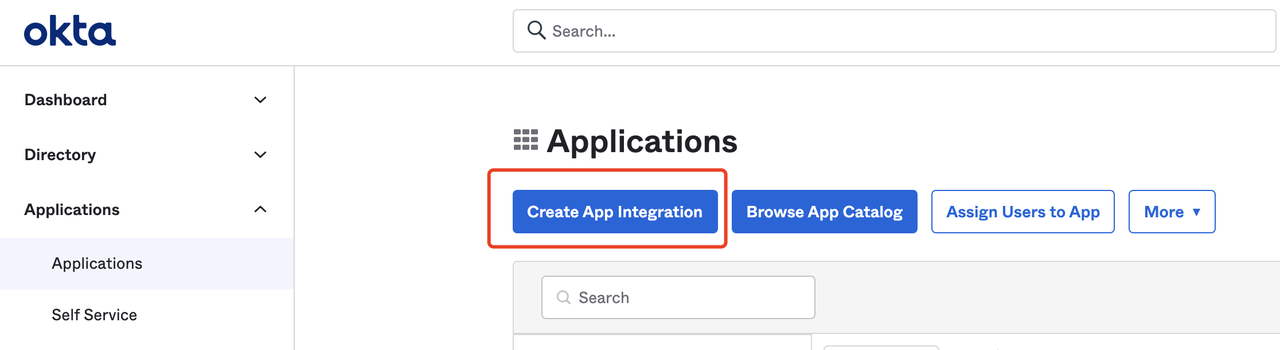
- Log in to your Okta account and click “Create App Integration” to create an Okta application.
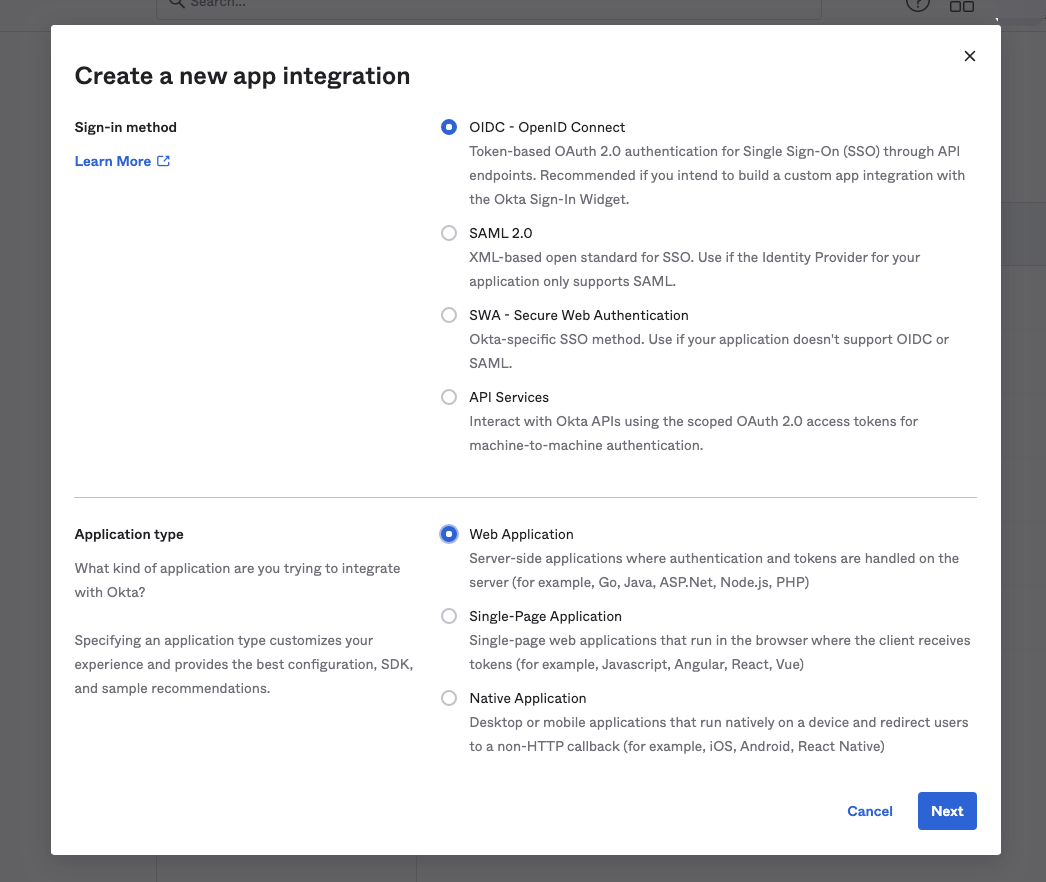
- Select “OIDC-OpenID Connect” for the Sign-in method, and select “Web Application” for the Application type.
- Set the redirect URL for login and logout. The “Sign-in redirect URIs” are links a user can go to after a successful login, and the “Sign-out redirect URIs” are links a user goes to after a successful logout. In this example, we set both sign-in and sign-out redirect URIs to
http://127.0.0.1:9080/.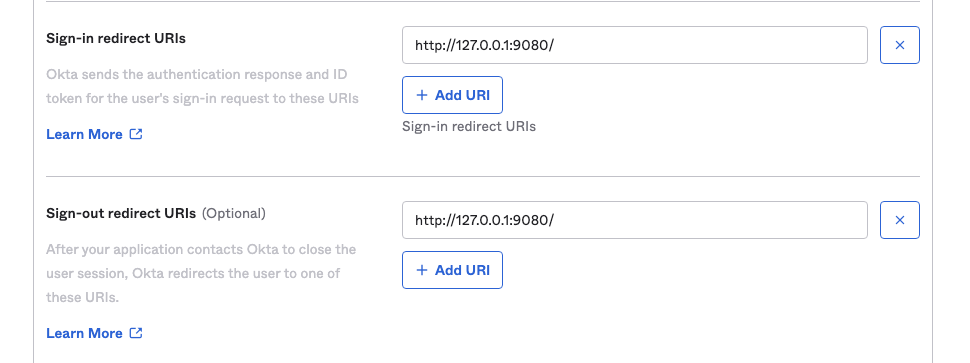
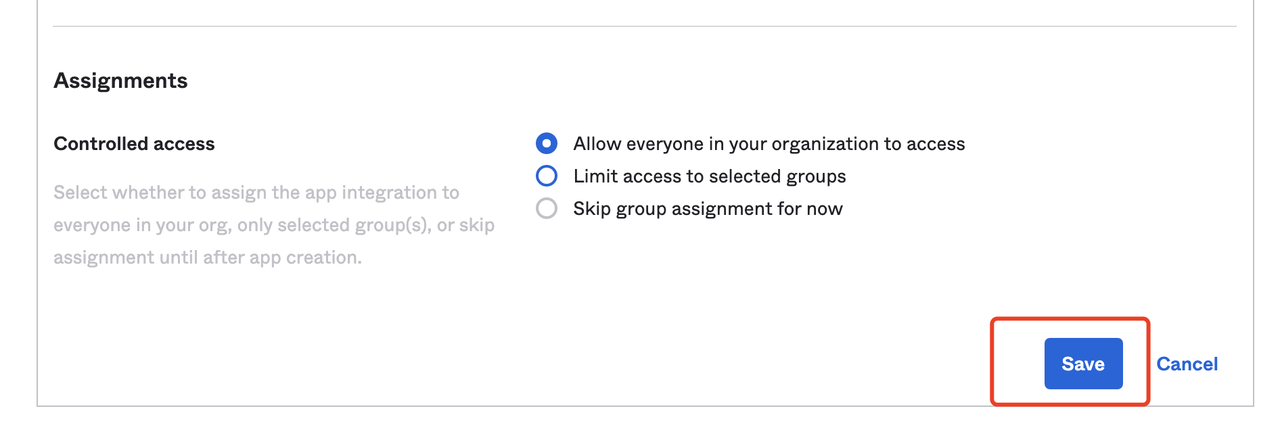
- After finishing the settings, click “Save” to save the changes.
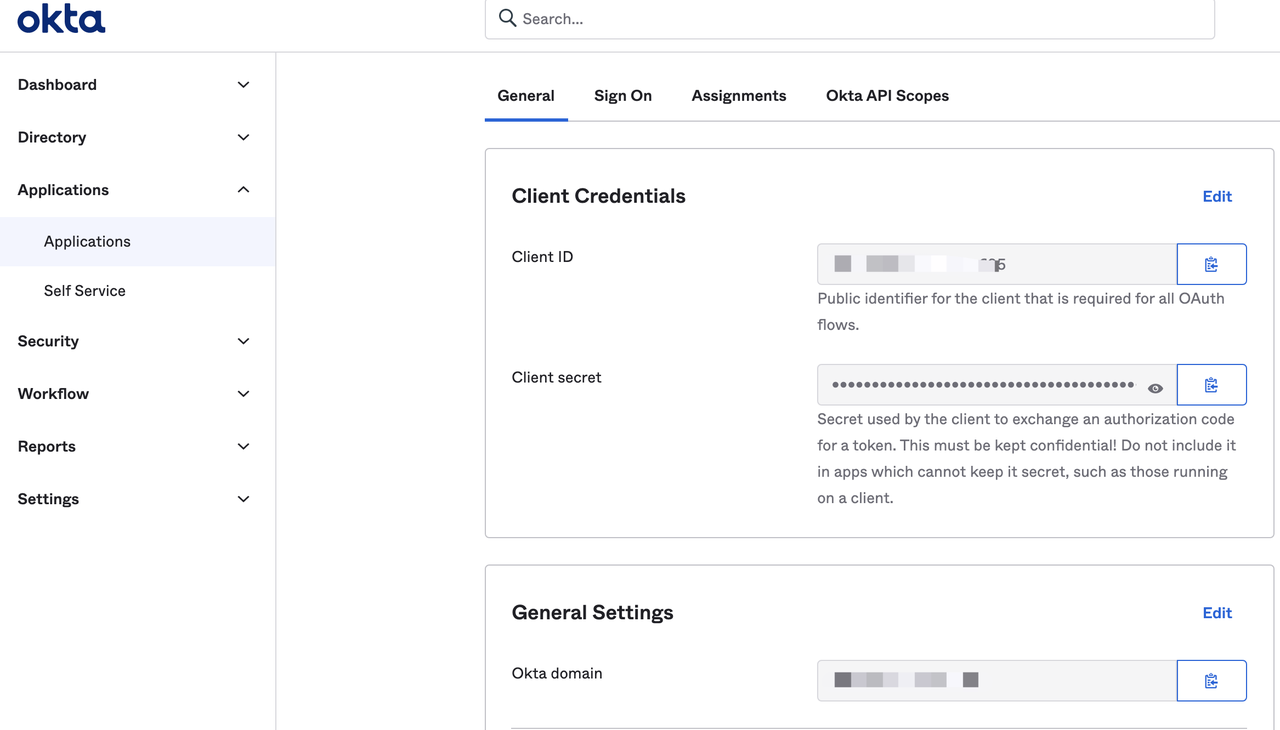
- Visit the General page of the application to obtain the following configuration, which is required to configure Apache APISIX OpenID Connect.
- Client ID: OAuth client ID, the application ID, which corresponds to client_id and {YOUR_CLIENT_ID} below.
- Client secret: OAuth client secret, the application key, which corresponds to client_secret and {YOUR_CLIENT_SECRET} below.
- Okta domain: The domain name used by the application, corresponding to {YOUR_ISSUER} below.
Step 2: Install Apache APISIX
Install dependencies
The Apache APISIX runtime environment requires dependencies on NGINX and etcd.
Before installing Apache APISIX, please install dependencies according to the operating system you are using. We provide the dependencies installation instructions for CentOS7, Fedora 31 and 32, Ubuntu 16.04 and 18.04, Debian 9 and 10, and macOS. Please refer to Install Dependencies for more details.
Installation via RPM Package (CentOS 7)
This installation method is suitable for CentOS 7; please run the following command to install Apache APISIX.
sudo yum install -y https://github.com/apache/apisix/releases/download/2.7/apisix-2.7-0.x86_64.rpmInstallation via Docker
Please refer to Installing Apache APISIX with Docker.
Installation via Helm Chart
Please refer to Installing Apache APISIX with Helm Chart.
Installation via source release
- Create a directory named
apisix-2.7.
mkdir apisix-2.7- Download Apache APISIX Release source package.
wget https://downloads.apache.org/apisix/2.7/apache-apisix-2.7-src.tgzYou can also download the Apache APISIX release source package from the Apache APISIX website. The Apache APISIX Official Website - Download Page also provides source packages for Apache APISIX, APISIX Dashboard, and APISIX Ingress Controller.
- Unzip the Apache APISIX Release source package.
tar zxvf apache-apisix-2.7-src.tgz -C apisix-2.7- Install the runtime-dependent Lua libraries.
# Switch to the apisix-2.7 directory
cd apisix-2.7
# Create dependencies
make deps
Initializing Dependencies
Run the following command to initialize the NGINX configuration file and etcd.
# initialize NGINX config file and etcd
make init
Step 3: Start Apache APISIX and Configure the Corresponding Route
- Run the following command to start Apache APISIX.
apisix start- Create a route and configure the OpenID Connect plugin. The following code example creates a route through the Apache APISIX Admin API, setting the upstream path to httpbin.org, a simple backend service for receiving and responding to requests. The following will use the get page of httpbin.org. Please refer to http bin get for more information. For specific configuration items, please refer to the Apache APISIX OpenID Connect Plugin.
The OpenID Connect configuration fields are listed below:
| Field | Default Value | Description |
|---|---|---|
| client_id | "" | OAuth client ID. |
| client_secret | "" | OAuth client secret. |
| discovery | "" | Service discovery endpoints for identity providers. |
| scope | openid | Scope of resources to be accessed. |
| relm | apisix | Specify the WWW-Authenticate response header authentication information. |
| bearer_only | false | Whether to check the token in the request header. |
| logout_path | /logout | Log out URI. |
| redirect_uri | request_uri | The URI that the identity provider redirects back to, defaulting to the request address. |
| timeout | 3 | Request timeout time, the unit is defined in seconds. |
| ssl_verify | false | Verify the identity provider’s SSL certificate. |
| introspection_endpoint | "" | The URL of the identity provider’s token authentication endpoint, which will be extracted from the discovery, response if left blank. |
| introspection_endpoint_auth_method | client_secret_basic | Name of the authentication method for token introspection. |
| public_key | "" | Public key for an authentication token. |
| token_signing_alg_values_expected | "" | Algorithm for authentication tokens. |
| set_access_token_header | true | Whether to carry the access token in the request header. |
| access_token_in_authorization_header | false | Whether to put an access token in the Authorization header. The access token is placed in the Authorization header when this value is set to true and in the X-Access-Token header when it is set to false. |
| set_id_token_header | true | Whether to carry the ID token in the X-ID-Token request header. |
| set_userinfo_header | true | Whether to carry user information in the X-Userinfo request header. |
curl  -XPOST 127.0.0.1:9080/apisix/admin/routes -H "X-Api-Key: edd1c9f034335f136f87ad84b625c8f1" -d '{
    "uri":"/*",
    "plugins":{
        "openid-connect":{
            "client_id":"{YOUR_CLIENT_ID}",
            "client_secret":"{YOUR_CLIENT_SECRET}",
            "discovery":"https://{YOUR_ISSUER}/.well-known/openid-configuration",
            "scope":"openid profile",
            "bearer_only":false,
            "realm":"master",
            "introspection_endpoint_auth_method":"client_secret_post",
            "redirect_uri":"http://127.0.0.1:9080/"
        }
    },
    "upstream":{
        "type":"roundrobin",
        "nodes":{
            "httpbin.org:80":1
        }
    }
}'
Step 4: Access Apache APISIX
- Visit “http://127.0.0.1:9080/get” and the page is redirected to the Okta login page because the OpenID Connect plugin is enabled.
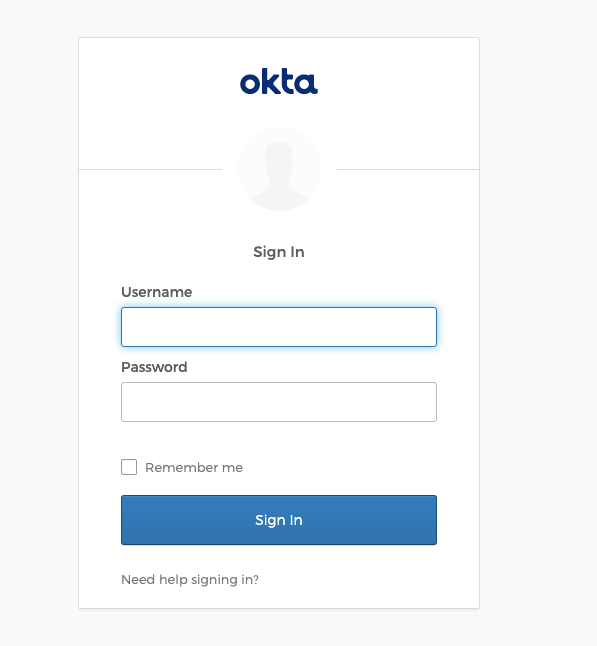
- Enter the username and password for the user’s Okta account and click “Sign In” to log in to your Okta account.
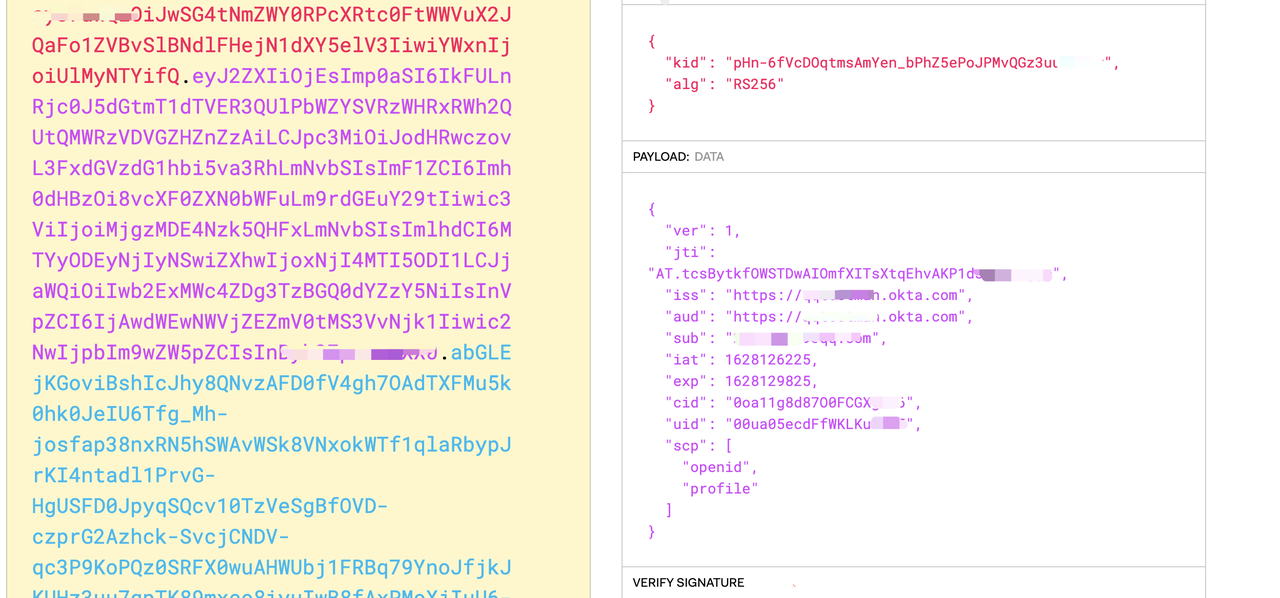
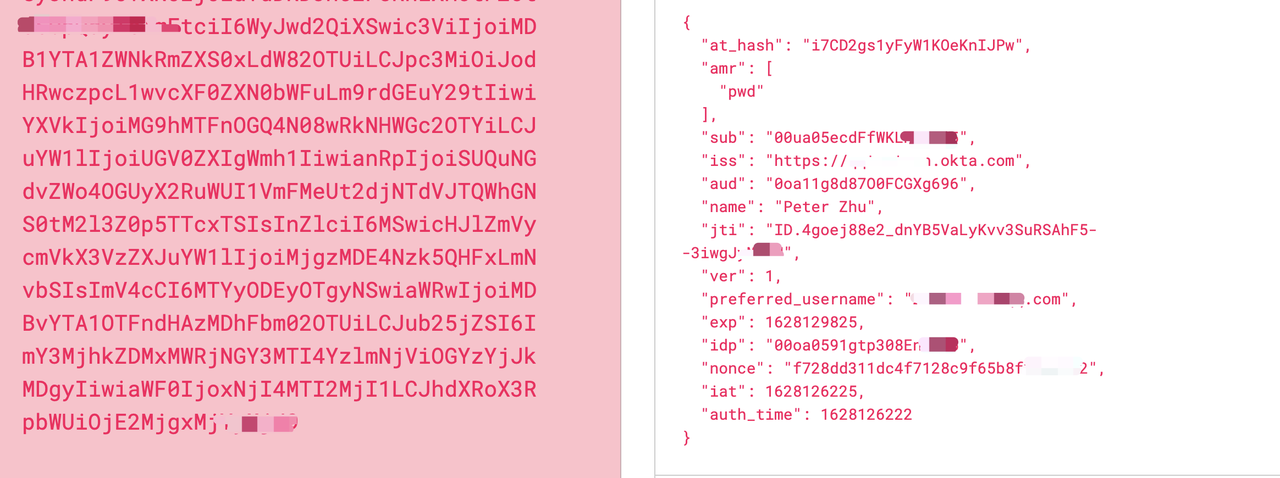
- After successful login, you can access the get page in “httpbin.org”. The “httpbin.org/get” page will return the requested data with X-Access-Token,X-Id-Token, and X-Userinfo as follows.
"X-Access-Token": "******Y0RPcXRtc0FtWWVuX2JQaFo1ZVBvSlBNdlFHejN1dXY5elV3IiwiYWxnIjoiUlMyNTYifQ.***TVER3QUlPbWZYSVRzWHRxRWh2QUtQMWRzVDVGZHZnZzAiLCJpc3MiOiJodHRwczovL3FxdGVzdG1hbi5va3RhLmNvbSIsImF1ZCI6Imh0dHBzOi8vcXF0ZXN0bWFuLm9rdGEuY29tIiwic3ViIjoiMjgzMDE4Nzk5QHFxLmNvbSIsImlhdCI6MTYyODEyNjIyNSwiZXhwIjoxNjI4MTI5ODI1LCJjaWQiOiIwb2ExMWc4ZDg3TzBGQ0dYZzY5NiIsInVpZCI6IjAwdWEwNWVjZEZmV0tMS3VvNjk1Iiwic2NwIjpbIm9wZW5pZCIsInByb2Zpb***.****iBshIcJhy8QNvzAFD0fV4gh7OAdTXFMu5k0hk0JeIU6Tfg_Mh-josfap38nxRN5hSWAvWSk8VNxokWTf1qlaRbypJrKI4ntadl1PrvG-HgUSFD0JpyqSQcv10TzVeSgBfOVD-czprG2Azhck-SvcjCNDV-qc3P9KoPQz0SRFX0wuAHWUbj1FRBq79YnoJfjkJKUHz3uu7qpTK89mxco8iyuIwB8fAxPMoXjIuU6-6Bw8kfZ4S2FFg3GeFtN-vE9bE5vFbP-JFQuwFLZNgqI0XO2S7l7Moa4mWm51r2fmV7p7rdpoNXYNerXOeZIYysQwe2_L****",
"X-Id-Token": "******aTdDRDJnczF5RnlXMUtPZUtuSUpQdyIsImFtciI6WyJwd2QiXSwic3ViIjoiMDB1YTA1ZWNkRmZXS0xLdW82OTUiLCJpc3MiOiJodHRwczpcL1wvcXF0ZXN0bWFuLm9rdGEuY29tIiwiYXVkIjoiMG9hMTFnOGQ4N08wRkNHWGc2OTYiLCJuYW1lIjoiUGV0ZXIgWmh1IiwianRpIjoiSUQuNGdvZWo4OGUyX2RuWUI1VmFMeUt2djNTdVJTQWhGNS0tM2l3Z0p5TTcxTSIsInZlciI6MSwicHJlZmVycmVkX3VzZXJuYW1lIjoiMjgzMDE4Nzk5QHFxLmNvbSIsImV4cCI6MTYyODEyOTgyNSwiaWRwIjoiMDBvYTA1OTFndHAzMDhFbm02OTUiLCJub25jZSI6ImY3MjhkZDMxMWRjNGY3MTI4YzlmNjViOGYzYjJkMDgyIiwiaWF0IjoxNjI4MTI2MjI1LCJhdXRoX3RpbWUi*****",
"X-Userinfo": "*****lfbmFtZSI6IlpodSIsImxvY2FsZSI6ImVuLVVTIiwicHJlZmVycmVkX3VzZXJuYW1lIjoiMjgzMDE4Nzk5QHFxLmNvbSIsInVwZGF0ZWRfYXQiOjE2MjgwNzA1ODEsInpvbmVpbmZvIjoiQW1lcmljYVwvTG9zX0FuZ2VsZXMiLCJzdWIiOiIwMHVhMDVlY2RGZldLTEt1bzY5NSIsImdpdmVuX25hbWUiOiJQZXRlciIsIm5hbWUiOiJQZXRl****"X-Access-Token: Apache APISIX puts the access token obtained from the user provider into the X-Access-Token request header, optionally via the access_token_in_authorization_header in the plugin configuration Authorization request header.
X-Id-Token: Apache APISIX will get the Id token from the user provider through the base64 encoding into the X-Id-Token request header, you can choose whether to enable this function through the set_id_token_header in the plugin configuration, the default is enabled.
X-Userinfo: Apache APISIX will get the user information from the user provider and put it into X-Userinfo after encoding it with Base64, you can choose whether to enable this feature through set_userinfo_header in the plugin configuration, it is set to be on by default.
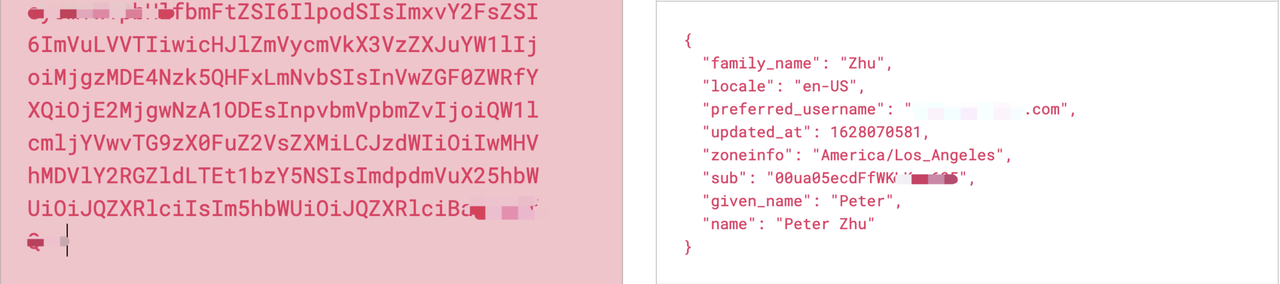
As you can see, Apache APISIX will carry the X-Access-Token, X-Id-Token, and X-Userinfo request headers to the upstream. The upstream can parse these headers to get the user IDid information and user metadata.
We have shown the process of building centralized identity authentication from Okta directly into the Apache APISIX Gateway. It is easy to sign up for a free Okta Developer Account to get started. Our approach reduces developer overhead and enables a safe and streamlined experience.
About Okta
Okta is a customizable, secure, and drop-in solution to add authentication and authorization services to your applications. Get scalable authentication built right into your application without the development overhead, security risks, and maintenance that come from coding it yourself. You can connect any application in any language or on any stack to Okta and define how you want your users to sign in. Each time a user tries to authenticate, Okta will verify their identity and send the required information back to your app.
About Apache APISIX
Apache APISIX is a dynamic, real-time, high-performance API gateway. Apache APISIX provides rich traffic management features such as load balancing, dynamic upstream, canary release, circuit breaking, authentication, observability, and more. You can use Apache APISIX to handle traditional north-south traffic, as well as east-west traffic between services. It can also be used as a k8s ingress controller.
Hundreds of companies worldwide have used Apache APISIX, covering finance, internet, manufacturing, retail, operators, such as NASA, the European Union’s Digital Factory, TravelSky, Tencent, Huawei, Weibo, China Mobile, Taikang, 360 , etc.
Github: https://github.com/apache/apisix
Website: https://apisix.apache.org