

We are excited to announce a new integration between Apache APISIX and open-appsec WAF, combining the power of a dynamic API gateway with cutting-edge application security.
Introduction
open-appsec WAF is excited to announce a new integration with the open-source API gateway Apache APISIX.
This new collaboration between the open-appsec and API7 teams now allows users to protect their web APIs and other web services exposed by Apache APISIX against unknown and known attack types effectively based on open-appsec's advanced machine-learning-based technology and also adds several more enhanced security capabilities.
About Apache APISIX
Apache APISIX is a modern, flexible, and high-performance open-source API gateway solution designed to handle various use cases in microservices and cloud-native architectures. Its primary purpose is to facilitate API management by serving as a gateway for managing, securing, and optimizing API traffic between clients and backend services.
Further use cases for APISIX as an API gateway include load balancing, rate limiting, authentication, and authorization. It provides comprehensive features such as traffic control, dynamic upstream, and plugin extensibility, enabling developers to customize and extend functionality according to their specific needs.
Website: apisix.apache.org
Github: github.com/apache/apisix
Docs: apisix.apache.org/docs
About open-appsec WAF
open-appsec WAF provides automatic, preemptive threat prevention and integrates with various types of reverse proxies like NGINX as well as API gateways like APISIX. It is machine-learning-based, meaning it doesn't require signatures (or updates) at all. This enables it to provide automatic, state-of-the-art threat prevention even for true zero-day attacks while significantly reducing both administrative effort and the amount of false positives.
In addition, open-appsec provides many additional security layers such as AntiBot, rate limiting, schema enforcement, snort signature support, custom rules/exceptions, and more. open-appsec can be managed centrally using a Web UI provided as a SaaS service and also locally using a declarative configuration file.
Website: www.openappsec.io
Github: github.com/openappsec
Docs: docs.openappsec.io
Playgrounds: www.openappsec.io/playground
Integrating Apache APISIX with open-appsec
With this new integration, APISIX users will now have access to open-appsec WAF as an integrated, state-of-the-art machine-learning-based WAF solution for the protection of their web APIs and web applications.
They can now use e.g. open-appsec's free and open-source "Community Edition" to get effective, AI-based protection against known but also unknown attacks for everything exposed by their APISIX API gateway, while at the same time reducing the amount of false positives significantly unburdening the administrator from tedious tasks such as creating exceptions, updating traditional signature-based policies and more.
This integration will be available for all common platforms: Linux, Docker, and Kubernetes.
Linux
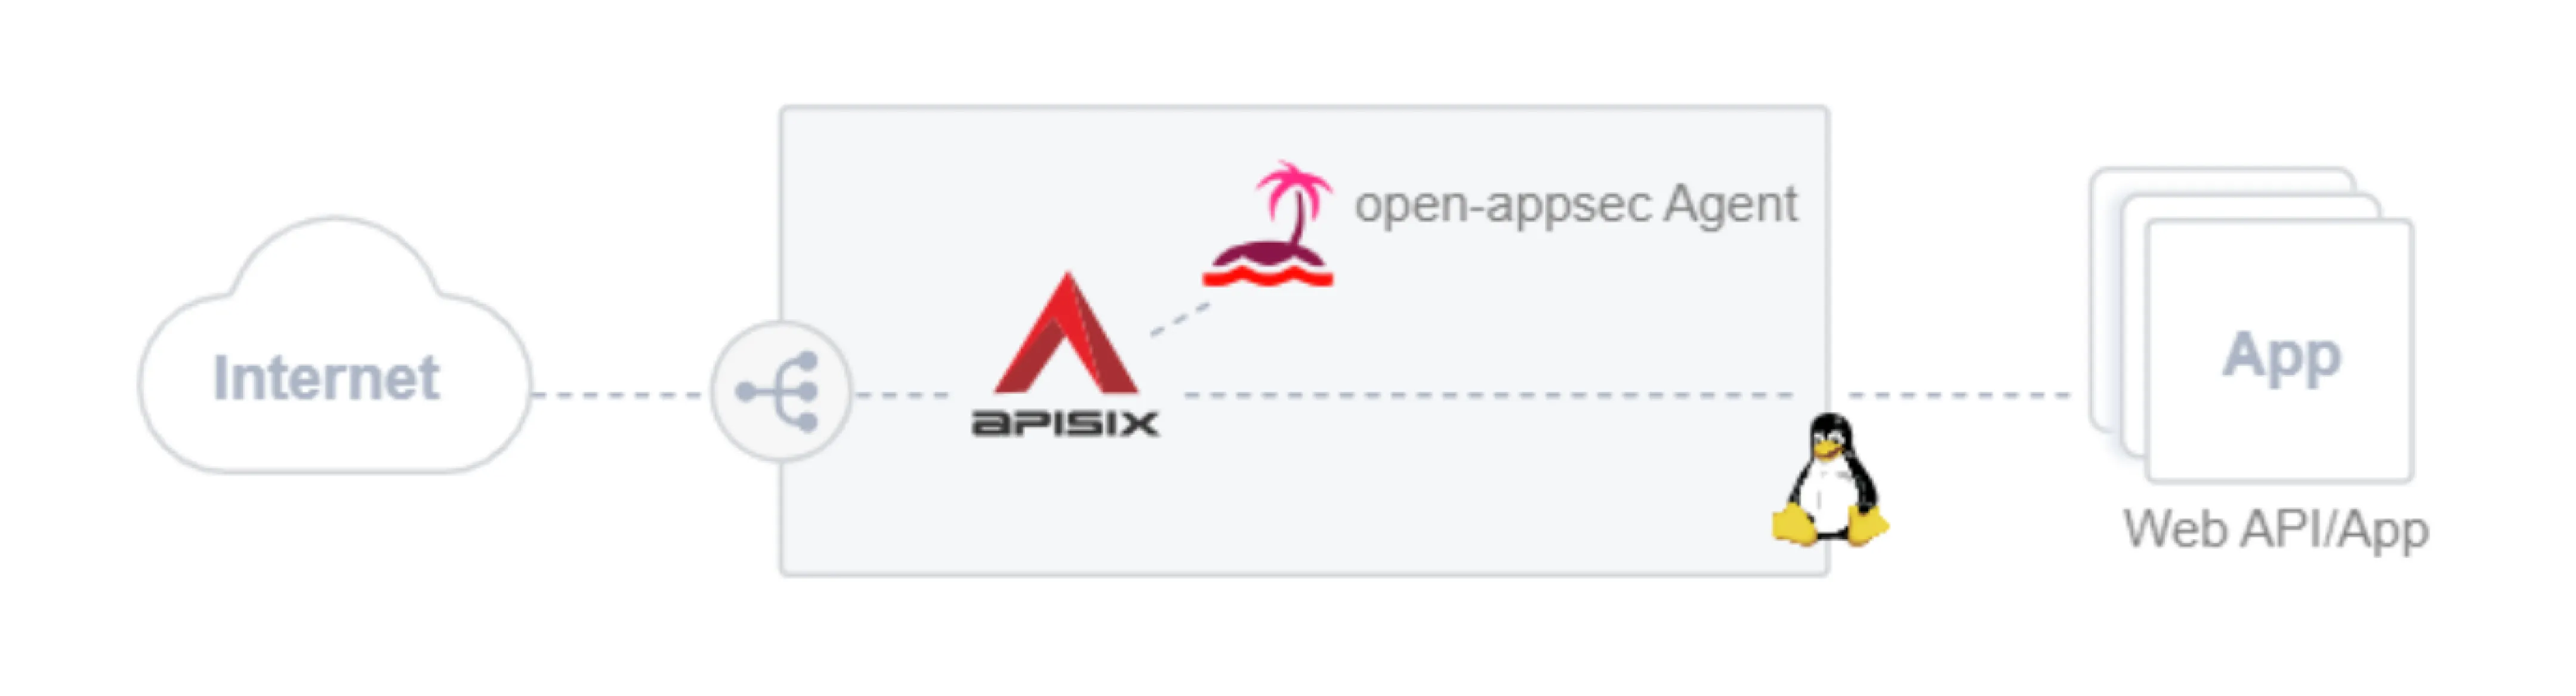
For Linux "embedded" deployments of APISIX, an open-appsec installer will add an "open-appsec attachment" module to the existing APISIX installation and also install the "open-appsec agent" alongside it, which will receive the traffic from the attachment, inspect it, and return the concluded action to block or allow the traffic back to the APISIX respectively the open-appsec attachment integrated with it.
Here's a simple architecture schematic for Linux deployment.

Docker
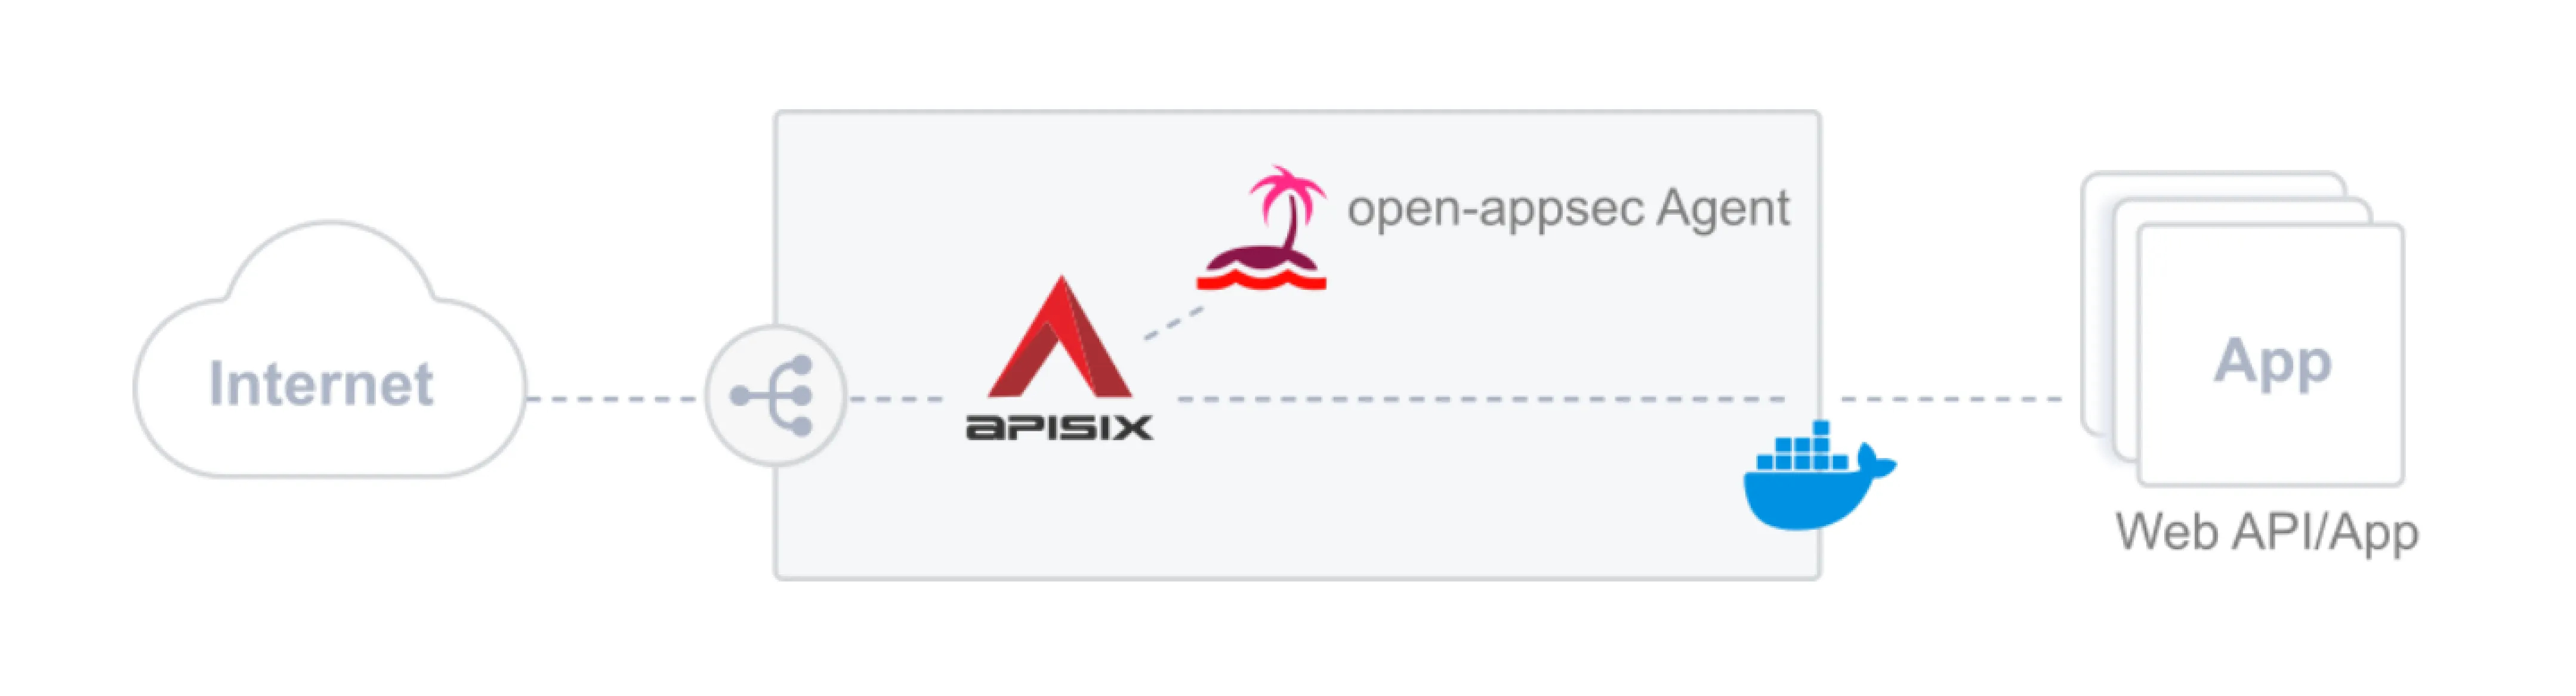
For Docker-based deployments of APISIX with open-appsec WAF, there is a special APISIX container image available, to which the open-appsec attachment was already added and also an enhanced docker-compose file, which deploys both, the APISIX gateway container as well as an open-appsec Agent that does the security inspection and returns the concluded decisions to the APISIX gateway to allow or block traffic.
Here's a simple architecture schematic for deployment on Docker.

Kubernetes
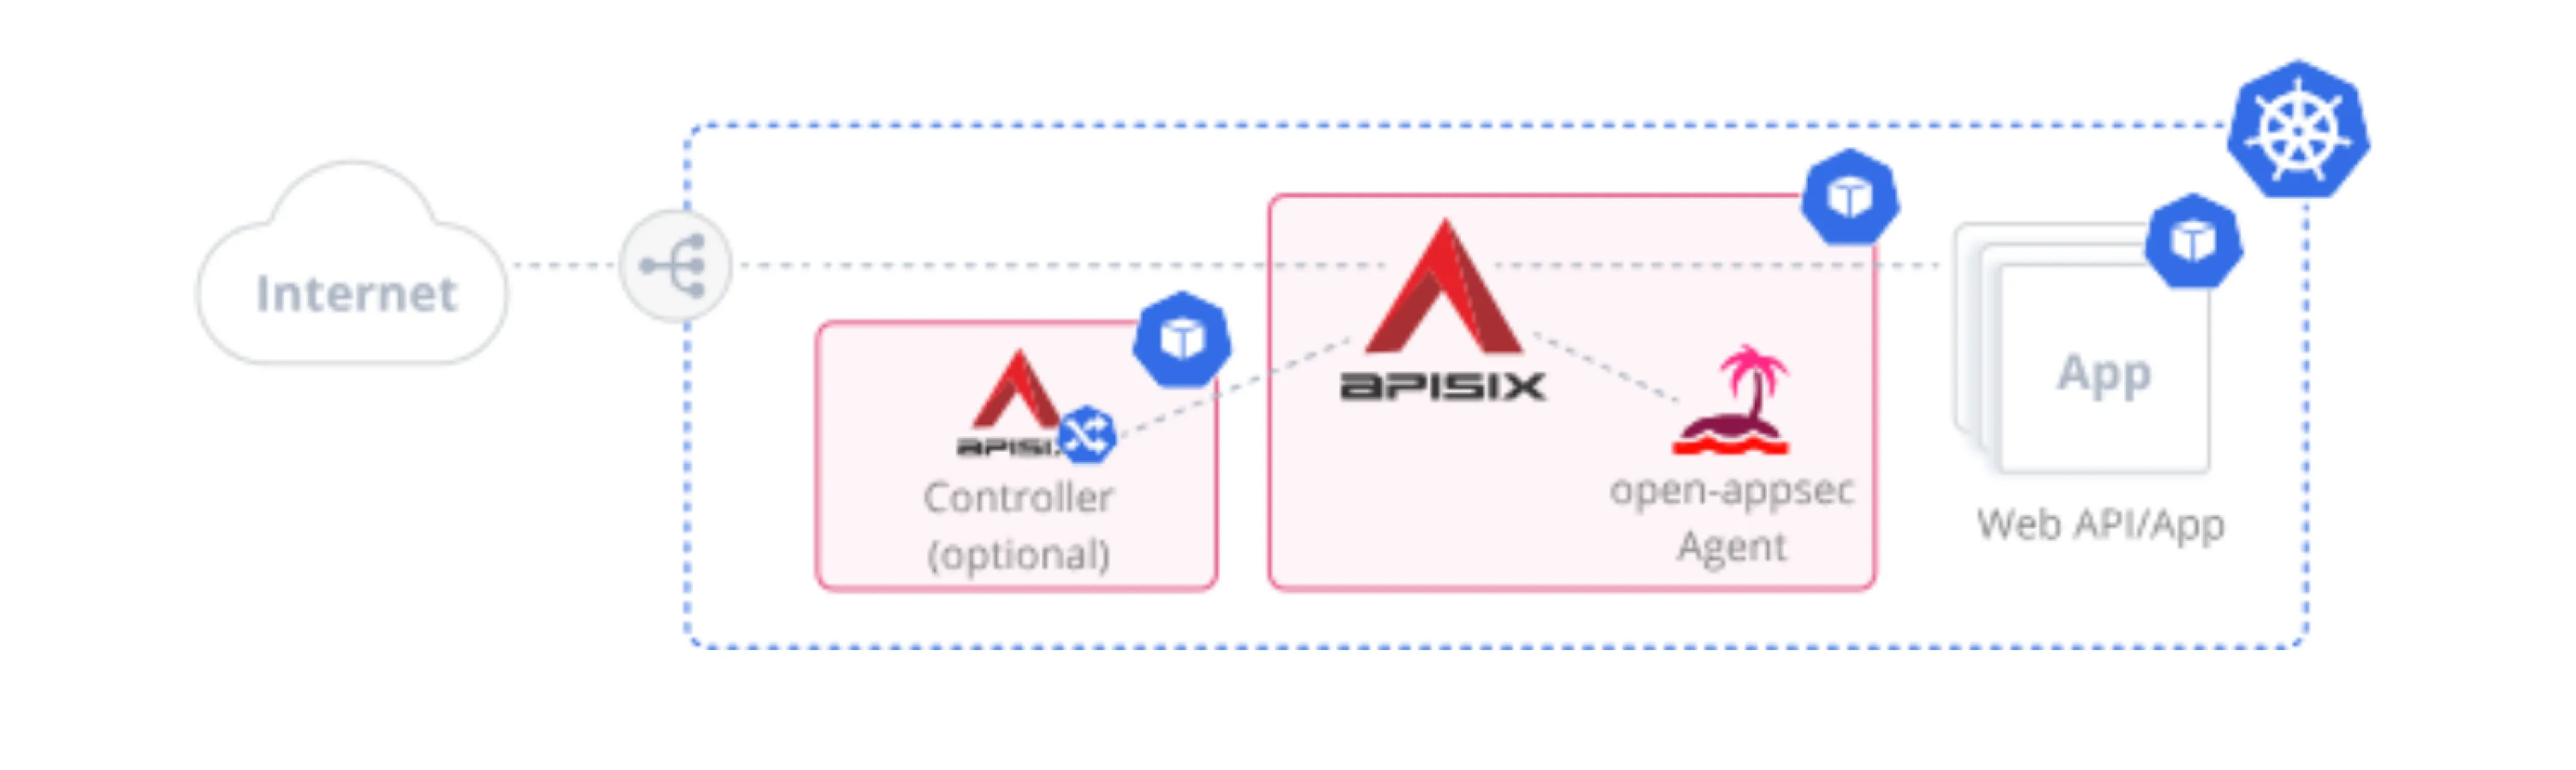
For Kubernetes based-deployments of APISIX integrated with open-appsec, there's a Helm chart available, which is based on the official APISIX Helm chart and further enhanced to also include the open-appsec attachment in the APISIX gateway container and also deploys the open-appsec agent. Further, you will have the option to configure open-appsec in a declarative "DevOps-style" way using custom resources in K8s as an alternative to using the open-appsec central management Web UI.
Here's a simple architecture schematic for deployment on Kubernetes.

Adding open-appsec WAF to APISIX on Linux
To install open-appsec on a Linux system with APISIX installed, please follow these steps:
1. Prerequisites
- The Linux platform must be Ubuntu 22.04.
- Make sure to have APISIX installed.
You can find the list of supported APISIX versions here: https://downloads.openappsec.io/packages/supported-apisix.txt.
If you don't have APISIX installed yet, you can use the following commands to perform an APISIX installation in "traditional mode". By running these commands you will first install the etcd database for APISIX, then add the required repos before installing and starting APISIX.
Install etcd Database
ETCD_VERSION='3.5.4'
wget https://github.com/etcd-io/etcd/releases/download/v${ETCD_VERSION}/etcd-v${ETCD_VERSION}-linux-amd64.tar.gz
tar -xvf etcd-v${ETCD_VERSION}-linux-amd64.tar.gz && cd etcd-v${ETCD_VERSION}-linux-amd64
cp -a etcd etcdctl /usr/bin/
nohup etcd >/tmp/etcd.log 2>&1 &
etcd
Add and Update Package Repositories
apt install gnupg
echo "deb http://openresty.org/package/debian bullseye openresty" | tee /etc/apt/sources.list.d/openresty.list
wget -O - https://openresty.org/package/pubkey.gpg | apt-key add -
wget -O - http://repos.apiseven.com/pubkey.gpg | apt-key add -
echo "deb http://repos.apiseven.com/packages/debian bullseye main" | tee /etc/apt/sources.list.d/apisix.list
apt update
Install, Initiate, and Start APISIX
apt install apisix=3.9.1-0
apisix init
apisix start
2. Download the open-appsec Installer
wget https://downloads.openappsec.io/open-appsec-install && chmod +x open-appsec-install
3. Install open-appsec
Install open-appsec to integrate with the existing APISIX installation.
Note that the
--preventflag will install open-appsec with a default policy already set to prevent mode.
./open-appsec-install --auto --prevent
4. Get and Store APISIX Admin Key
Get the APISIX admin key from the APISIX config.yaml configuration file and store it in the APISIX_KEY env variable.
export APISIX_KEY=$(awk '/key:/{ if ($2 ~ /^edd1/) print $2 }' /usr/local/apisix/conf/config.yaml )
5. Configure Route to Expose Services
Configure an example route in the APISIX gateway to expose an external web service or web API. In this example, we use httpbin.org as the example backend.
curl http://127.0.0.1:9180/apisix/admin/routes/100 -H "X-API-KEY:$APISIX_KEY" -X PUT -d '{
    "methods": [
      "GET"
    ],
    "uri": "/anything",
    "upstream": {
      "type": "roundrobin",
      "nodes": {
        "httpbin.org:80": 1
      }
    }
  }'
6. Validate
Let's see if this route works by accessing it.
curl -s -v -G --data-urlencode email=user@domain.abc http://localhost:9080/anything
7. Simulate an SQL Injection Attack
Now let's try to simulate an SQL injection attack (see 'OR '1'='1' in the below HTTP request) against the httpbin.org service exposed by the APISIX gateway which is now protected by the open-appsec WAF.
curl -s -v -G --data-urlencode email=user@domain.abc' OR '1'='1 http://localhost:9080/anything
This simulated attack now gets blocked successfully by open-appsec's contextual machine-learning WAF engine.
8. Review Log Files
Check out the corresponding log files showing the "prevent" for the HTTP request with the simulated attack that we just sent.
tail -f /var/log/nano_agent/cp-nano-http-transaction-handler.log*| grep -i user@domain.abc
Alternatively you can use the open-appsec-ctl tool:
open-appsec-ctl --view-logs | grep -i user@domain.abc
9. Connect to open-appsec for Central Management (Optional)
Optionally you can connect your deployment now to https://my.openappsec.io for centrally managing open-appsec with an easy-to-use Web UI, monitoring security events and more, see section How to Manage Your open-appsec WAF Deployment Centrally? further below for more information.
Congratulations! You successfully added open-appsec WAF to your existing APISIX installation and verified that your web services exposed by the APISIX gateway are now protected against web attacks.
Deploying APISIX with open-appsec WAF on Containerized Platforms (Docker)
To install APISIX integrated with open-appsec on Docker, you can follow the steps shown below.
Opposite to the above example here we are deploying APISIX in "standalone mode", which means it's declaratively configured using a docker volume mount with a yaml file that holds the configurations and therefore won't require an etcd database deployment.
Note that APISIX supports both, traditional as well as standalone modes in all deployment types (Linux, Docker, …)
1. Prerequisite
Make sure to have a Linux platform with both Docker and docker-compose tools installed.
2. Create a Folder for open-appsec
Within the directory that you want to use for the deployment, create a folder appsec-localconfig which will hold the appsec declarative configuration file:
mkdir ./appsec-localconfig
3. Download the open-appsec File into the Folder
Download the initial declarative configuration file for open-appsec into that folder.
wget https://raw.githubusercontent.com/openappsec/openappsec/main/config/linux/latest/prevent/local_policy.yaml -O appsec-localconfig/local_policy.yaml
Note that this example declarative configuration file is already set to prevent attacks.
4. Create a Folder for APISIX
Create another folder apisix-localconfig which will hold the declarative configuration file for APISIX: mkdir ./apisix-localconfig.
5. Download APISIX File into the Folder
Let's download a simple declarative configuration file also for APISIX so we can verify open-appsec protection after the deployment.
wget https://raw.githubusercontent.com/openappsec/openappsec/main/deployment/apisix/apisix-example-config/apisix-standalone.yaml -O ./apisix-localconfig/apisix-standalone.yaml
6. Create a docer-compose.yaml File
Create a docker-compose.yaml file with the content below, which can be downloaded as follows:
wget https://raw.githubusercontent.com/openappsec/openappsec/main/deployment/apisix/docker-compose.yaml
version: "3"

services:
  apisix:
    container_name: apisix
    image: "ghcr.io/openappsec/apisix-attachment:latest"
    ipc: service:appsec-agent
    restart: always
    volumes:
      - ./apisix-localconfig/apisix-standalone.yaml:/usr/local/apisix/conf/apisix.yaml:ro
    environment:
      - APISIX_STAND_ALONE=true
    ports:
      - "9180:9180/tcp"
      - "9080:9080/tcp"
      - "9091:9091/tcp"
      - "9443:9443/tcp"

  appsec-agent:
    container_name: appsec-agent
    image: 'ghcr.io/openappsec/agent:latest'
    ipc: shareable
    restart: unless-stopped
    environment:
      # adjust with your own email below
      - user_email=user@email.com
      - registered_server="APISIX Server"
    volumes:
      - ./appsec-config:/etc/cp/conf
      - ./appsec-data:/etc/cp/data
      - ./appsec-logs:/var/log/nano_agent
      - ./appsec-localconfig:/ext/appsec
    command: /cp-nano-agent
7. Update Your Email Address (Optional)
Edit the docker-compose.yaml file and replace "user@email.com" with your own email address, so we can provide assistance in case of any issues with the specific deployment in the future and provide information proactively regarding open-appsec.
This is an optional parameter and can be removed. If we send automatic emails, there will also be an opt-out option included for receiving similar communication in the future.
8. Start All Containers
Run docker-compose up to start the deployment of all relevant containers:
docker-compose up -d
9. Check Container Status
Check if the apisix-attachment and the appsec-agent containers are up and running.
docker ps
10. Validate the Standalone Configuration
Let's see if the standalone configuration works by accessing it.
curl -s -v -G --data-urlencode email=user@domain.abc http://localhost:9080/anything
11. Simulate an SQL Injection Attack
Now let's try to simulate an SQL injection attack against the httpin.org service exposed by the APISIX gateway container which is now protected by open-appsec.
curl -s -v -G --data-urlencode email=user@domain.abc' OR '1'='1 http://localhost:9080/anything
12. Connect to open-appsec for Central Management (Optional)
Optionally you can connect your deployment now to https://my.openappsec.io for centrally managing open-appsec with an easy-to-use Web UI, monitoring security events, and more, see section How to Manage Your open-appsec WAF Deployment Centrally? further below for more information.
Deploying APISIX with open-appsec WAF on Kubernetes Using Helm
1. Prerequisite
Make sure the Kubernetes platform and Helm tool are available.
2. Download open-appsec
Download the open-appsec for the APISIX Helm chart here.
wget https://downloads.openappsec.io/packages/helm-charts/apisix/open-appsec-k8s-apisix-latest.tgz
3. Install Helm Chart
This example helm install command is installing the open-appsec for the APISIX Helm chart which is based on an extended version of the official APISIX Helm chart.
It will deploy the APISIX gateway as the APISIX Ingress Controller, as well as open-appsec WAF integrated with it. It also offers an additional configuration option specifically for open-appsec WAF (see values.yaml inside the Helm chart and open-appsec docs).
After deployment, you can assign your K8s ingress resources to the APISIX gateway by configuring them to use the following ingress class: appsec-apisix.
helm install open-appsec-k8s-apisix-latest.tgz \
--name-template=appsec-apisix \
--set rbac.create=true \
--set appsec.mode=standalone \
--set service.type=LoadBalancer \
--set appsec.persistence.enabled=false \
--set ingress-controller.enabled=true \
--set ingress-controller.config.ingressClass=appsec-apisix \
--set appsec.userEmail=”<your-email-address>” \
--set appsec.agentToken= \
--create-namespace \
-n appsec-apisix
Replace
<your-email-address>in the Helm install command above with your own email address, so we can send you news and updates related to open-appsec and better support you with your deployment if needed! You can unsubscribe at any time or alternatively, just remove that line if you prefer not to provide your email.
4. Validate
Validate that pods were properly deployed and are in a ready state:
kubectl get pods -n appsec-apisix
5. Create an open-appsec Policy Resource
Run the following command to create the "open-appsec-best-practice-policy" in K8s.
Note that this example policy is already pre-configured to prevent attacks.
kubectl apply -f https://raw.githubusercontent.com/openappsec/openappsec/main/config/k8s/v1beta1/open-appsec-k8s-prevent-config-v1beta1.yaml
You can also create your own custom policy, here you find all the details.
6. Fetch the Target Resource Name
Find out the name of the relevant ingress resource which you want to protect:
kubectl get ing -A
7. Edit the Ingress Resource
kubectl edit ing/<ingress name> -n <ingress namespace>
8. Change the ingressClassname
Change the ingressClassname to use open-appsec:
spec: ingressClassName: appsec-apisix
9. Add Annotation to the Ingress Resource
Add this annotation to the ingress resource to activate open-appsec for this ingress by specifying the desired open-appsec policy custom resource.
openappsec.io/policy: open-appsec-best-practice-policy
10. Validate the Standalone Configuration
Let's see if the standalone configuration works by accessing it:
curl -s -v -G --data-urlencode email=user@domain.abc http://[YOUR-INGRESS-HOSTNAME]
11. Simulate an SQL Injection Attack
Now let's try to simulate an SQL injection attack against the httpin.org service exposed by the APISIX gateway container which is now protected by open-appsec.
curl -s -v -G --data-urlencode email=user@domain.abc' OR '1'='1 http://[YOUR-INGRESS-HOSTNAME]
Replace [YOUR-INGRESS-HOSTNAME] in the command above with the hostname you set in the ingress resource which you protected with open-appsec WAF in the earlier steps, also change "http" to "https" if required.
Congratulations! You successfully deployed APISIX integrated with open-appsec WAF and verified that your web services exposed by the APISIX Gateway are now protected against attacks.
How to Manage Your open-appsec WAF Deployment Centrally?
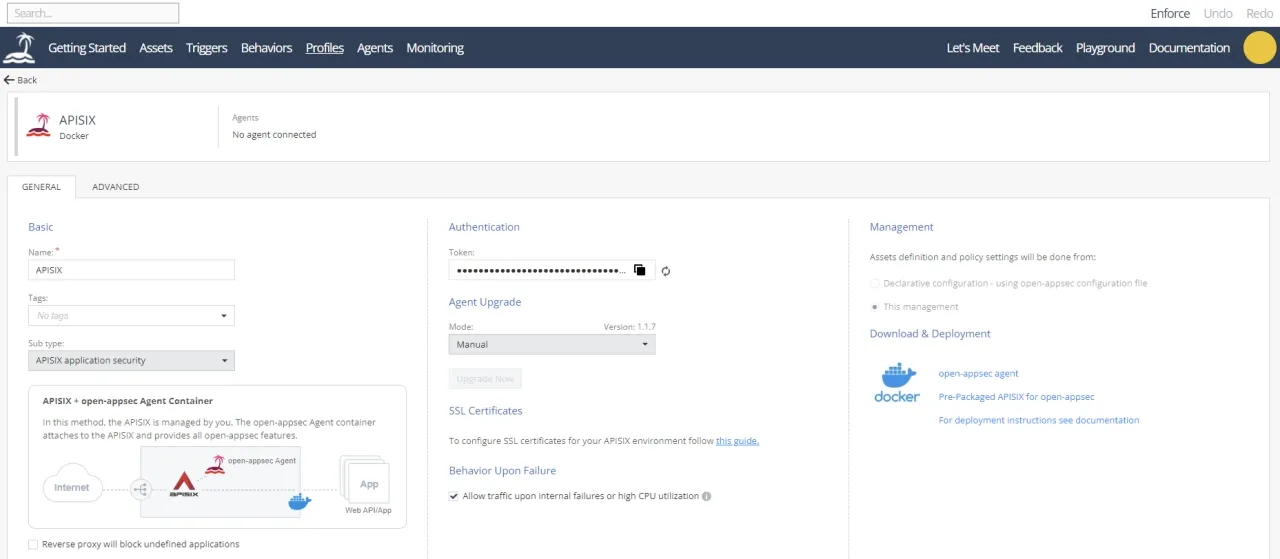
If you like you can also manage your open-appsec WAF deployment (integrated with APISIX) centrally using the open-appsec Web UI (SaaS Service) available at https://my.openappsec.io, by connecting the open-appsec agent to a deployment profile in the central Web UI.
You can alternatively continue to manage your deployment locally but still connect to a central WebUI profile in "Declarative mode" so that you will be able to see the local configuration (read-only) in the Web UI.
Alongside the configuration of open-appsec the Web UI allows you to also see much more information like the status of deployed open-appsec agents, security logs, dashboards and more.
For instructions on how to connect your deployment to the central Web UI see the open-appsec docs available at https://docs.openappsec.io.
Below you find some screenshots of the Web UI.


Summary
In this blog we explained how open-appsec can integrate with Apache APISIX on all of the following: regular Linux-based deployments, containerized deployments (Docker), and also Kubernetes environments.
Following the deployment steps for APISIX with open-appsec WAF, we simulated SQL injection attacks, which were effectively prevented by open-appsec's machine learning-based WAF technology.
Additionally, it was explained, what the benefits are of connecting to open-appsec central WebUI for managing, monitoring, log analysis, and reporting.
We hope these new integrations will prove very useful to enhance the security of your APISIX API gateway and its exposed web APIs and web applications with open-appsec machine learning-based WAF.
Welcome you to contact us if you have any feedback, or questions or might face some technical challenge that you want us to assist with. You can reach the open-appsec team via the chat on https://www.openappsec.io or via email to: info@openappsec.io.
Additional Resources
open-appsec WAF
Website: https://www.openappsec.io
GitHub: https://github.com/openappsec
Docs: https://docs.openappsec.io
Playgrounds: https://www.openappsec.io/playground
Blogs: https://www.openappsec.io/blogs
Apache APISIX
Website: https://apisix.apache.org
GitHub: https://github.com/apache/apisix