

本文将通过非常详细的操作步骤,向大家一步步地展示了如何使用 Istio Service Mesh 和 Apache APISIX,将启用 Service Mesh 的 Kubernetes 集群中服务暴露至集群外。
Service Mesh 简介
随着云原生技术的火热发展,Service Mesh 逐渐在微服务领域流行起来。当下 Service Mesh 比较流行的实现方案是 Istio 和 Linkerd。
下图为 Service Mesh 示意图,通过引入 Sidecar Proxy 来完成微服务之间的互联及通信。
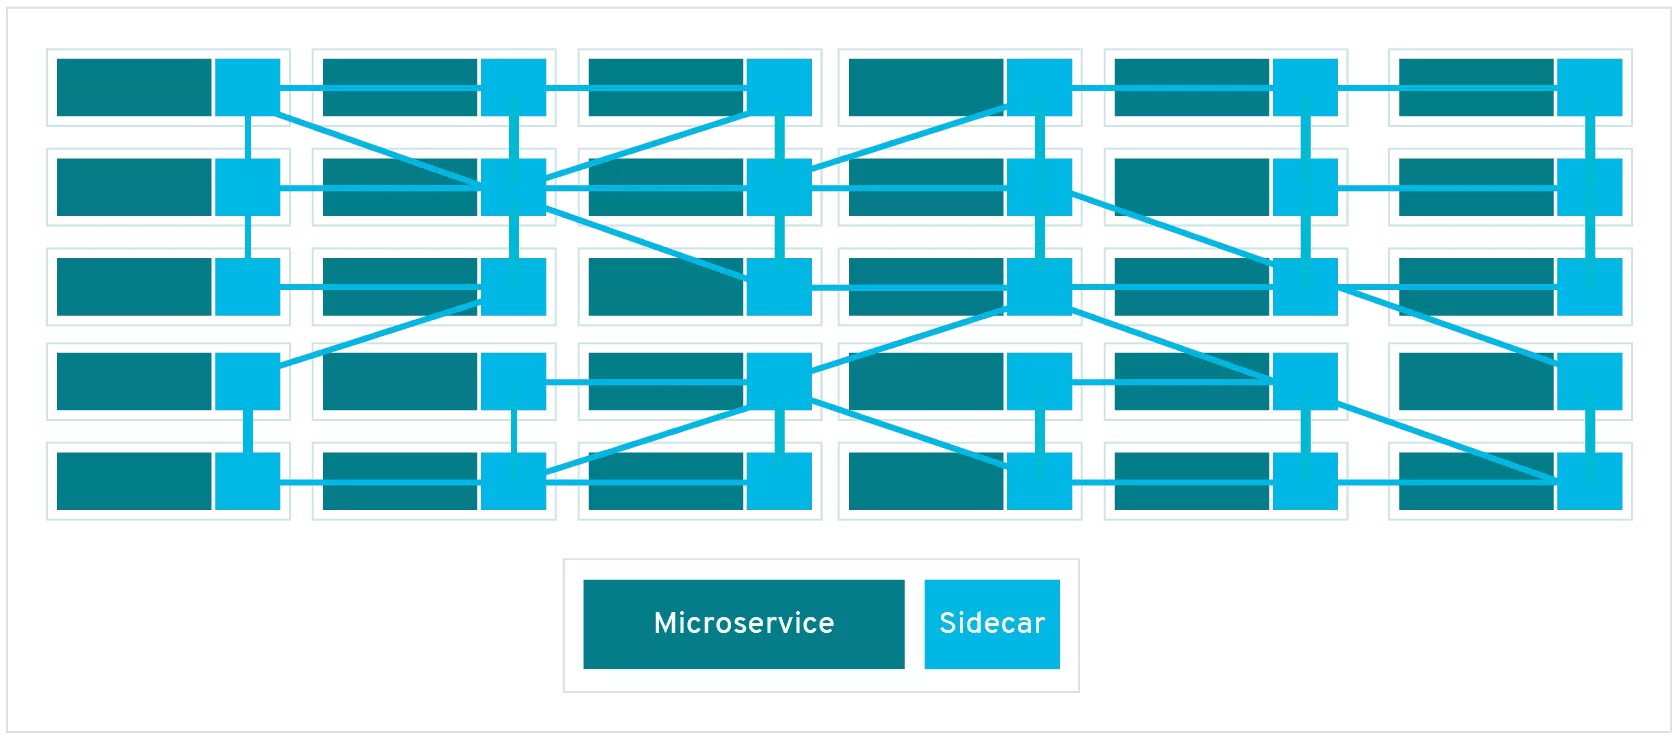

通过上图我们可以看出 Service Mesh 比较侧重传统意义上的东西向流量,即服务间的流量。当我们将 Service Mesh 与 Kubernetes 配合使用时,东西向流量对应的则是 Kubernetes 集群内的流量。
回到真实使用场景下,我们不会只接触到包含 Kubernetes 集群内的流量,大多数情况下都需要将一些服务暴露到集群外,供用户或其他服务使用。但将 Kubernetes 集群中的服务暴露到集群外时,我们就必须要考虑诸如安全性和可观测性等相关因素。
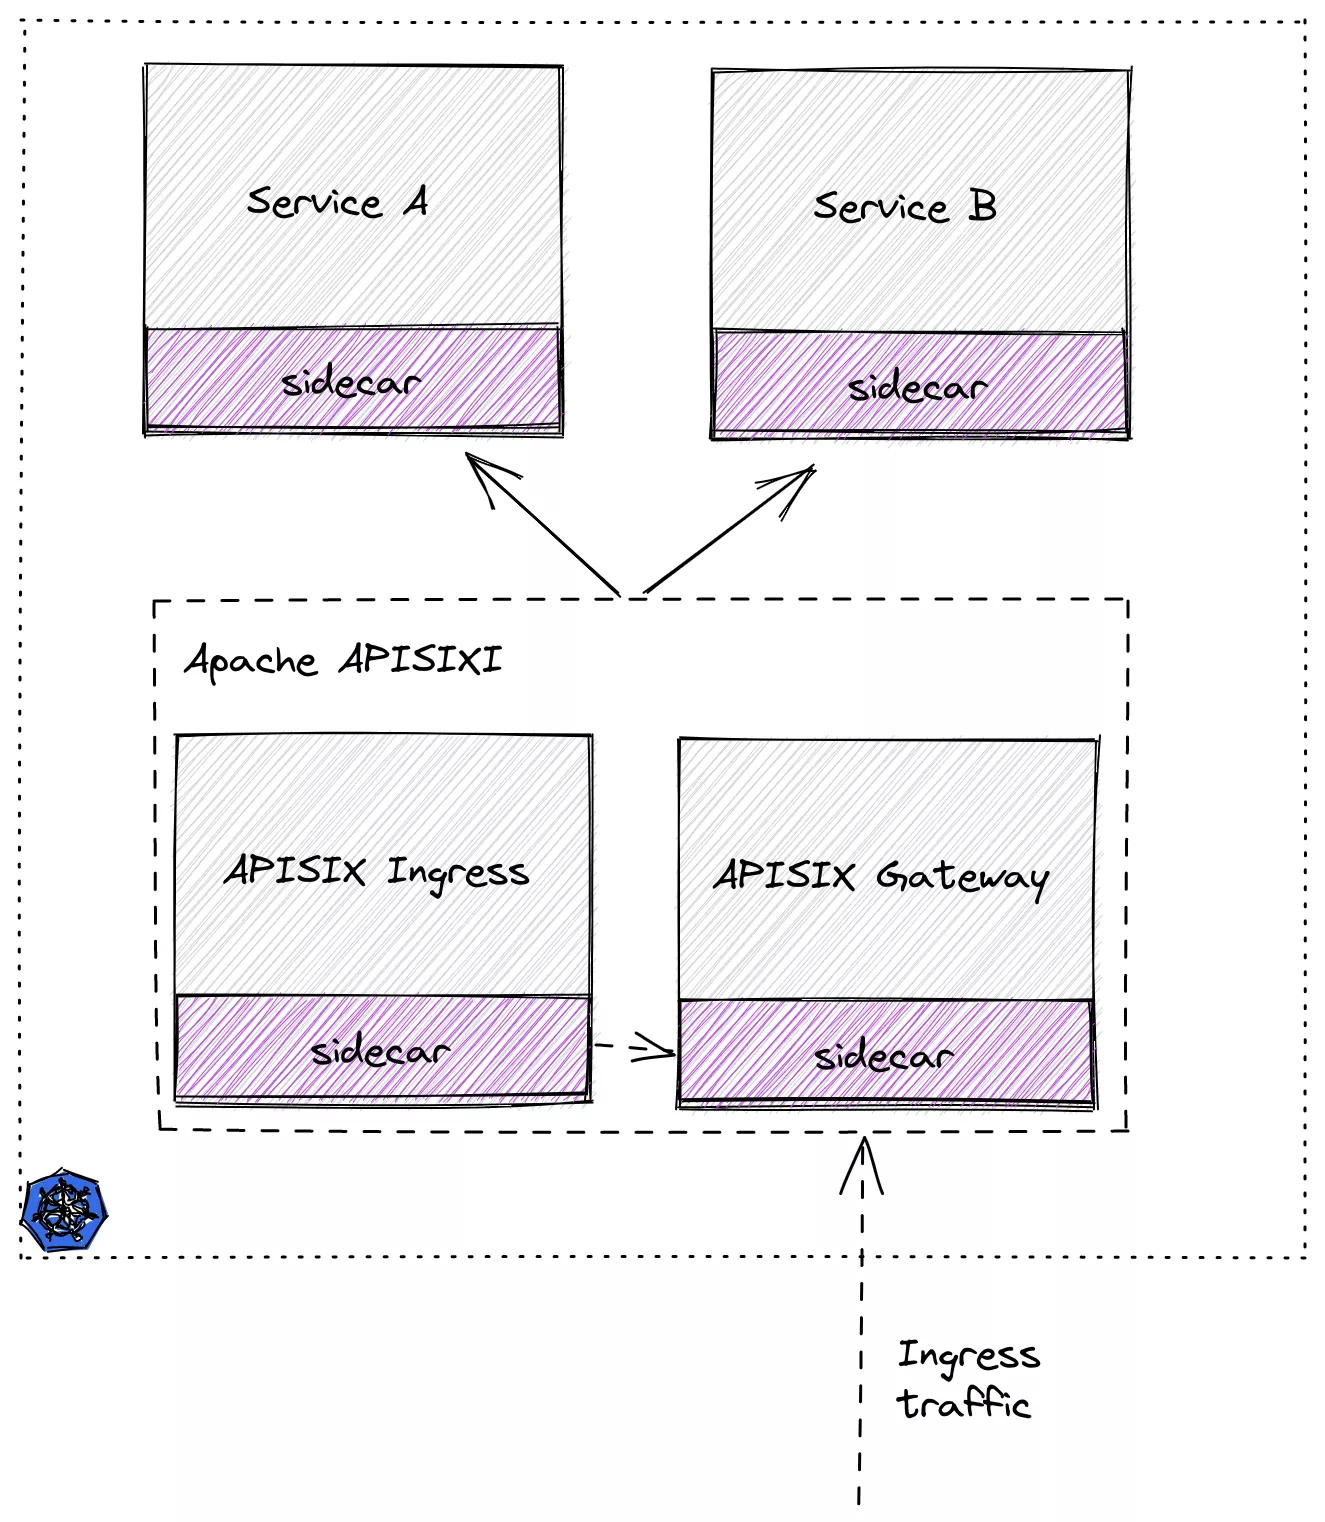
接下来我们将通过使用 Istio Service Mesh 和 Apache APISIX,为大家演示如何将启用 Service Mesh 的 Kubernetes 集群中服务安全暴露至集群外。
第一步:准备 Kubernetes 集群
这里我们使用 Kind 在本地创建一个临时集群用于演示。关于如何通过 Kind 命令进行安装可参考官方文档。
以下为用于创建演示集群所使用的 yaml 配置文件,将其保存为 kind-config.yaml。
kind: Cluster
apiVersion: kind.x-k8s.io/v1alpha4
nodes:
- role: control-plane
- role: worker
- role: worker
- role: worker
然后使用此配置文件创建一个集群。
(MoeLove) ➜ kind create cluster --config kind-config.yaml
Creating cluster "kind" ...
 ✓ Ensuring node image (kindest/node:v1.22.2) 🖼
 ✓ Preparing nodes 📦 📦 📦 📦
 ✓ Writing configuration 📜
 ✓ Starting control-plane 🕹️
 ✓ Installing CNI 🔌
 ✓ Installing StorageClass 💾
 ✓ Joining worker nodes 🚜
Set kubectl context to "kind-kind"
You can now use your cluster with:

kubectl cluster-info --context kind-kind

Not sure what to do next? 😅  Check out https://kind.sigs.k8s.io/docs/user/quick-start/
第二步:部署 Istio
在 Kubernetes 集群创建完毕后,我们来进行 Istio 的相关部署。
这里先创建一个名为 apisix-istio 的目录,进入该目录后进行如下操作。
(MoeLove) ➜ mkdir apisix-istio
(MoeLove) ➜ cd apisix-istio
(MoeLove) ➜ curl -sL https://istio.io/downloadIstio | sh -

Downloading istio-1.12.1 from https://github.com/istio/istio/releases/download/1.12.1/istio-1.12.1-linux-amd64.tar.gz ...

Istio 1.12.1 Download Complete!

Istio has been successfully downloaded into the istio-1.12.1 folder on your system.

Next Steps:
See https://istio.io/latest/docs/setup/install/ to add Istio to your Kubernetes cluster.

To configure the istioctl client tool for your workstation,
add the /root/apisix-istio/istio-1.12.1/bin directory to your environment path variable with:
         export PATH="$PATH:/root/apisix-istio/istio-1.12.1/bin"

Begin the Istio pre-installation check by running:
         istioctl x precheck

Need more information? Visit https://istio.io/latest/docs/setup/install/
上述操作执行完毕,会在当前目录下创建出一个新目录。我们可以按照以上命令的输出继续进行操作。
(MoeLove) ➜ ls
istio-1.12.1
(MoeLove) ➜ export PATH="$PATH:/root/apisix-istio/istio-1.12.1/bin"
(MoeLove) ➜ istioctl x precheck
✔ No issues found when checking the cluster. Istio is safe to install or upgrade!
  To get started, check out https://istio.io/latest/docs/setup/getting-started/
接下来开始进行真正的部署操作。将其设置 --set profile=minimal 进行最小化安装即可。
(MoeLove) ➜ istioctl install --set profile=minimal  -y
✔ Istio core
installed

✔ Istiod
installed

✔ Installation
complete

Making this installation the default for injection and validation.

Thank you for installing Istio 1.12.  Please take a few minutes to tell us about your install/upgrade experience!  https://forms.gle/FegQbc9UvePd4Z9z7
最后检查当前的部署状态,可以看到 Pod 已经在运行中了。
(MoeLove) ➜ kubectl -n istio-system get pods
NAME                      READY   STATUS    RESTARTS   AGE
istiod-58d79b7bff-g66cv   1/1     Running   0          1m
第三步:部署 Apache APISIX
接下来我们进行 Apache APISIX 的相关部署。
首先创建名为 apisix-istio 的 Namespace 并开启自动注入。
(MoeLove) ➜ kubectl create ns apisix-istio
namespace/apisix-istio created
(MoeLove) ➜ kubectl label namespace apisix-istio istio-injection=enabled
namespace/apisix-istio labeled
接下来添加 Helm Repo 并使用 Helm 进行 Apache APISIX 和 Apache APISIX Ingress Controller 的部署。
(MoeLove) ➜ helm repo add apisix https://charts.apiseven.com
"apisix" has been added to your repositories
(MoeLove) ➜ helm install apisix-istio apisix/apisix --set gateway.type=NodePort --set ingress-controller.enabled=true --set ingress-controller.config.apisix.serviceNamespace=apisix-istio  --set ingress-controller.config.apisix.serviceName=apisix-istio-admin  --namespace apisix-istio
NAME: apisix-istio
LAST DEPLOYED: Wed Dec 15 14:16:33 2021
NAMESPACE: apisix-istio
STATUS: deployed
REVISION: 1
TEST SUITE: None
NOTES:
1. Get the application URL by running these commands:
  export NODE_PORT=$(kubectl get --namespace apisix-istio -o jsonpath="{.spec.ports[0].nodePort}" services apisix-istio-gateway)
  export NODE_IP=$(kubectl get nodes --namespace apisix-istio -o jsonpath="{.items[0].status.addresses[0].address}")
  echo http://$NODE_IP:$NODE_PORT
执行完上述命令后,可通过执行以下命令等待所有 Pod 均正常运行。
(MoeLove) ➜ kubectl -n apisix-istio wait --for=condition=Ready pods --all
pod/apisix-istio-7bdfcb4bd9-89jcn condition met
pod/apisix-istio-etcd-0 condition met
pod/apisix-istio-etcd-1 condition met
pod/apisix-istio-etcd-2 condition met
pod/apisix-istio-ingress-controller-5fcbb75b8c-b4nnc condition met
可以看到当前 Pod 全部的已经正常运行了。接下来我们进行相关测试和验证。
测试环节
简单测试
在之前使用 Helm 部署 Apache APISIX 时,我们将服务暴露方式选择为 NodePort,所以接下来就可以使用以下命令直接访问到 Apache APISIX。
(MoeLove) ➜ export NODE_PORT=$(kubectl get --namespace apisix-istio -o jsonpath="{.spec.ports[0].nodePort}" services apisix-istio-gateway)
(MoeLove) ➜ export NODE_IP=$(kubectl get nodes --namespace apisix-istio -o jsonpath="{.items[0].status.addresses[0].address}")
(MoeLove) ➜ curl http://$NODE_IP:$NODE_PORT
{"error_msg":"404 Route Not Found"}
注意,在使用 curl 命令请求时我们增加一个 -v 选项,查看一下请求的响应头。
(MoeLove) ➜ curl -v http://$NODE_IP:$NODE_PORT
* Rebuilt URL to: http://172.20.0.2:31225/
*   Trying 172.20.0.2...
* TCP_NODELAY set
* Connected to 172.20.0.2 (172.20.0.2) port 31225 (#0)
> GET / HTTP/1.1
> Host: 172.20.0.2:31225
> User-Agent: curl/7.58.0
> Accept: */*
>
< HTTP/1.1 404 Not Found
< date: Wed, 15 Dec 2021 14:31:40 GMT
< content-type: text/plain; charset=utf-8
< server: istio-envoy
< x-envoy-upstream-service-time: 1
< x-envoy-decorator-operation: apisix-istio-gateway.apisix-istio.svc.cluster.local:80/*
< transfer-encoding: chunked
<
{"error_msg":"404 Route Not Found"}
* Connection #0 to host 172.20.0.2 left intact
从上述的输出结果中可以看到,响应头中包含如下内容:
< server: istio-envoy
< x-envoy-upstream-service-time: 1
< x-envoy-decorator-operation: apisix-istio-gateway.apisix-istio.svc.cluster.local:80/*
这说明 Istio 的自动注入已经成功,当前直接进行交互的并不是 Apache APISIX 而是 Istio 的 Sidecar。
BookInfo 部署测试
接下来我们使用 Istio 自带的 BookInfo 示例程序进行相关测试验证。
首先创建一个 Namespace,并开启 Istio 的自动注入。
(MoeLove) ➜ kubectl create ns bookinfo
namespace/bookinfo created
(MoeLove) ➜ kubectl label namespace bookinfo istio-injection=enabled
namespace/bookinfo labeled
然后进行 BookInfo 部署,相关部署文件在上述安装 Istio 过程中会自动创建在目录中。
(MoeLove) ➜ kubectl -n bookinfo apply -f istio-1.12.1/samples/bookinfo/platform/kube/bookinfo.yaml
service/details created
serviceaccount/bookinfo-details created
deployment.apps/details-v1 created
service/ratings created
serviceaccount/bookinfo-ratings created
deployment.apps/ratings-v1 created
service/reviews created
serviceaccount/bookinfo-reviews created`
deployment.apps/reviews-v1 created
deployment.apps/reviews-v2 created
deployment.apps/reviews-v3 created
service/productpage created
serviceaccount/bookinfo-productpage created
deployment.apps/productpage-v1 created
等待所有 Pod 正常运行。
(MoeLove) ➜ kubectl -n bookinfo get pods
NAME                             READY   STATUS    RESTARTS   AGE
details-v1-96cf758d8-qr6p9       2/2     Running   0          64s
productpage-v1-5f75dfbfb-22hcw   2/2     Running   0          64s
ratings-v1-779dbc4fdd-jt5zp      2/2     Running   0          64s
reviews-v1-ffbbf7fc8-kxvrr       2/2     Running   0          64s
reviews-v2-54546c6f84-pnjkn      2/2     Running   0          64s
reviews-v3-74d6bf84cd-h4r9z      2/2     Running   0          63s
现在我们可以使用 Apache APISIX 将服务暴露到 Kubernetes 集群外了。使用如下内容创建一条路由配置,保存为 productpage-ar.yaml。
apiVersion: apisix.apache.org/v2beta2
kind: ApisixRoute
metadata:
 name: productpage
spec:
 http:
 - name: rule1
   match:
     hosts:
     - apisix-istio.dev
     paths:
       - /*
   backends:
   - serviceName: productpage
     servicePort: 9080
备注
以上配置可理解为:创建一条路由,设置域名为 apisix-istio.dev 并将所有请求流量均转发至 productpage 服务的 9080 端口。
然后创建此资源:
(MoeLove) ➜ kubectl -n bookinfo apply -f productpage-ar.yaml
apisixroute.apisix.apache.org/productpage created
携带我们刚才配置的域名再次请求 Apache APISIX ,可以看到返回了 200 相关提示。
(MoeLove) ➜ curl -I -H "HOST: apisix-istio.dev" http://$NODE_IP:$NODE_PORT/
HTTP/1.1 200 OK
content-type: text/html; charset=utf-8
content-length: 1683
date: Wed, 15 Dec 2021 15:47:30 GMT
x-envoy-upstream-service-time: 7
server: istio-envoy
x-envoy-decorator-operation: apisix-istio-gateway.apisix-istio.svc.cluster.local:80/*
之后可以通过 port-forward 的方式将 Apache APISIX 端口暴露出来。
(MoeLove) ➜ kubectl -n apisix-istio port-forward --address 0.0.0.0 svc/apisix-istio-gateway 8080:80
Forwarding from 0.0.0.0:8080 -> 9080
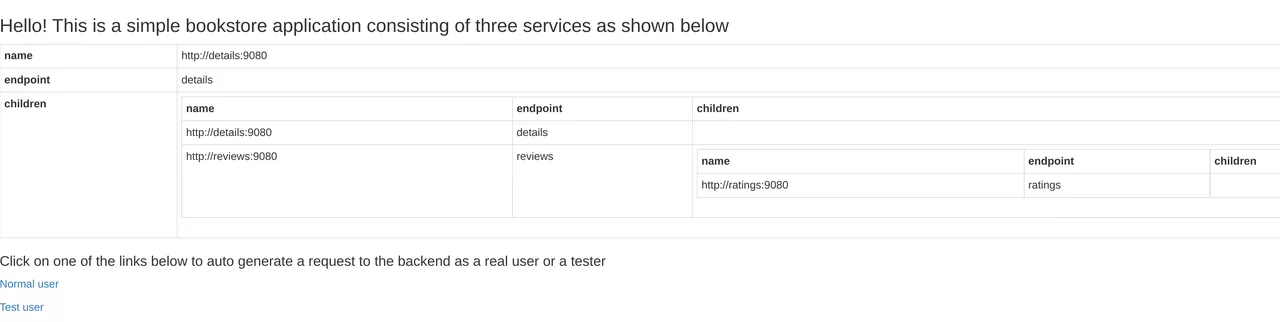
最后在浏览器中设置 HOST: apisix-istio.dev 的 Header 并尝试进行请求,就可以得到如下所示的正确页面了。

可视化处理利器:Kiali
Kiali 是一个可以对 Istio 进行可视化的工具,可作为 Istio add-on 进行安装。
在这里直接使用 Istio 携带的 addons 目录中的配置文件进行部署。
(MoeLove) ➜ kubectl -n istio-system apply -f  istio-1.12.1/samples/addons/
serviceaccount/grafana created
configmap/grafana created
service/grafana created
deployment.apps/grafana created
configmap/istio-grafana-dashboards created
configmap/istio-services-grafana-dashboards created
deployment.apps/jaeger created
service/tracing created
service/zipkin created
service/jaeger-collector created
serviceaccount/kiali created
configmap/kiali created
clusterrole.rbac.authorization.k8s.io/kiali-viewer created
clusterrole.rbac.authorization.k8s.io/kiali created
clusterrolebinding.rbac.authorization.k8s.io/kiali created
role.rbac.authorization.k8s.io/kiali-controlplane created
rolebinding.rbac.authorization.k8s.io/kiali-controlplane created
service/kiali created
deployment.apps/kiali created
serviceaccount/prometheus created
configmap/prometheus created
clusterrole.rbac.authorization.k8s.io/prometheus created
clusterrolebinding.rbac.authorization.k8s.io/prometheus created
service/prometheus created
deployment.apps/prometheus created
等待 Pod 正常运行后查看:
(MoeLove) ➜ kubectl -n istio-system get pods
NAME                          READY   STATUS    RESTARTS   AGE
grafana-6ccd56f4b6-wq6k5      1/1     Running   0          2m12s
istiod-58d79b7bff-g66cv       1/1     Running   0          42m
jaeger-5d44bc5c5d-84ksf       1/1     Running   0          2m11s
kiali-79b86ff5bc-w457g        1/1     Running   0          2m3s
prometheus-64fd8ccd65-2mjcc   2/2     Running   0          2m9s
接下来执行以下命令进行 Kiali 的端口转发并在浏览器中进行访问。当然使用上述 port-forward 的方式也是一样的。
(MoeLove) ➜ istioctl dashboard kiali  --address 0.0.0.0 --port 9999 --browser=false
http://0.0.0.0:9999/kiali
skipping opening a browser
在浏览器中打开 http://0.0.0.0:9999/kiali,同时尝试多次通过 Apache APISIX 访问 BookInfo 服务,即可看到如下效果。
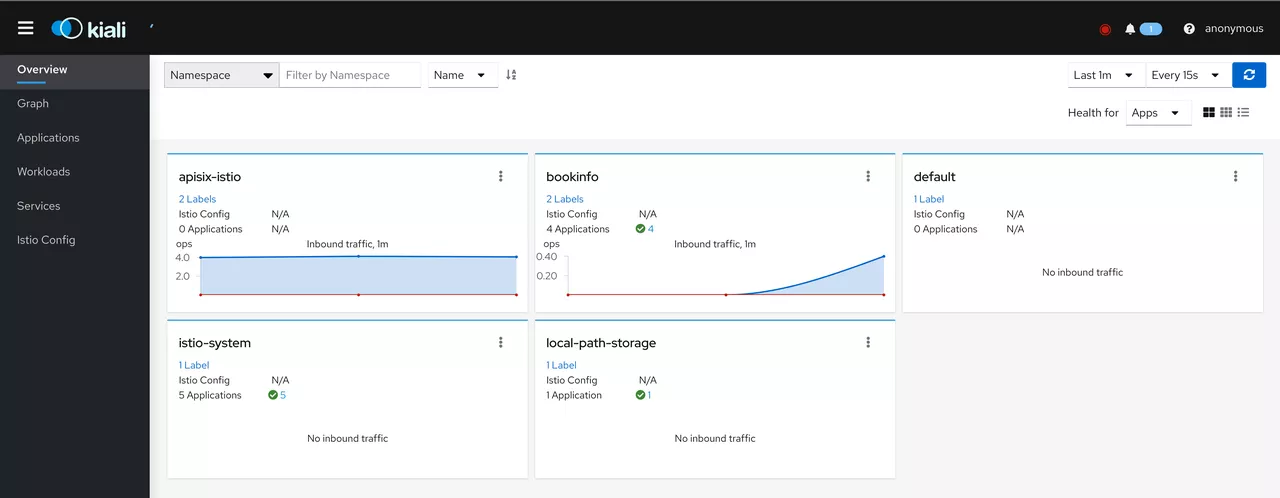

点击 Graph ,将 Namespace 选择为 BookInfo。在测试访问 BookInfo 应用的过程中,可看到如下所示效果。可以看到流量从 Apache APISIX 进来,然后流向应用程序的各个组件。
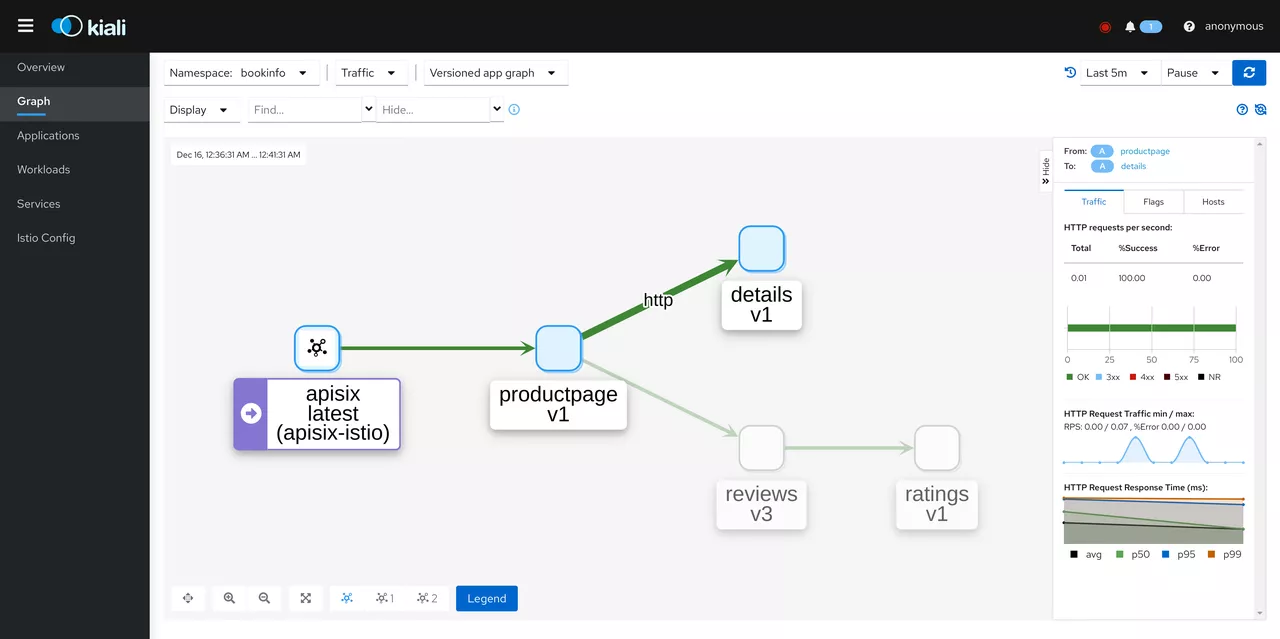

至此,全部流程结束。我们已经成功地使用 Apache APISIX 和 Apache APISIX Ingress Controller,将开启 Service Mesh 的 Kubernetes 集群中的服务安全地暴露出来了。
总结
本文通过非常详细的操作步骤,向大家一步步地展示了如何使用 Istio Service Mesh 和 Apache APISIX,将启用 Service Mesh 的 Kubernetes 集群中服务暴露至集群外。后续也可以通过 Apache APISIX 丰富的插件能力提供更多安全防护或流量控制。
希望通过以上的细节教学,可以帮助大家在使用 Apache APISIX 时更方便地实现与 Istio 等方案进行集成。