openid-connect
描述#
OpenID Connect(OIDC)是基于 OAuth 2.0 的身份认证协议,APISIX 可以与支持该协议的身份认证服务对接,如 Okta、Keycloak、Ory Hydra、Authing 等,实现对客户端请求的身份认证。
属性#
| 名称 | 类型 | 必选项 | 默认值 | 有效值 | 描述 |
|---|---|---|---|---|---|
| client_id | string | 是 | OAuth 客户端 ID。 | ||
| client_secret | string | 是 | OAuth 客户端 secret。 | ||
| discovery | string | 是 | 身份认证服务暴露的服务发现端点。 | ||
| scope | string | 否 | "openid" | OIDC 范围对应于应返回的有关经过身份验证的用户的信息,也称为 claims。默认值是openid,这是 OIDC 返回唯一标识经过身份验证的用户的 sub 声明所需的范围。可以附加其他范围并用空格分隔,例如 openid email profile。 | |
| realm | string | 否 | "apisix" | bearer token 无效时 WWW-Authenticate 响应头中会伴随着的 realm 讯息。 | |
| claim_validator | object | 否 | 设置 JWT claim 验证器。 | ||
| claim_validator.audience | object | 否 | OpenID Connect Audience ("aud") 验证器。 | ||
| claim_validator.audience.claim | string | 否 | "aud" | 自定义存储 audience 的声明(字段名)。 | |
| claim_validator.audience.required | boolean | 否 | false | 要求 JWT 中的 audience 声明必须存在,它将遵循自定义声明设置。 | |
| claim_validator.audience.match_with_client_id | boolean | 否 | false | 要求 JWT 中的 audience 声明与 client_id 相等(其值为字符串时)或包含 client_id(其值为字符串数组时),这符合 OpenID Connect 规范中的定义。 | |
| bearer_only | boolean | 否 | false | 当设置为 true 时,将仅检查请求头中的令牌(Token)。 | |
| logout_path | string | 否 | "/logout" | 登出路径。 | |
| post_logout_redirect_uri | string | 否 | 调用登出接口后想要跳转的 URL。如果 OIDC 的服务发现端点没有提供 end_session_endpoint ,插件内部会使用 redirect_after_logout_uri 进行重定向,否则使用 post_logout_redirect_uri 进行重定向。 | ||
| redirect_uri | string | 否 | 身份提供者重定向返回的 URI。如果缺失,则 APISIX 将在当前 URI 之后追加 .apisix/redirect 作为默认的 redirect_uri。注意,OP 也需要适当配置以允许这种形式的 redirect_uri。 | ||
| timeout | integer | 否 | 3 | [1,...] | 请求超时时间,单位为秒 |
| ssl_verify | boolean | 否 | false | [true, false] | 当设置为 true 时,验证身份提供者的 SSL 证书。 |
| introspection_endpoint | string | 否 | 用于内省访问令牌的身份提供者的令牌内省端点的 URL。如果未设置,则使用发现文档中提供的内省端点作为后备。 | ||
| introspection_endpoint_auth_method | string | 否 | "client_secret_basic" | 令牌内省端点的身份验证方法。该值应是 introspection_endpoint_auth_methods_supported 授权服务器元数据中指定的身份验证方法之一,如发现文档中所示,例如 client_secret_basic, client_secret_post, private_key_jwt,或 client_secret_jwt。 | |
| token_endpoint_auth_method | string | 否 | 令牌端点的身份验证方法。该值应是 token_endpoint_auth_methods_supported 授权服务器元数据中指定的身份验证方法之一,如发现文档中所示,例如 client_secret_basic, client_secret_post, private_key_jwt,或 client_secret_jwt。如果不支持配置的方法,则回退到token_endpoint_auth_methods_supported 数组中的第一个方法。 | ||
| public_key | string | 否 | 验证令牌的公钥。 | ||
| use_jwks | boolean | 否 | false | 当设置为 true 时,则会使用身份认证服务器的 JWKS 端点来验证令牌。 | |
| use_pkce | boolean | 否 | false | [true, false] | 当设置为 true 时,则使用 PKCE(Proof Key for Code Exchange)。 |
| token_signing_alg_values_expected | string | 否 | 用于对令牌进行签名的算法。 | ||
| set_access_token_header | boolean | 否 | true | [true, false] | 在请求头设置访问令牌。默认使用请求头参数 X-Access-Token。 |
| access_token_in_authorization_header | boolean | 否 | false | [true, false] | 当设置为 true 以及 set_access_token_header 也设置为 true时,将访问令牌设置在请求头参数 Authorization。 |
| set_id_token_header | boolean | 否 | true | [true, false] | 是否将 ID 令牌设置到请求头参数 X-ID-Token。 |
| set_userinfo_header | boolean | 否 | true | [true, false] | 是否将用户信息对象设置到请求头参数 X-Userinfo。 |
| set_refresh_token_header | boolean | 否 | false | 当设置为 true 并且刷新令牌可用时,则会将该属性设置在X-Refresh-Token请求头中。 | |
| session | object | 否 | 当设置 bearer_only 为 false 时,openid-connect 插件将使用 Authorization Code 在 IDP 上进行认证,因此你必须设置 session 相关设置。 | ||
| session.secret | string | 是 | 自动生成 | 16 个以上字符 | 用于 session 加密和 HMAC 计算的密钥。 |
| session.cookie | object | False | |||
| session.cookie.lifetime | integer | False | 3600 | 用于设置 cookie 的生命周期,以秒为单位。 | |
| unauth_action | string | False | "auth" | ["auth","deny","pass"] | 指定未经身份验证的请求的响应类型。 auth 重定向到身份提供者,deny 导致 401 响应,pass 将允许请求而无需身份验证。 |
| proxy_opts | object | 否 | OpenID 服务器前面的 HTTP 代理服务器。 | ||
| proxy_opts | object | 否 | 用来访问身份认证服务器的代理服务器。 | ||
| proxy_opts.http_proxy | string | 否 | http://proxy-server:port | HTTP 代理服务器地址。 | |
| proxy_opts.https_proxy | string | 否 | http://proxy-server:port | HTTPS 代理服务器地址。 | |
| proxy_opts.http_proxy_authorization | string | 否 | Basic [base64 username:password] | 与 http_proxy 一起使用的默认 Proxy-Authorization 标头值。可以使用自定义 Proxy-Authorization 请求标头覆盖。 | |
| proxy_opts.https_proxy_authorization | string | 否 | Basic [base64 username:password] | 与 https_proxy 一起使用的默认 Proxy-Authorization 标头值。无法使用自定义 Proxy-Authorization 请求标头覆盖,因为使用 HTTPS 时,授权在连接时完成。 | |
| proxy_opts.no_proxy | string | 否 | 不应被代理的主机的逗号分隔列表。 | ||
| authorization_params | object | 否 | 在请求中发送到授权端点的附加参数 | ||
| client_rsa_private_key | string | 否 | 用于签署 JWT 的客户端 RSA 私钥。 | ||
| client_rsa_private_key_id | string | 否 | 用于计算签名 JWT 的客户端 RSA 私钥 ID。 | ||
| client_jwt_assertion_expires_in | integer | 否 | 60 | 签名 JWT 的生存期,以秒为单位。 | |
| renew_access_token_on_expiry | boolean | 否 | true | 如果为 true,在访问令牌过期或存在刷新令牌时,尝试静默更新访问令牌。如果令牌无法更新,则重定向用户进行重新认证。 | |
| access_token_expires_in | integer | 否 | 访问令牌的生命周期,以秒为单位,如果令牌终端响应中不存在 expires_in 属性。 | ||
| refresh_session_interval | integer | 否 | 900 | 刷新用户 ID 令牌而无需重新进行身份验证的时间间隔,以秒为单位。若未设置,则不会检查网关向客户端签发的 ID 令牌(如浏览器中的 session)过期时间。如果设置为 900,意味着在 900 秒后刷新用户的 ID 令牌(如浏览器中的 session),而无需重新进行身份验证。 | |
| iat_slack | integer | 否 | 120 | 与 ID 令牌中的 iat 声明的时钟偏差容忍度,以秒为单位。 | |
| accept_none_alg | boolean | 否 | false | 如果 OpenID 提供程序不对其 ID 令牌进行签名将其设置为 true。 | |
| accept_unsupported_alg | boolean | 否 | true | 如果为 true,忽略 ID 令牌签名以接受不支持的签名算法。 | |
| access_token_expires_leeway | integer | 否 | 0 | 访问令牌续订的过期宽限期,以秒为单位。当设置为大于 0 的值时,令牌续订将在令牌到期之前的一段时间内进行。这样可以避免在到达资源服务器时令牌刚好过期时出现错误。 | |
| force_reauthorize | boolean | 否 | false | 如果为 true,即使已缓存令牌,也执行授权流程。 | |
| use_nonce | boolean | 否 | false | 如果为 true,启用授权请求中的 nonce 参数。 | |
| revoke_tokens_on_logout | boolean | 否 | false | 如果为 true,通知授权服务器不再需要先前获取的刷新令牌或访问令牌,发送到吊销端点。 | |
| jwk_expires_in | integer | 否 | 86400 | JWK 缓存的过期时间,以秒为单位。 | |
| jwt_verification_cache_ignore | boolean | 否 | false | 如果为 true,请强制对持有者令牌进行重新验证,并忽略任何现有的缓存验证结果。 | |
| cache_segment | string | 否 | 可选的缓存段的名称,用于区分和区分用于令牌内省或 JWT 验证的缓存。 | ||
| introspection_interval | integer | 否 | 0 | 以秒为单位的缓存和内省访问令牌的 TTL。 | |
| introspection_expiry_claim | string | 否 | 过期声明的名称,用于控制缓存和内省访问令牌的 TTL。 | ||
| introspection_addon_headers | string[] | 否 | introspection_addon_headers 是字符串列表,用于配置额外添加到内省 HTTP 请求中的请求头,如果配置的请求头不存在于源请求中,它将被忽略。 | ||
| claim_validator.issuer.valid_issuers | string[] | 否 | 将经过审查的 jwt 发行者列入白名单。当用户未传递时,将使用发现端点返回的颁发者。如果两者均缺失,发行人将无法得到验证 |
注意:schema 中还定义了 encrypt_fields = {"client_secret"},这意味着该字段将会被加密存储在 etcd 中。具体参考 加密存储字段。
使用场景#
该插件提供两种使用场景:
应用之间认证授权:将
bearer_only设置为true,并配置introspection_endpoint或public_key属性。该场景下,请求头(Header)中没有令牌或无效令牌的请求将被拒绝。浏览器中认证授权:将
bearer_only设置为false。认证成功后,该插件可获得并管理 Cookie 中的令牌,后续请求将使用该令牌。在这种模式中,用户 session 将作为 Cookie 存储在浏览器中,这些数据是加密的,因此你必须通过session.secret设置一个密钥用于加密。
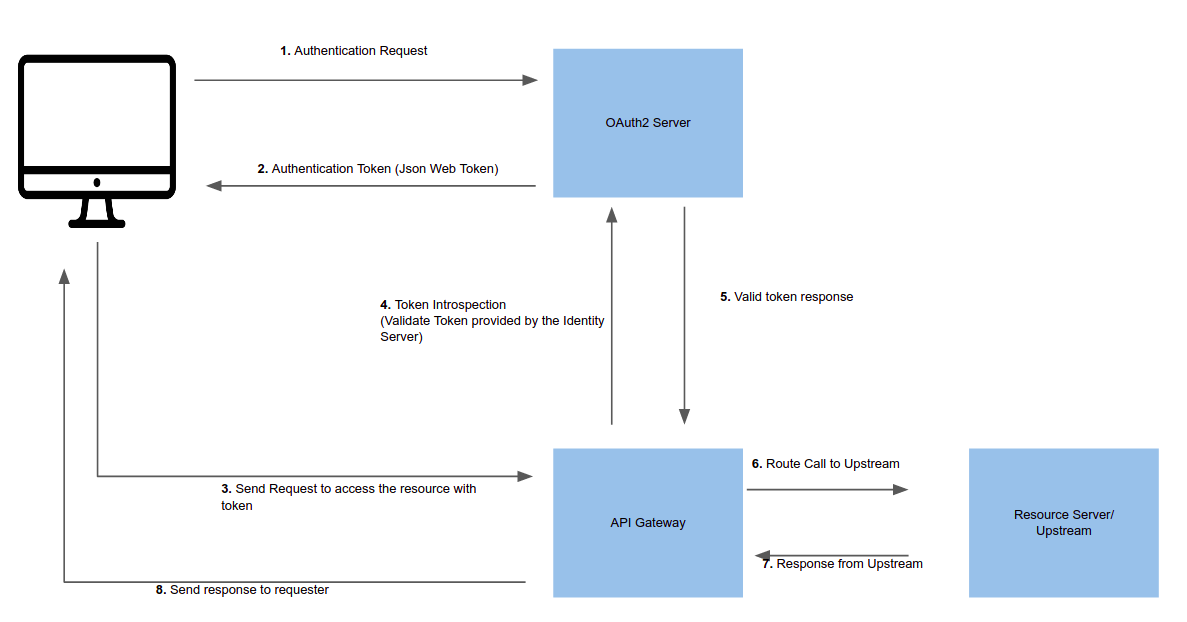
令牌内省#
令牌内省是通过针对 OAuth 2.0 授权的服务器来验证令牌及相关请求,详情请阅读 Token Introspection。
首先,需要在身份认证服务器中创建受信任的客户端,并生成用于内省的有效令牌(JWT)。下图是通过网关进行令牌内省的成功示例流程:
以下示例是在路由上启用插件。该路由将通过内省请求头中提供的令牌来保护上游:
note
您可以这样从 config.yaml 中获取 admin_key 并存入环境变量:
admin_key=$(yq '.deployment.admin.admin_key[0].key' conf/config.yaml | sed 's/"//g')
curl http://127.0.0.1:9180/apisix/admin/routes/1 \
-H "X-API-KEY: $admin_key" -X PUT -d '
{
  "uri": "/get",
  "plugins":{
    "openid-connect":{
      "client_id": "${CLIENT_ID}",
      "client_secret": "${CLIENT_SECRET}",
      "discovery": "${DISCOVERY_ENDPOINT}",
      "introspection_endpoint": "${INTROSPECTION_ENDPOINT}",
      "bearer_only": true,
      "realm": "master",
      "introspection_endpoint_auth_method": "client_secret_basic"
    }
  },
  "upstream":{
    "type": "roundrobin",
    "nodes":{
      "httpbin.org:443":1
    }
  }
}'
以下命令可用于访问新路由:
curl -i -X GET http://127.0.0.1:9080/get -H "Authorization: Bearer {JWT_TOKEN}"
在此示例中,插件强制在请求头中设置访问令牌和 Userinfo 对象。
当 OAuth 2.0 授权服务器返回结果里除了令牌之外还有过期时间,其中令牌将在 APISIX 中缓存直至过期。更多信息请参考:
- lua-resty-openidc 的文档和源代码。
exp字段的定义:Introspection Response。
公钥内省#
除了令牌内省外,还可以使用 JWT 令牌的公钥进行验证。如果使用了公共密钥和令牌内省端点,就会执行公共密钥工作流,而不是通过身份服务器进行验证。该方式适可用于减少额外的网络调用并加快认证过程。
以下示例展示了如何将公钥添加到路由中:
curl http://127.0.0.1:9180/apisix/admin/routes/1 \
-H "X-API-KEY: $admin_key" -X PUT -d '
{
  "uri": "/get",
  "plugins":{
    "openid-connect":{
      "client_id": "${CLIENT_ID}",
      "client_secret": "${CLIENT_SECRET}",
      "discovery": "${DISCOVERY_ENDPOINT}",
      "bearer_only": true,
      "realm": "master",
      "token_signing_alg_values_expected": "RS256",
      "public_key": "-----BEGIN PUBLIC KEY-----
      {public_key}
      -----END PUBLIC KEY-----"
    }
  },
  "upstream":{
    "type": "roundrobin",
    "nodes":{
      "httpbin.org:443":1
    }
  }
}'
通过 OIDC 依赖方认证流程进行身份验证#
当一个请求在请求头或 session cookie 中不包含访问令牌时,该插件可以充当 OIDC 依赖方并重定向到身份提供者的授权端点以通过 OIDC authorization code flow。
一旦用户通过身份提供者进行身份验证,插件将代表用户从身份提供者获取和管理访问令牌和更多信息。该信息当前存储在 session cookie 中,该插件将会识别 Cookie 并使用其中的信息,以避免再次执行认证流程。
以下示例是将此操作模式添加到 Route:
curl http://127.0.0.1:9180/apisix/admin/routes/1 \
-H "X-API-KEY: $admin_key" -X PUT -d '
{
  "uri": "/get",
  "plugins": {
    "openid-connect": {
      "client_id": "${CLIENT_ID}",
      "client_secret": "${CLIENT_SECRET}",
      "discovery": "${DISCOVERY_ENDPOINT}",
      "bearer_only": false,
      "realm": "master"
    }
  },
  "upstream": {
    "type": "roundrobin",
    "nodes": {
      "httpbin.org:443": 1
    }
  }
}'
在以上示例中,该插件可以强制在配置的请求头中设置访问令牌、ID 令牌和 UserInfo 对象。
故障排除#
本节介绍使用此插件时的一些常见问题,以帮助您排除故障。
APISIX 无法连接到 OpenID 提供商#
如果 APISIX 无法解析或无法连接到 OpenID 提供商,请仔细检查配置文件 config.yaml 中的 DNS 设置并根据需要进行修改。
No Session State Found#
如果您在使用授权码流 时遇到 500 内部服务器错误并在日志中显示以下消息,则可能有多种原因。
the error request to the redirect_uri path, but there's no session state found
1. 重定向 URI 配置错误#
一个常见的错误配置是将 redirect_uri 配置为与路由的 URI 相同。当用户发起访问受保护资源的请求时,请求直接命中重定向 URI,且请求中没有 session cookie,从而导致 no session state found 错误。
要正确配置重定向 URI,请确保 redirect_uri 与配置插件的路由匹配,但不要完全相同。例如,正确的配置是将路由的 uri 配置为 /api/v1/*,并将 redirect_uri 的路径部分配置为 /api/v1/redirect。
您还应该确保 redirect_uri 包含 scheme,例如 http 或 https 。
2. 缺少 Session Secret#
如果您在standalone 模式下部署 APISIX,请确保配置了 session.secret。
用户 session 作为 cookie 存储在浏览器中,并使用 session 密钥进行加密。如果没有通过 session.secret 属性配置机密,则会自动生成机密并将其保存到 etcd。然而,在独立模式下,etcd 不再是配置中心。因此,您应该在 YAML 配置中心 apisix.yaml 中为此插件显式配置 session.secret。
3. Cookie 未发送或不存在#
检查 SameSite cookie 属性是否已正确设置(即您的应用程序是否需要跨站点发送 cookie),看看这是否会成为阻止 cookie 保存到浏览器的 cookie jar 或从浏览器发送的因素。
4. 上游发送的标头太大#
如果您有 NGINX 位于 APISIX 前面来代理客户端流量,请查看 NGINX 的 error.log 中是否观察到以下错误:
upstream sent too big header while reading response header from upstream
如果是这样,请尝试将 proxy_buffers 、 proxy_buffer_size 和 proxy_busy_buffers_size 调整为更大的值。
5. 无效的客户端密钥#
验证 client_secret 是否有效且正确。无效的 client_secret 将导致身份验证失败,并且不会返回任何令牌并将其存储在 session 中。