
This article will show you how to create an Apache APISIX controller by integrating Dapr, includes the concept of the project and the specific operation steps.
Essentially, the Apache APISIX controller will configure the same standard DAPR annotations to inject DAPRD sidecar. Exposing this sidecar allows external applications to communicate with applications in the cluster that have Dapr enabled.
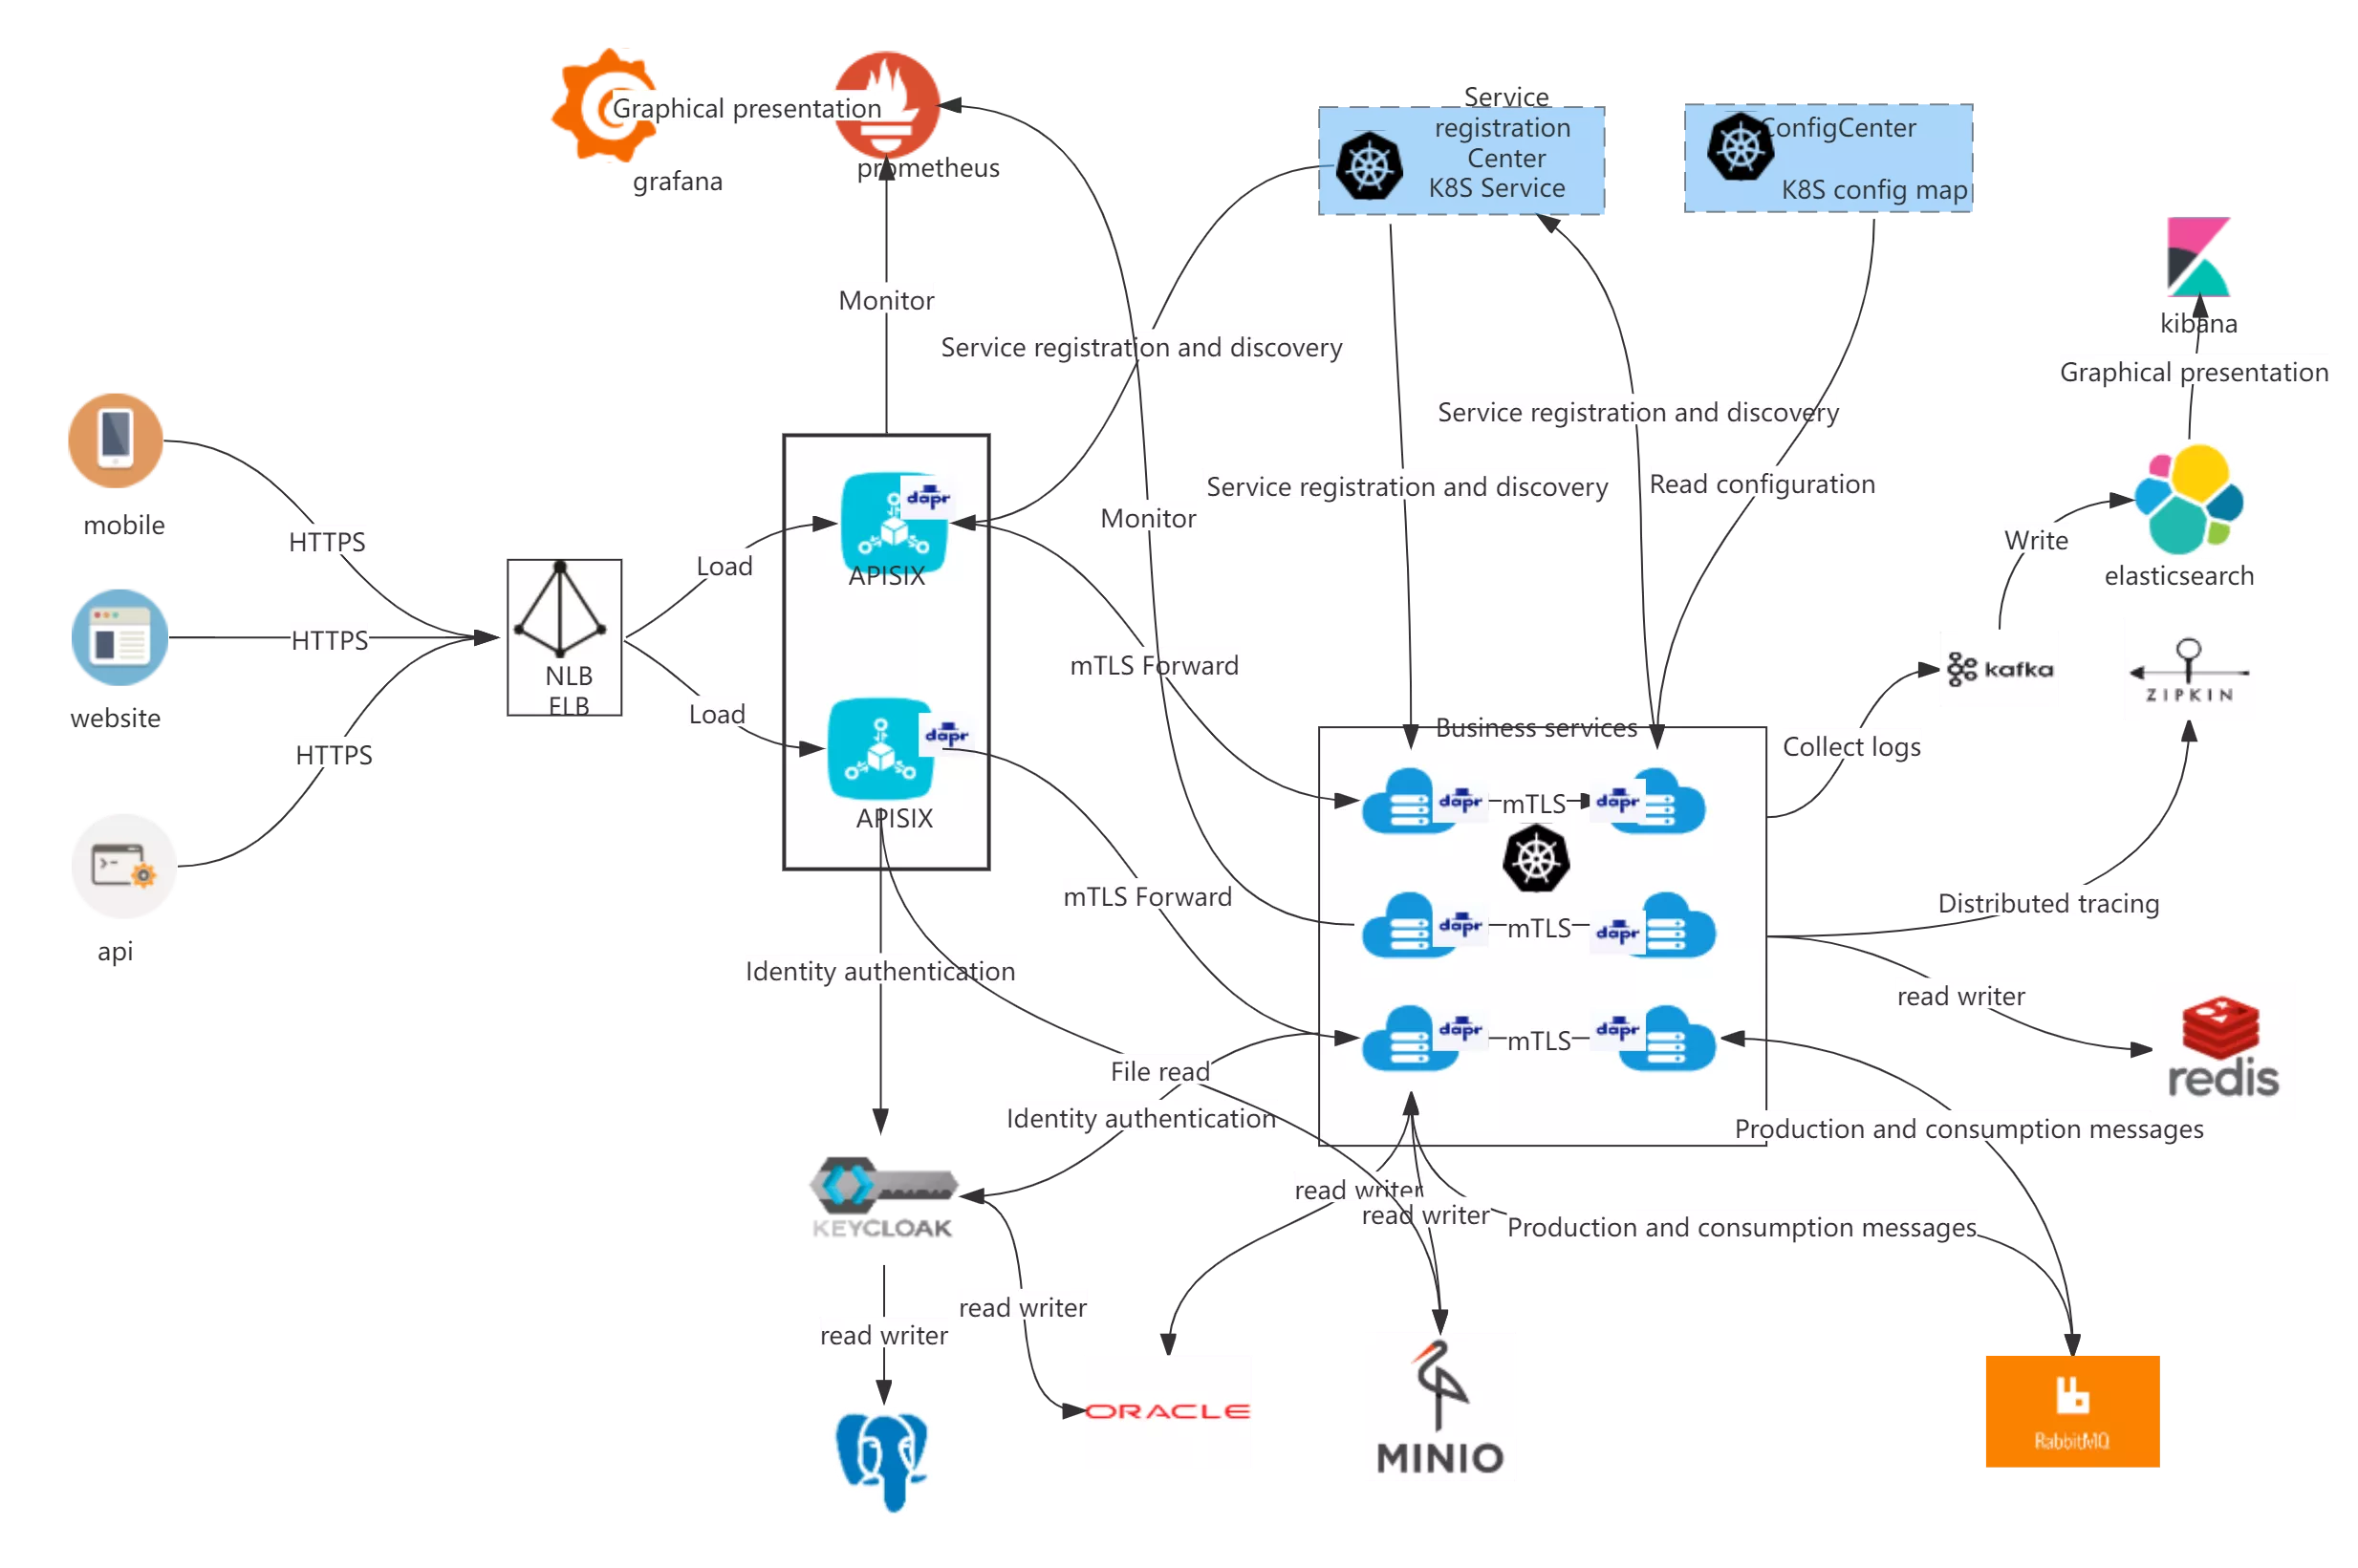
The following diagram shows the architectural flow of the actual project:

Overview
Apache APISIX Ingress
In the K8s ecosystem, Ingress is a resource that represents the entry point for K8s traffic. To make it effective, an Ingress Controller is needed to listen to the Ingress resources in K8s, resolve the rules for those resources, and actually carry the traffic. The most widely used Ingress Controller implementations in today's trends are Kubernetes Ingress Nginx.
APISIX Ingress is another implementation of the Ingress Controller. The main difference from Kubernetes Ingress Nginx is that APISIX Ingress uses Apache APISIX as the actual data plane for hosting business traffic. As shown in the figure below, when a user requests a specific service/API/web page, the entire business traffic/user request is transferred to the K8s cluster through an external proxy and then processed by APISIX Ingress.
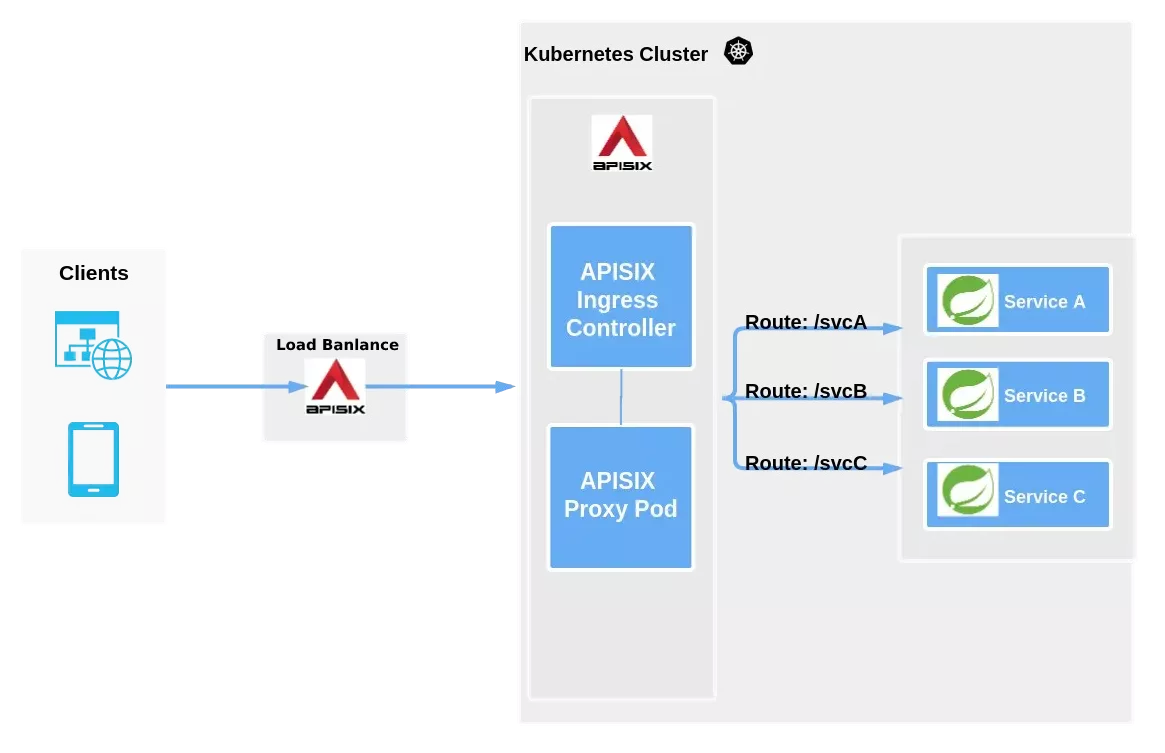
As you can see from the above diagram, APISIX Ingress is divided into two parts. One part is the APISIX Ingress Controller, which serves as the control plane for configuration management and distribution. The other part is the APISIX Proxy Pod, which is responsible for carrying business traffic and is implemented through CRD (Custom Resource Definitions). Apache APISIX Ingress supports not only custom resources but also native K8s Ingress resources.
Click here for more details.
Dapr
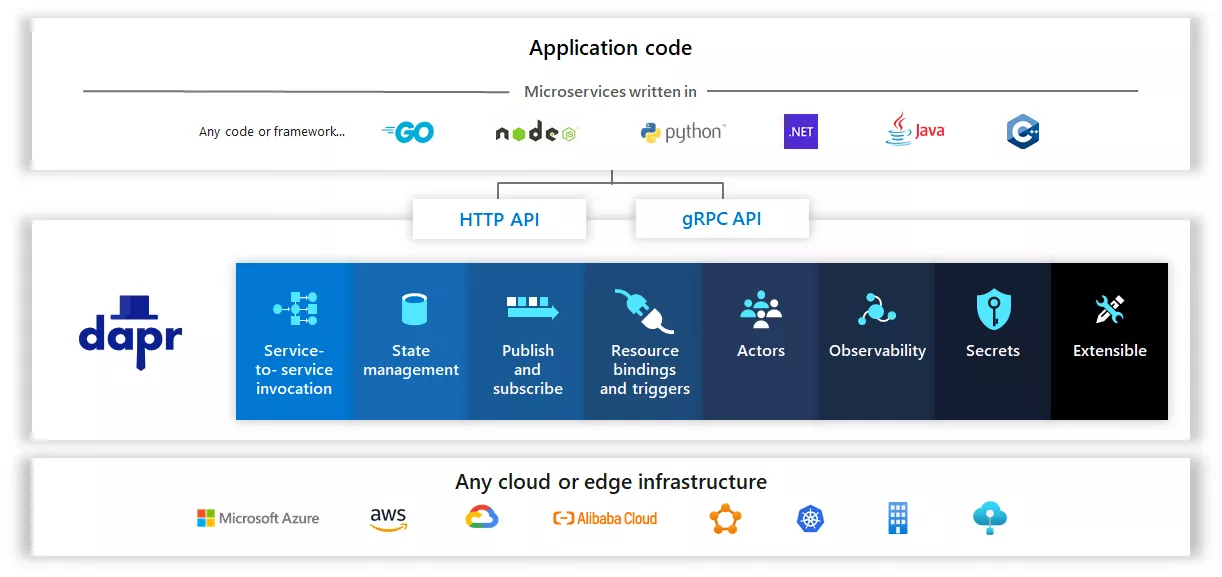
Dapr is a portable, event-driven runtime. It makes it simple for developers to build elastic, stateless and stateful applications running on the cloud and edge, and includes multiple languages and developer frameworks.

Today, we are experiencing a wave of cloud applications. Developers are familiar with web+ database application architectures (e.g., classic 3-tier designs), but not with what is essentially a distributed microservice application architecture. Developers want to focus on business logic while relying on the platform to infuse their applications with scalability, elasticity, maintainability, resiliency, and other attributes of native cloud architectures.
This is where Dapr comes in.
Dapr can codify best practices for building microservice applications into open, independent building blocks, enabling users to build portable applications using the language and framework of their choice. Each building block is completely independent and one or more of them can be used in an application.
In addition, Dapr is platform agnostic, which means users can run applications natively in any Kubernetes cluster and other hosting environments that integrate with Dapr.
Click here for more details.
Start of practice
Environment preparation
- Kubernetes 1.19+ cluster with Dapr already configured on the cluster
- Helm CLI 3x installed
- Kubectl CLI installed and configured to access the cluster
- Optional: OpenSSL for creating self-signed certificates
- The Helm Chart version for Apache APISIX is 0.7.2+
Step 1: Apache APISIX Helm Configuration
Add the latest helm chart repo for the Apache APISIX controller by running the following command.
helm repo add apisix https://charts.apiseven.com
helm repo update
Step 2: Create the Apache APISIX Ingerss namespace
Ensure that the current kubectl context points to the correct Kubernetes cluster, and then run the following command.
kubectl create namespace ingress-apisix
Step 3: Install the APISIX Controller with Dapr Support
Use the following to create a file called dapr-annotations.yaml to set up annotations on the Apache APISIX Proxy Pod.
apisix:
  podAnnotations:
    dapr.io/enabled: "true"
    dapr.io/app-id: " apisix-gateway"
dapr.io/app-port: "9080"
dapr.io/enable-metrics: "true"
dapr.io/metrics-port: "9099"
dapr.io/sidecar-listen-addresses: 0.0.0.0
dapr.io/config: ingress-apisix-config
Note: The app-port above is telling the daprd sidecar Proxy which port it is listening on. For a full list of supported annotations, see the Dapr Kubernetes pod annotation specification.
Here is a sample dapr-annotations.yaml from my personal installation on AKS.
 apisix:
  podAnnotations:
    dapr.io/app-id: apisix-gateway
    dapr.io/app-port: '9080'
    dapr.io/enable-metrics: 'true'
    dapr.io/enabled: 'true'
    dapr.io/metrics-port: '9099'
dapr.io/sidecar-listen-addresses: 0.0.0.0
dapr.io/config: ingress-apisix-config

gateway:
  type: LoadBalancer

ingress-controller:
  enabled: true

dashboard:
  enabled: true
Next, run the following command (referencing the above file).
helm install apisix apisix/apisix -f dapr-annotations.yaml -n ingress-apisix
Expose the launched APISIX Dashboard Pod to the outside world for subsequent use:
# You can get the dashboard-pod-name via kubectl get pods -n ingress-apisix
kubectl port-forward ${dashboard-pod-name} 9000:9000
Step 4: Create the Dapr Sidecar resource for Apache APISIX
First, access the APISIX Dashboard via http://localhost:9000 to configure Apache APISIX upstream-apisix-dapr.
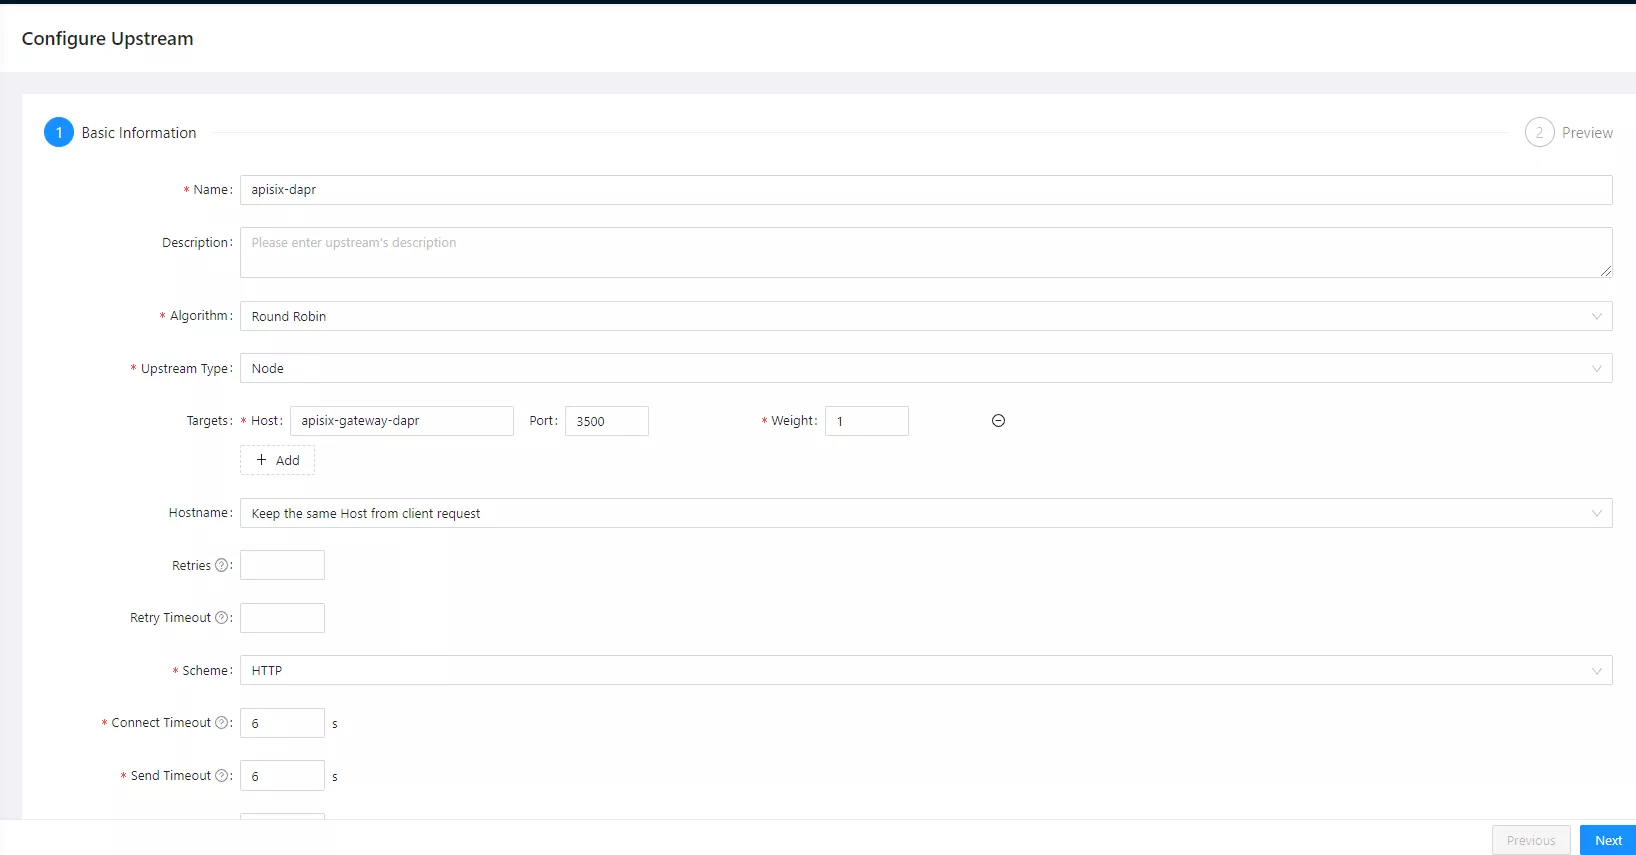

Fill in the hostname here: apisix-gateway-dapr and the port number 3500.
{
  "nodes": [
    {
      "host": "apisix-gateway-dapr",
      "port": 3500,
      "weight": 1
    }
  ],
  "retries": 1,
  "timeout": {
    "connect": 6,
    "read": 6,
    "send": 6
  },
  "type": "roundrobin",
  "scheme": "http",
  "pass_host": "pass",
  "name": "apisix-dapr"
}
Then configure the Apache APISIX service apisix-gateway-dapr, and select apisix-dapr for the upstream service.
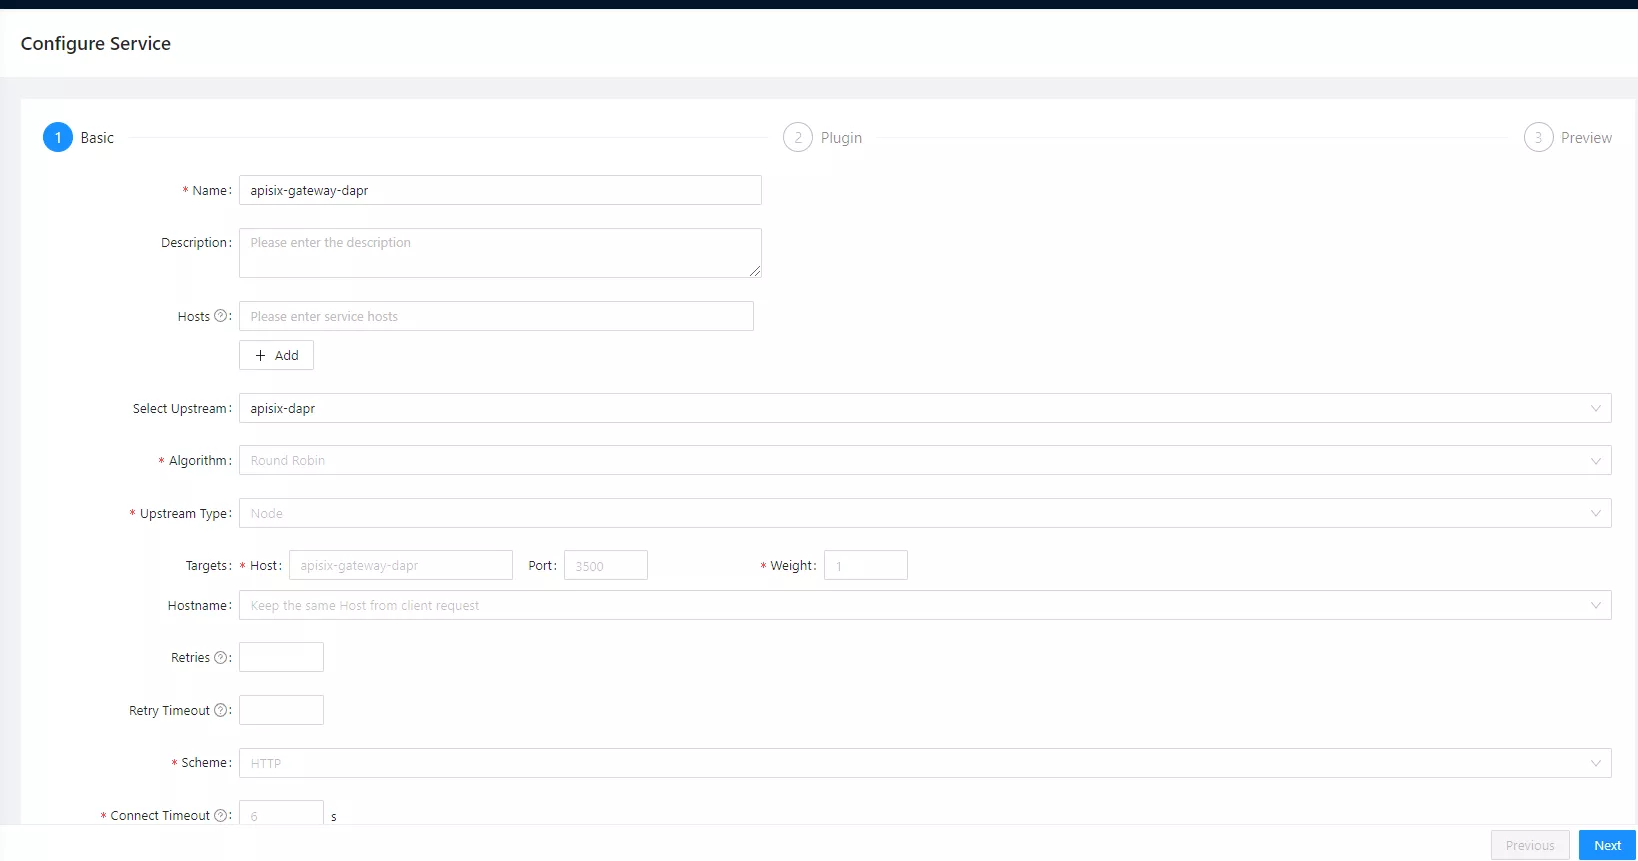

{
  "name": "apisix-gateway-dapr",
  "upstream_id": "376187148778341098"
}
Step 5: Deploy the test sample project
HTTPBin is a tool written in Python+Flask that covers various HTTP scenarios and returns to each interface. Next, we'll use kennethreitz/httpbin as a sample project for demonstration purposes.
kubectl apply -f 01.namespace.yaml
kubectl apply -f 02.deployment.yaml
kubectl apply -f 03.svc.yaml

The image above shows a hypothetical microservice running with the Dapr app-id kennethreitz-httpbin.
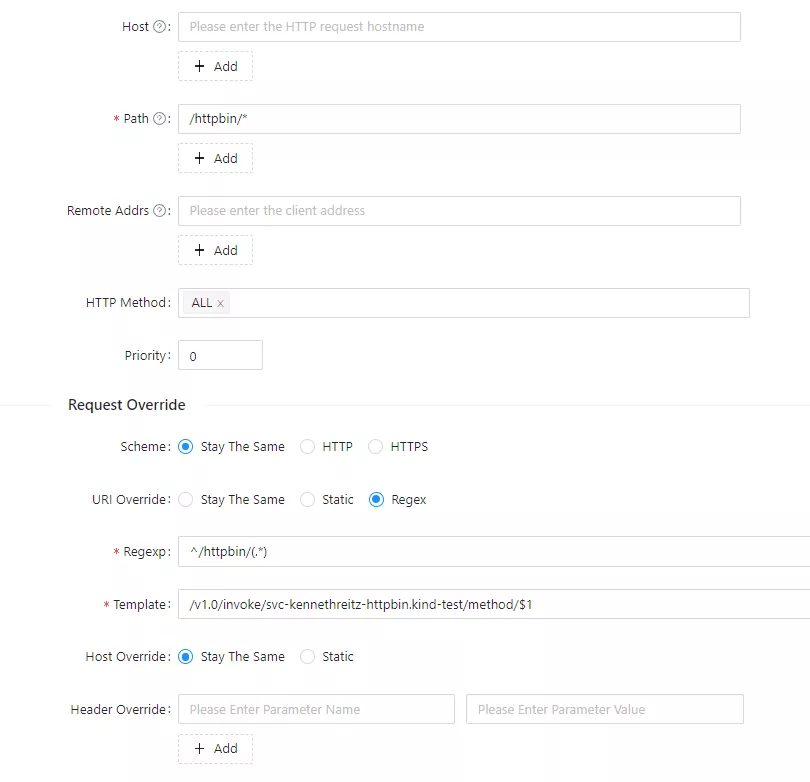
Path Matching Rewrites
Here we add some settings related to path matching. For example, if the request gateway is /httpbin/, the backend receive path should be /, with httpbin acting as a service name identifier.
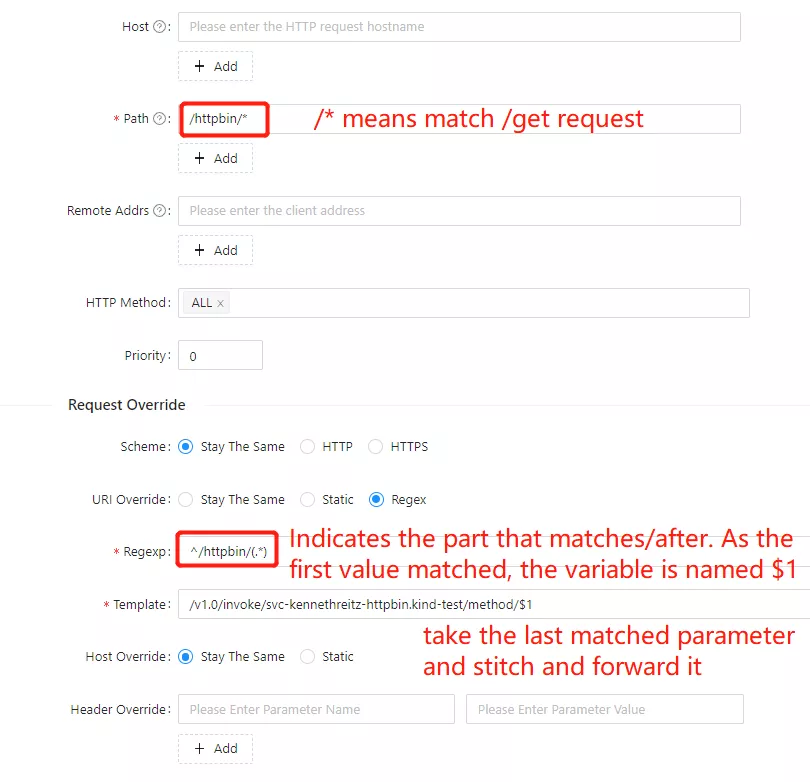

On hosted platforms that support namespaces, the Dapr application ID is in a valid FQDN format, which includes the target namespace. For example, the following string contains the application ID (svc-kennethreitz-httpbin) and the namespace the application is running in (kind-test).
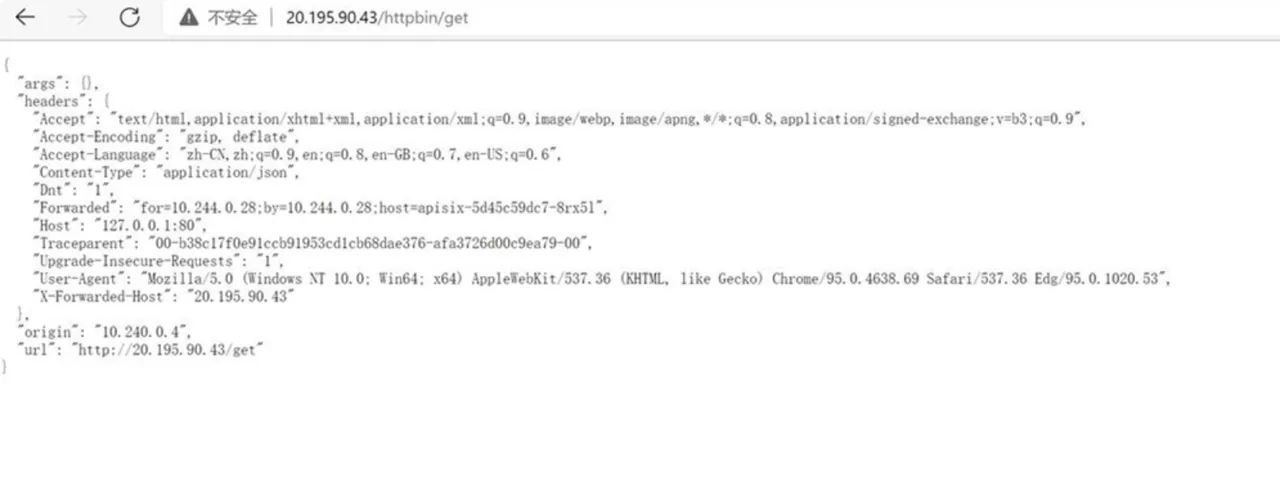
Finally, you can see if the proxy was successful by visiting: http://20.195.90.43/httpbin/get.

Additional Notes
Of course, you can also deploy Apache APISIX and APISIX Ingress Controller directly in Kubernetes using the official Apache APISIX Helm repository, which allows you to directly use Apache APISIX as a gateway to the APISIX Ingress Controller data plane to carry business traffic. This allows you to directly use Apache APISIX as a gateway to carry business traffic on the data plane of the APISIX Ingress Controller.
Finally, Dapr is injected into the Apache APISIX Proxy Pod via Sidecar annotations, and the microservices in the cluster are invoked through the service invocation module to achieve complete process deployment.
Deleting Apache APISIX Controller
If you want to delete the Apache APISIX controller at the end of the project, you can follow the command below (remember not to forget to delete the namespace ingress-apisix created before).
helm delete apisix -n ingress-apisix