openid-connect
Description#
The openid-connect Plugin supports the integration with OpenID Connect (OIDC) identity providers, such as Keycloak, Auth0, Microsoft Entra ID, Google, Okta, and more. It allows APISIX to authenticate clients and obtain their information from the identity provider before allowing or denying their access to upstream protected resources.
Attributes#
| Name | Type | Required | Default | Valid values | Description |
|---|---|---|---|---|---|
| client_id | string | True | OAuth client ID. | ||
| client_secret | string | True | OAuth client secret. | ||
| discovery | string | True | URL to the well-known discovery document of the OpenID provider, which contains a list of OP API endpoints. The Plugin can directly utilize the endpoints from the discovery document. You can also configure these endpoints individually, which takes precedence over the endpoints supplied in the discovery document. | ||
| scope | string | False | openid | OIDC scope that corresponds to information that should be returned about the authenticated user, also known as claims. This is used to authorize users with proper permission. The default value is openid, the required scope for OIDC to return a sub claim that uniquely identifies the authenticated user. Additional scopes can be appended and delimited by spaces, such as openid email profile. | |
| required_scopes | array[string] | False | Scopes required to be present in the access token. Used in conjunction with the introspection endpoint when bearer_only is true. If any required scope is missing, the Plugin rejects the request with a 403 forbidden error. | ||
| realm | string | False | apisix | Realm in WWW-Authenticate response header accompanying a 401 unauthorized request due to invalid bearer token. | |
| bearer_only | boolean | False | false | If true, strictly require bearer access token in requests for authentication. | |
| logout_path | string | False | /logout | Path to activate the logout. | |
| post_logout_redirect_uri | string | False | URL to redirect users to after the logout_path receive a request to log out. | ||
| redirect_uri | string | False | URI to redirect to after authentication with the OpenID provider. Note that the redirect URI should not be the same as the request URI, but a sub-path of the request URI. For example, if the uri of the Route is /api/v1/*, redirect_uri can be configured as /api/v1/redirect. If redirect_uri is not configured, APISIX will append /.apisix/redirect to the request URI to determine the value for redirect_uri. | ||
| timeout | integer | False | 3 | [1,...] | Request timeout time in seconds. |
| ssl_verify | boolean | False | false | If true, verify the OpenID provider 's SSL certificates. | |
| introspection_endpoint | string | False | URL of the token introspection endpoint for the OpenID provider used to introspect access tokens. If this is unset, the introspection endpoint presented in the well-known discovery document is used as a fallback. | ||
| introspection_endpoint_auth_method | string | False | client_secret_basic | Authentication method for the token introspection endpoint. The value should be one of the authentication methods specified in the introspection_endpoint_auth_methods_supported authorization server metadata as seen in the well-known discovery document, such as client_secret_basic, client_secret_post, private_key_jwt, and client_secret_jwt. | |
| token_endpoint_auth_method | string | False | client_secret_basic | Authentication method for the token endpoint. The value should be one of the authentication methods specified in the token_endpoint_auth_methods_supported authorization server metadata as seen in the well-known discovery document, such as client_secret_basic, client_secret_post, private_key_jwt, and client_secret_jwt. If the configured method is not supported, fall back to the first method in the token_endpoint_auth_methods_supported array. | |
| public_key | string | False | Public key used to verify JWT signature id asymmetric algorithm is used. Providing this value to perform token verification will skip token introspection in client credentials flow. You can pass the public key in -----BEGIN PUBLIC KEY-----\\n……\\n-----END PUBLIC KEY----- format. | ||
| use_jwks | boolean | False | false | If true and if public_key is not set, use the JWKS to verify JWT signature and skip token introspection in client credentials flow. The JWKS endpoint is parsed from the discovery document. | |
| use_pkce | boolean | False | false | If true, use the Proof Key for Code Exchange (PKCE) for Authorization Code Flow as defined in RFC 7636. | |
| token_signing_alg_values_expected | string | False | Algorithm used for signing JWT, such as RS256. | ||
| set_access_token_header | boolean | False | true | If true, set the access token in a request header. By default, the X-Access-Token header is used. | |
| access_token_in_authorization_header | boolean | False | false | If true and if set_access_token_header is also true, set the access token in the Authorization header. | |
| set_id_token_header | boolean | False | true | If true and if the ID token is available, set the value in the X-ID-Token request header. | |
| set_userinfo_header | boolean | False | true | If true and if user info data is available, set the value in the X-Userinfo request header. | |
| set_refresh_token_header | boolean | False | false | If true and if the refresh token is available, set the value in the X-Refresh-Token request header. | |
| session | object | False | Session configuration used when bearer_only is false and the Plugin uses Authorization Code flow. | ||
| session.secret | string | True | 16 or more characters | Key used for session encryption and HMAC operation when bearer_only is false. | |
| session.cookie | object | False | Cookie configurations. | ||
| session.cookie.lifetime | integer | False | 3600 | Cookie lifetime in seconds. | |
| session_contents | object | False | Session content configurations. If unconfigured, all data will be stored in the session. | ||
| session_contents.access_token | boolean | False | If true, store the access token in the session. | ||
| session_contents.id_token | boolean | False | If true, store the ID token in the session. | ||
| session_contents.enc_id_token | boolean | False | If true, store the encrypted ID token in the session. | ||
| session_contents.user | boolean | False | If true, store the user info in the session. | ||
| unauth_action | string | False | auth | ["auth","deny","pass"] | Action for unauthenticated requests. When set to auth, redirect to the authentication endpoint of the OpenID provider. When set to pass, allow the request without authentication. When set to deny, return 401 unauthenticated responses rather than start the authorization code grant flow. |
| proxy_opts | object | False | Configurations for the proxy server that the OpenID provider is behind. | ||
| proxy_opts.http_proxy | string | False | Proxy server address for HTTP requests, such as http://<proxy_host>:<proxy_port>. | ||
| proxy_opts.https_proxy | string | False | Proxy server address for HTTPS requests, such as http://<proxy_host>:<proxy_port>. | ||
| proxy_opts.http_proxy_authorization | string | False | Basic [base64 username:password] | Default Proxy-Authorization header value to be used with http_proxy. Can be overridden with custom Proxy-Authorization request header. | |
| proxy_opts.https_proxy_authorization | string | False | Basic [base64 username:password] | Default Proxy-Authorization header value to be used with https_proxy. Cannot be overridden with custom Proxy-Authorization request header since with HTTPS, the authorization is completed when connecting. | |
| proxy_opts.no_proxy | string | False | Comma separated list of hosts that should not be proxied. | ||
| authorization_params | object | False | Additional parameters to send in the request to the authorization endpoint. | ||
| client_rsa_private_key | string | False | Client RSA private key used to sign JWT for authentication to the OP. Required when token_endpoint_auth_method is private_key_jwt. | ||
| client_rsa_private_key_id | string | False | Client RSA private key ID used to compute a signed JWT. Optional when token_endpoint_auth_method is private_key_jwt. | ||
| client_jwt_assertion_expires_in | integer | False | 60 | Life duration of the signed JWT for authentication to the OP, in seconds. Used when token_endpoint_auth_method is private_key_jwt or client_secret_jwt. | |
| renew_access_token_on_expiry | boolean | False | true | If true, attempt to silently renew the access token when it expires or if a refresh token is available. If the token fails to renew, redirect user for re-authentication. | |
| access_token_expires_in | integer | False | Lifetime of the access token in seconds if no expires_in attribute is present in the token endpoint response. | ||
| refresh_session_interval | integer | False | Time interval to refresh user ID token without requiring re-authentication. When not set, it will not check the expiration time of the session issued to the client by the gateway. If set to 900, it means refreshing the user's id_token (or session in the browser) after 900 seconds without requiring re-authentication. | ||
| iat_slack | integer | False | 120 | Tolerance of clock skew in seconds with the iat claim in an ID token. | |
| accept_none_alg | boolean | False | false | Set to true if the OpenID provider does not sign its ID token, such as when the signature algorithm is set to none. | |
| accept_unsupported_alg | boolean | False | true | If true, ignore ID token signature to accept unsupported signature algorithm. | |
| access_token_expires_leeway | integer | False | 0 | Expiration leeway in seconds for access token renewal. When set to a value greater than 0, token renewal will take place the set amount of time before token expiration. This avoids errors in case the access token just expires when arriving to the resource server. | |
| force_reauthorize | boolean | False | false | If true, execute the authorization flow even when a token has been cached. | |
| use_nonce | boolean | False | false | If true, enable nonce parameter in authorization request. | |
| revoke_tokens_on_logout | boolean | False | false | If true, notify the authorization server a previously obtained refresh or access token is no longer needed at the revocation endpoint. | |
| jwk_expires_in | integer | False | 86400 | Expiration time for JWK cache in seconds. | |
| jwt_verification_cache_ignore | boolean | False | false | If true, force re-verification for a bearer token and ignore any existing cached verification results. | |
| cache_segment | string | False | Optional name of a cache segment, used to separate and differentiate caches used by token introspection or JWT verification. | ||
| introspection_interval | integer | False | 0 | TTL of the cached and introspected access token in seconds. The default value is 0, which means this option is not used and the Plugin defaults to use the TTL passed by expiry claim defined in introspection_expiry_claim. If introspection_interval is larger than 0 and less than the TTL passed by expiry claim defined in introspection_expiry_claim, use introspection_interval. | |
| introspection_expiry_claim | string | False | exp | Name of the expiry claim, which controls the TTL of the cached and introspected access token. | |
| introspection_addon_headers | array[string] | False | Used to append additional header values to the introspection HTTP request. If the specified header does not exist in origin request, value will not be appended. | ||
| claim_validator | object | False | JWT claim validation configurations. | ||
| claim_validator.issuer.valid_issuers | array[string] | False | An array of trusted JWT issuers. If unconfigured, the issuer returned by discovery endpoint will be used. If both are unavailable, the issuer will not be validated. | ||
| claim_validator.audience | object | False | Audience claim validation configurations. | ||
| claim_validator.audience.claim | string | False | aud | Name of the claim that contains the audience. | |
| claim_validator.audience.required | boolean | False | false | If true, audience claim is required and the name of the claim will be the name defined in claim. | |
| claim_validator.audience.match_with_client_id | boolean | False | false | If true, require the audience to match the client ID. If the audience is a string, it must exactly match the client ID. If the audience is an array of strings, at least one of the values must match the client ID. If no match is found, you will receive a mismatched audience error. This requirement is stated in the OpenID Connect specification to ensure that the token is intended for the specific client. | |
| claim_schema | object | False | JSON schema of OIDC response claim. Example: {"type":"object","properties":{"access_token":{"type":"string"}},"required":["access_token"]} - validates that the response contains a required string field access_token. |
NOTE: encrypt_fields = {"client_secret"} is also defined in the schema, which means that the field will be stored encrypted in etcd. See encrypted storage fields.
In addition, you can use Environment Variables or APISIX secret to store and reference plugin attributes. APISIX currently supports storing secrets in two ways - Environment Variables and HashiCorp Vault.
For example, use below command to set environment variable
export keycloak_secret=abc
and use it in plugin conf like below
"client_secret": "$ENV://keycloak_secret"
Examples#
The examples below demonstrate how you can configure the openid-connect Plugin for different scenarios.
note
You can fetch the admin_key from config.yaml and save to an environment variable with the following command:
admin_key=$(yq '.deployment.admin.admin_key[0].key' conf/config.yaml | sed 's/"//g')
Authorization Code Flow#
The authorization code flow is defined in RFC 6749, Section 4.1. It involves exchanging an temporary authorization code for an access token, and is typically used by confidential and public clients.
The following diagram illustrates the interaction between different entities when you implement the authorization code flow:
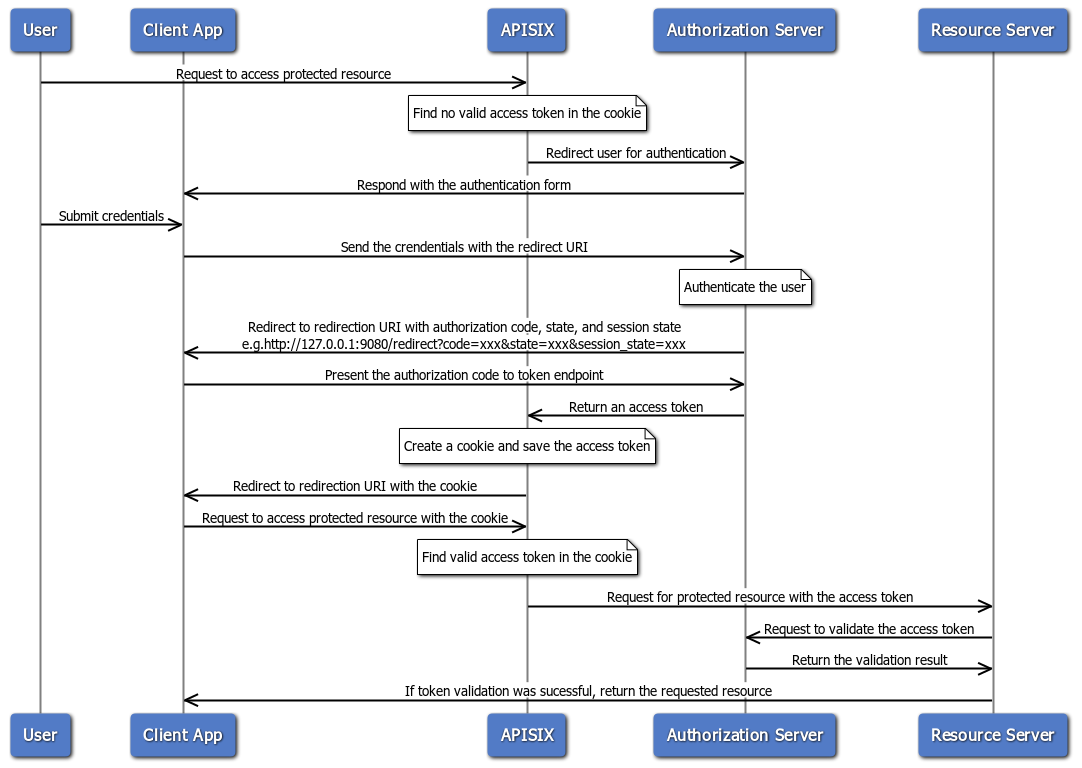
When an incoming request does not contain an access token in its header nor in an appropriate session cookie, the Plugin acts as a relying party and redirects to the authorization server to continue the authorization code flow.
After successful authentication, the Plugin keeps the token in the session cookie, and subsequent requests will use the token stored in the cookie.
See Implement Authorization Code Grant for an example to use the openid-connect Plugin to integrate with Keycloak using the authorization code flow.
Proof Key for Code Exchange (PKCE)#
The Proof Key for Code Exchange (PKCE) is defined in RFC 7636. PKCE enhances the authorization code flow by adding a code challenge and verifier to prevent authorization code interception attacks.
The following diagram illustrates the interaction between different entities when you implement the authorization code flow with PKCE:
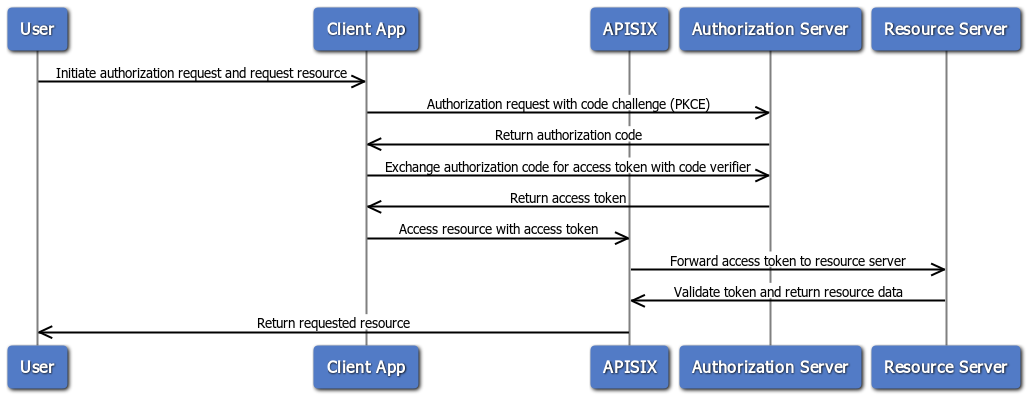
See Implement Authorization Code Grant for an example to use the openid-connect Plugin to integrate with Keycloak using the authorization code flow with PKCE.
Client Credential Flow#
The client credential flow is defined in RFC 6749, Section 4.4. It involves clients requesting an access token with its own credentials to access protected resources, typically used in machine to machine authentication and is not on behalf of a specific user.
The following diagram illustrates the interaction between different entities when you implement the client credential flow:
See Implement Client Credentials Grant for an example to use the openid-connect Plugin to integrate with Keycloak using the client credentials flow.
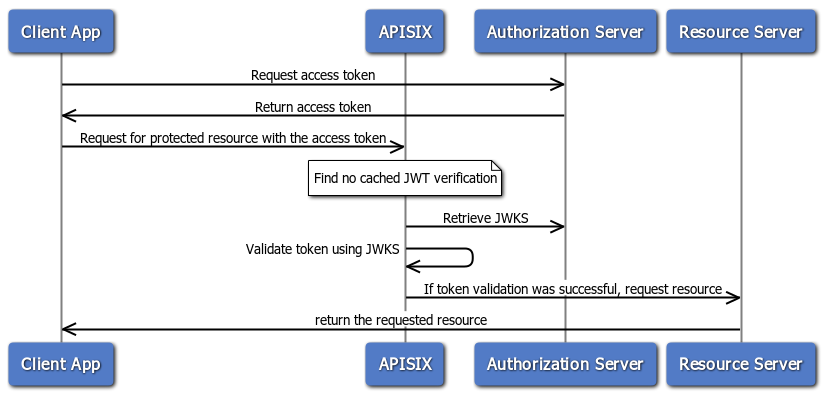
Introspection Flow#
The introspection flow is defined in RFC 7662. It involves verifying the validity and details of an access token by querying an authorization server’s introspection endpoint.
In this flow, when a client presents an access token to the resource server, the resource server sends a request to the authorization server’s introspection endpoint, which responds with token details if the token is active, including information like token expiration, associated scopes, and the user or client it belongs to.
The following diagram illustrates the interaction between different entities when you implement the authorization code flow with token introspection:
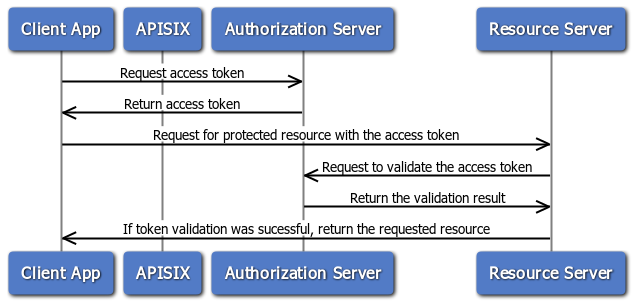
See Implement Client Credentials Grant for an example to use the openid-connect Plugin to integrate with Keycloak using the client credentials flow with token introspection.
Password Flow#
The password flow is defined in RFC 6749, Section 4.3. It is designed for trusted applications, allowing them to obtain an access token directly using a user’s username and password. In this grant type, the client app sends the user’s credentials along with its own client ID and secret to the authorization server, which then authenticates the user and, if valid, issues an access token.
Though efficient, this flow is intended for highly trusted, first-party applications only, as it requires the app to handle sensitive user credentials directly, posing significant security risks if used in third-party contexts.
The following diagram illustrates the interaction between different entities when you implement the password flow:
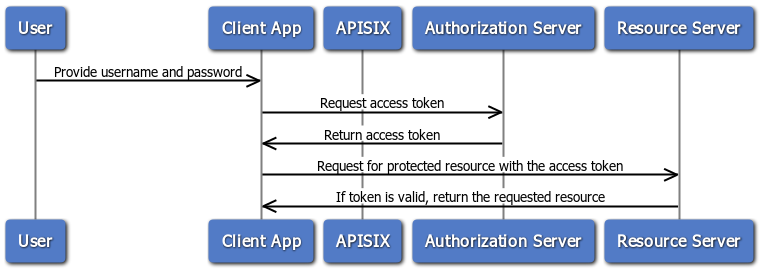
See Implement Password Grant for an example to use the openid-connect Plugin to integrate with Keycloak using the password flow.
Refresh Token Grant#
The refresh token grant is defined in RFC 6749, Section 6. It enables clients to request a new access token without requiring the user to re-authenticate, using a previously issued refresh token. This flow is typically used when an access token expires, allowing the client to maintain continuous access to resources without user intervention. Refresh tokens are issued along with access tokens in certain OAuth flows and their lifespan and security requirements depend on the authorization server’s configuration.
The following diagram illustrates the interaction between different entities when implementing password flow with refresh token flow:

See Refresh Token for an example to use the openid-connect Plugin to integrate with Keycloak using the password flow with token refreshes.
Troubleshooting#
This section covers a few commonly seen issues when working with this Plugin to help you troubleshoot.
APISIX Cannot Connect to OpenID provider#
If APISIX fails to resolve or cannot connect to the OpenID provider, double check the DNS settings in your configuration file config.yaml and modify as needed.
No Session State Found#
If you encounter a 500 internal server error with the following message in the log when working with authorization code flow, there could be a number of reasons.
the error request to the redirect_uri path, but there's no session state found
1. Misconfigured Redirection URI#
A common misconfiguration is to configure the redirect_uri the same as the URI of the route. When a user initiates a request to visit the protected resource, the request directly hits the redirection URI with no session cookie in the request, which leads to the no session state found error.
To properly configure the redirection URI, make sure that the redirect_uri matches the Route where the Plugin is configured, without being fully identical. For instance, a correct configuration would be to configure uri of the Route to /api/v1/* and the path portion of the redirect_uri to /api/v1/redirect.
You should also ensure that the redirect_uri include the scheme, such as http or https.
2. Cookie Not Sent or Absent#
Check if the SameSite cookie attribute is properly set (i.e. if your application needs to send the cookie cross sites) to see if this could be a factor that prevents the cookie being saved to the browser's cookie jar or being sent from the browser.
3. Upstream Sent Too Big Header#
If you have NGINX sitting in front of APISIX to proxy client traffic, see if you observe the following error in NGINX's error.log:
upstream sent too big header while reading response header from upstream
If so, try adjusting proxy_buffers, proxy_buffer_size, and proxy_busy_buffers_size to larger values.
Another option is to configure the session_content attribute to adjust which data to store in session. For instance, you can set session_content.access_token to true.
4. Invalid Client Secret#
Verify if client_secret is valid and correct. An invalid client_secret would lead to an authentication failure and no token shall be returned and stored in session.
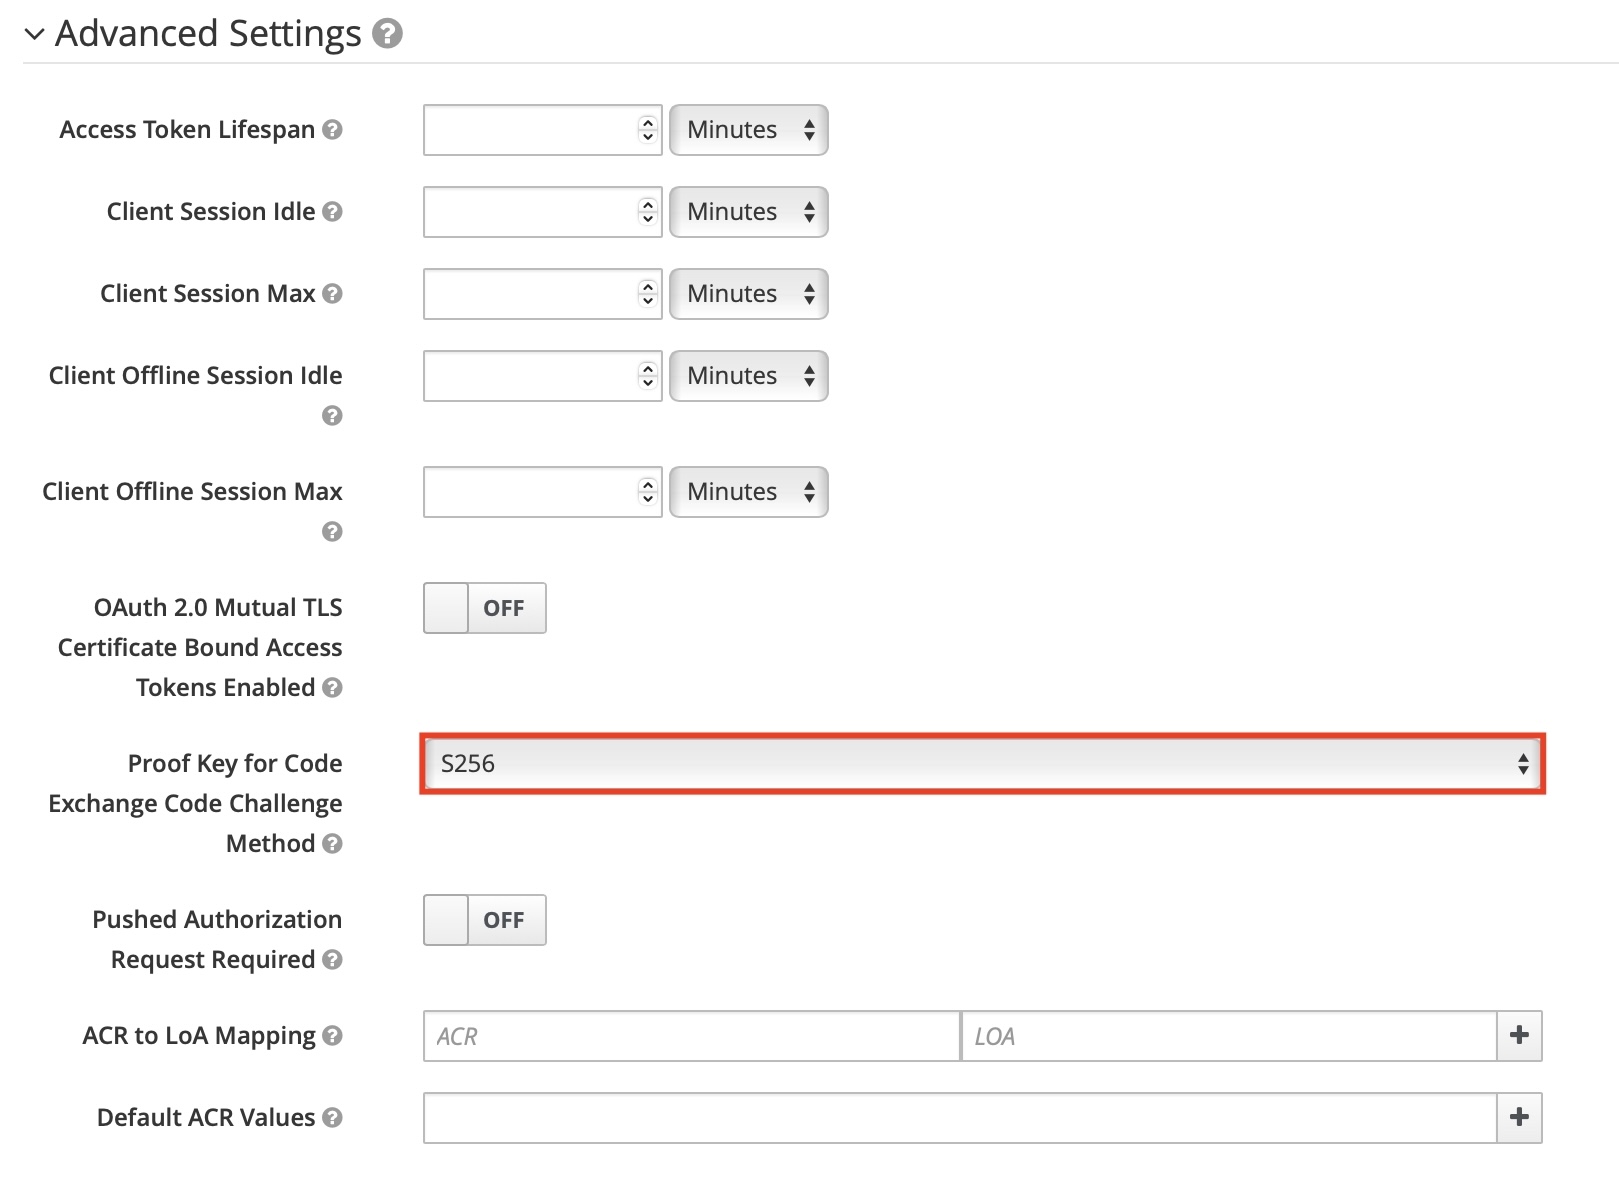
5. PKCE IdP Configuration#
If you are enabling PKCE with the authorization code flow, make sure you have configured the IdP client to use PKCE. For example, in Keycloak, you should configure the PKCE challenge method in the client's advanced settings: