Keycloak Authorization (authz-keycloak)
Description#
The authz-keycloak Plugin integrates with Keycloak to authenticate and authorize users. See Keycloak's Authorization Services Guide for more information about the configuration options available in this Plugin.
While the Plugin was developed for Keycloak, it could theoretically be used with other OAuth/OIDC and UMA-compliant identity providers.
Attributes#
| Name | Type | Required | Default | Valid values | Description |
|---|---|---|---|---|---|
| discovery | string | False | https://host.domain/realms/foo/.well-known/uma2-configuration | URL to discovery document of Keycloak Authorization Services. | |
| token_endpoint | string | False | https://host.domain/realms/foo/protocol/openid-connect/token | An OAuth2-compliant token endpoint that supports the urn:ietf:params:oauth:grant-type:uma-ticket grant type. If provided, overrides the value from discovery. | |
| resource_registration_endpoint | string | False | https://host.domain/realms/foo/authz/protection/resource_set | A UMA-compliant resource registration endpoint. If provided, overrides the value from discovery. | |
| client_id | string | True | The identifier of the resource server to which the client is seeking access. | ||
| client_secret | string | False | The client secret, if required. You can use APISIX Secret to store and reference this value. APISIX currently supports storing secrets in two ways: Environment Variables and HashiCorp Vault. | ||
| grant_type | string | False | "urn:ietf:params:oauth:grant-type:uma-ticket" | ["urn:ietf:params:oauth:grant-type:uma-ticket"] | |
| policy_enforcement_mode | string | False | "ENFORCING" | ["ENFORCING", "PERMISSIVE"] | |
| permissions | array[string] | False | An array of strings, each representing a set of one or more resources and scopes the client is seeking access. | ||
| lazy_load_paths | boolean | False | false | When set to true, dynamically resolves the request URI to resource(s) using the resource registration endpoint instead of the static permission. | |
| http_method_as_scope | boolean | False | false | When set to true, maps the HTTP request type to scope of the same name and adds to all requested permissions. | |
| timeout | integer | False | 3000 | [1000, ...] | Timeout in ms for the HTTP connection with the Identity Server. |
| access_token_expires_in | integer | False | 300 | [1, ...] | Expiration time(s) of the access token. |
| access_token_expires_leeway | integer | False | 0 | [0, ...] | Expiration leeway(s) for access_token renewal. When set, the token will be renewed access_token_expires_leeway seconds before expiration. This avoids errors in cases where the access_token just expires when reaching the OAuth Resource Server. |
| refresh_token_expires_in | integer | False | 3600 | [1, ...] | The expiration time(s) of the refresh token. |
| refresh_token_expires_leeway | integer | False | 0 | [0, ...] | Expiration leeway(s) for refresh_token renewal. When set, the token will be renewed refresh_token_expires_leeway seconds before expiration. This avoids errors in cases where the refresh_token just expires when reaching the OAuth Resource Server. |
| ssl_verify | boolean | False | true | When set to true, verifies if TLS certificate matches hostname. | |
| cache_ttl_seconds | integer | False | 86400 (equivalent to 24h) | positive integer >= 1 | Maximum time in seconds up to which the Plugin caches discovery documents and tokens used by the Plugin to authenticate to Keycloak. |
| keepalive | boolean | False | true | When set to true, enables HTTP keep-alive to keep connections open after use. Set to true if you are expecting a lot of requests to Keycloak. | |
| keepalive_timeout | integer | False | 60000 | positive integer >= 1000 | Idle time after which the established HTTP connections will be closed. |
| keepalive_pool | integer | False | 5 | positive integer >= 1 | Maximum number of connections in the connection pool. |
| access_denied_redirect_uri | string | False | [1, 2048] | URI to redirect the user to instead of returning an error message like "error_description":"not_authorized". | |
| password_grant_token_generation_incoming_uri | string | False | /api/token | Set this to generate token using the password grant type. The Plugin will compare incoming request URI to this value. |
NOTE: encrypt_fields = {"client_secret"} is also defined in the schema, which means that the field will be stored encrypted in etcd. See encrypted storage fields.
Discovery and Endpoints#
It is recommended to use the discovery attribute as the authz-keycloak Plugin can discover the Keycloak API endpoints from it.
If set, the token_endpoint and resource_registration_endpoint will override the values obtained from the discovery document.
Client ID and Secret#
The Plugin needs the client_id attribute for identification and to specify the context in which to evaluate permissions when interacting with Keycloak.
If the lazy_load_paths attribute is set to true, then the Plugin additionally needs to obtain an access token for itself from Keycloak. In such cases, if the client access to Keycloak is confidential, you need to configure the client_secret attribute.
Policy Enforcement Mode#
The policy_enforcement_mode attribute specifies how policies are enforced when processing authorization requests sent to the server.
ENFORCING Mode#
Requests are denied by default even when there is no policy associated with a resource.
The policy_enforcement_mode is set to ENFORCING by default.
PERMISSIVE Mode#
Requests are allowed when there is no policy associated with a given resource.
Permissions#
When handling incoming requests, the Plugin can determine the permissions to check with Keycloak statically or dynamically from the properties of the request.
If the lazy_load_paths attribute is set to false, the permissions are taken from the permissions attribute. Each entry in permissions needs to be formatted as expected by the token endpoint's permission parameter. See Obtaining Permissions.
note
A valid permission can be a single resource or a resource paired with one or more scopes.
If the lazy_load_paths attribute is set to true, the request URI is resolved to one or more resources configured in Keycloak using the resource registration endpoint. The resolved resources are used as the permissions to check.
note
This requires the Plugin to obtain a separate access token for itself from the token endpoint. So, make sure to set the Service Accounts Enabled option in the client settings in Keycloak.
Also make sure that the issued access token contains the resource_access claim with the uma_protection role to ensure that the Plugin is able to query resources through the Protection API.
Automatically Mapping HTTP Method to Scope#
The http_method_as_scope is often used together with lazy_load_paths but can also be used with a static permission list.
If the http_method_as_scope attribute is set to true, the Plugin maps the request's HTTP method to the scope with the same name. The scope is then added to every permission to check.
If the lazy_load_paths attribute is set to false, the Plugin adds the mapped scope to any of the static permissions configured in the permissions attribute—even if they contain one or more scopes already.
Generating a Token Using password Grant#
To generate a token using password grant, you can set the value of the password_grant_token_generation_incoming_uri attribute.
If the incoming URI matches the configured attribute and the request method is POST, a token is generated using the token_endpoint.
You also need to add application/x-www-form-urlencoded as Content-Type header and username and password as parameters.
Examples#
The examples below demonstrate how you can configure authz-keycloak for different scenarios.
To follow along, complete the preliminary setups for Keycloak.
note
You can fetch the admin_key from conf/config.yaml and save to an environment variable with the following command:
admin_key=$(yq '.deployment.admin.admin_key[0].key' conf/config.yaml | sed 's/"//g')
Set Up Keycloak#
Start Keycloak#
- Docker
- Kubernetes
Start a Keycloak instance named apisix-quickstart-keycloak with the administrator name quickstart-admin and password quickstart-admin-pass in development mode:
docker run -d --name "apisix-quickstart-keycloak" \
  -e 'KEYCLOAK_ADMIN=quickstart-admin' \
  -e 'KEYCLOAK_ADMIN_PASSWORD=quickstart-admin-pass' \
  -p 8080:8080 \
  quay.io/keycloak/keycloak:18.0.2 start-dev
Deploy Keycloak to Kubernetes:
apiVersion: apps/v1
kind: Deployment
metadata:
  namespace: aic
  name: keycloak
spec:
  replicas: 1
  selector:
    matchLabels:
      app: keycloak
  template:
    metadata:
      labels:
        app: keycloak
    spec:
      containers:
        - name: keycloak
          image: quay.io/keycloak/keycloak:18.0.2
          args:
            - start-dev
          env:
            - name: KEYCLOAK_ADMIN
              value: quickstart-admin
            - name: KEYCLOAK_ADMIN_PASSWORD
              value: quickstart-admin-pass
          ports:
            - containerPort: 8080
---
apiVersion: v1
kind: Service
metadata:
  namespace: aic
  name: keycloak
spec:
  selector:
    app: keycloak
  ports:
    - port: 8080
      targetPort: 8080
Apply the manifest:
kubectl apply -f keycloak.yaml
If you would like to open the Keycloak console locally, port-forward the Service:
kubectl port-forward -n aic svc/keycloak 8080:8080
Save Keycloak URL#
Save the Keycloak URL to an environment variable to be referenced in future configuration:
- Docker
- Kubernetes
KEYCLOAK_URL=http://192.168.42.145:8080 # replace with your Keycloak URL
KEYCLOAK_URL=http://keycloak.aic.svc.cluster.local:8080
Create a Realm, Client, and Authorization Objects#
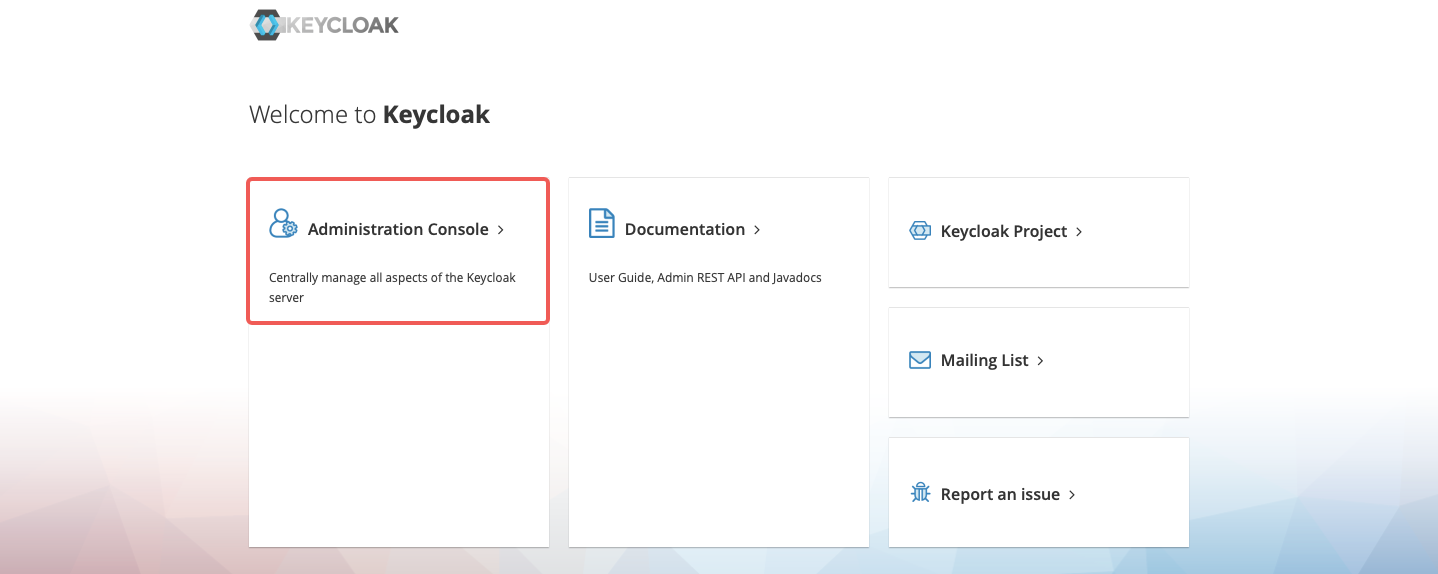
Navigate to http://localhost:8080 and click Administration Console:
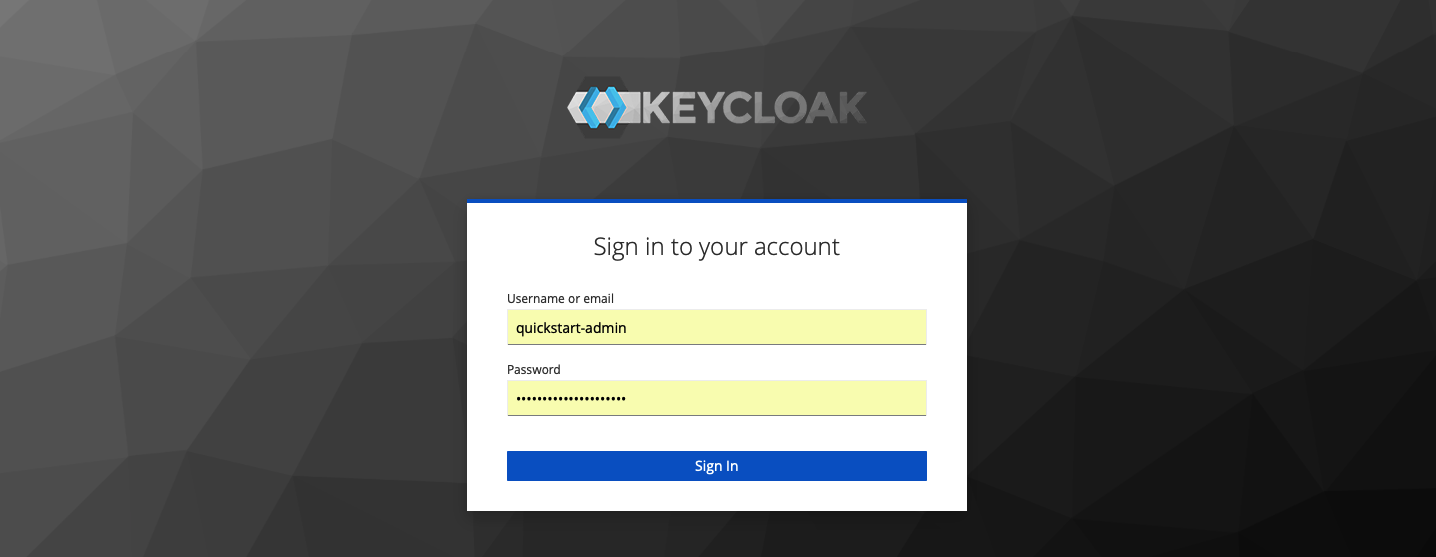
Sign in with the administrator username quickstart-admin and password quickstart-admin-pass:
Create a realm named quickstart-realm:

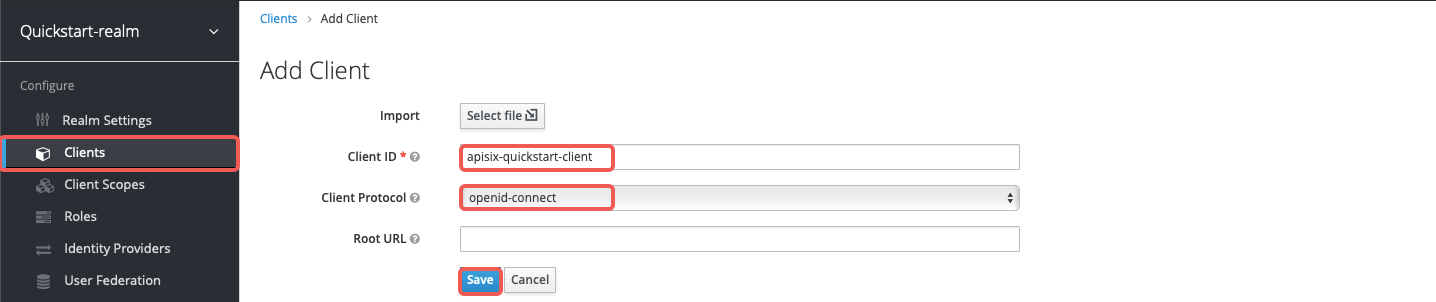
Create a client named apisix-quickstart-client:
On the client settings page, select confidential as the access type:

Enable authorization for the client and save the configuration. This should also enable the client service account and assign the uma_protection role automatically:

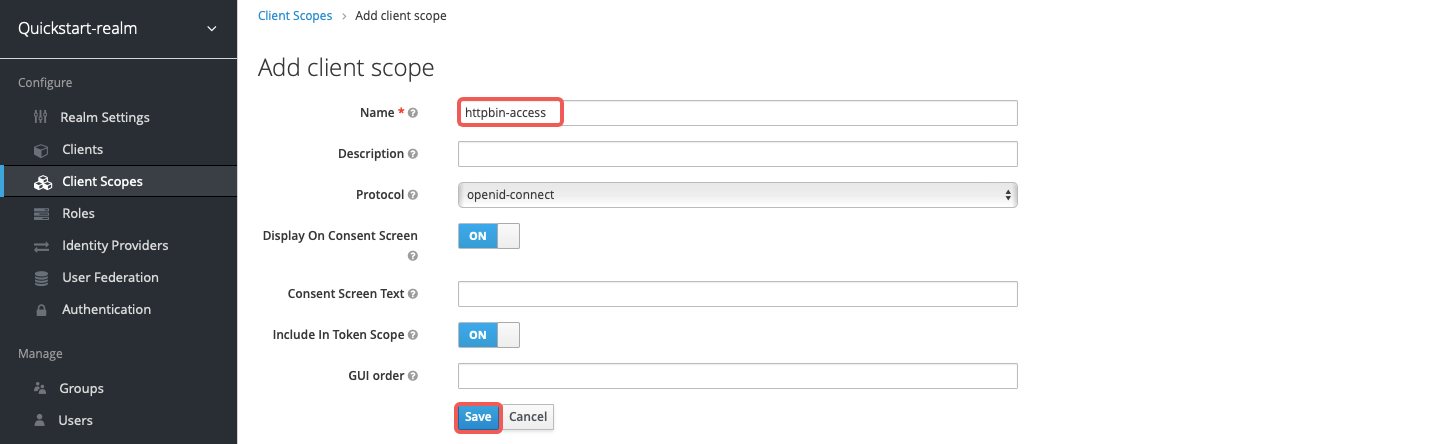
Create a client scope named httpbin-access:
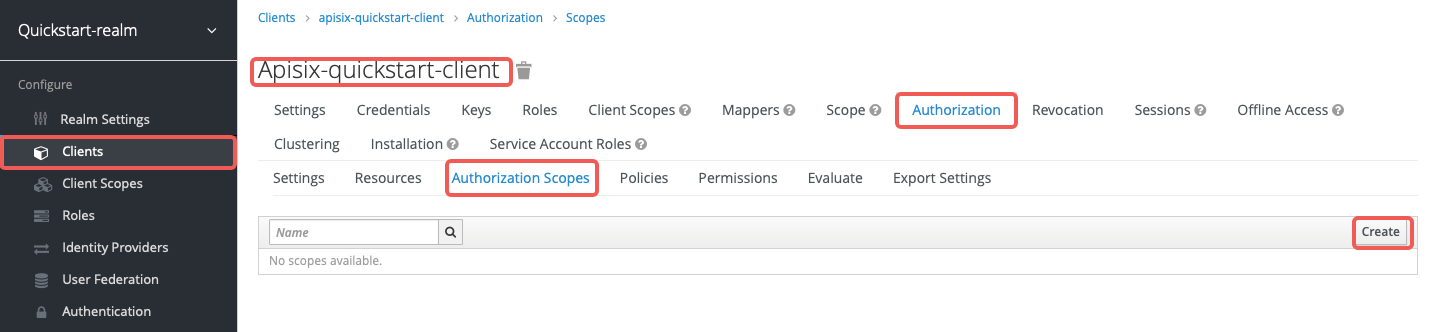
In the client's Authorization section, create the authorization scope access:
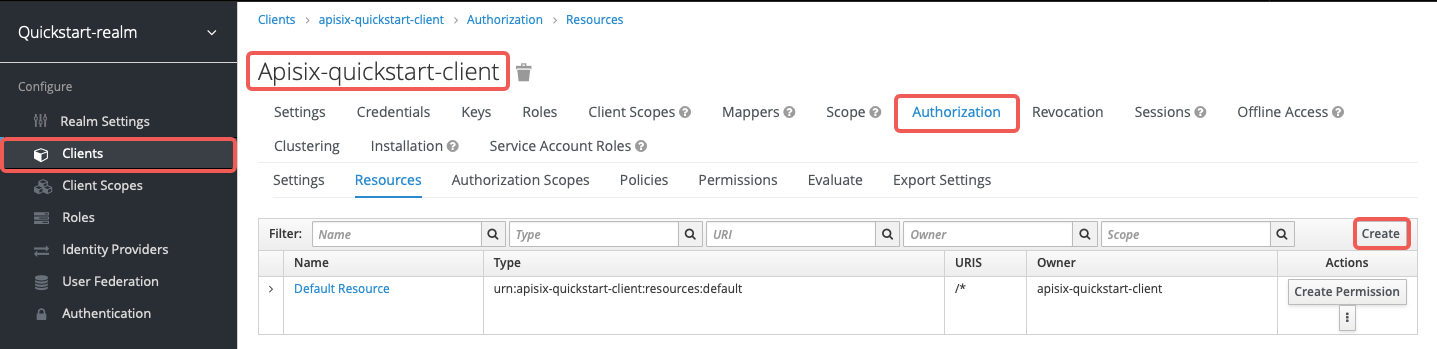
Create the resource httpbin-anything with URI /anything and scope access:
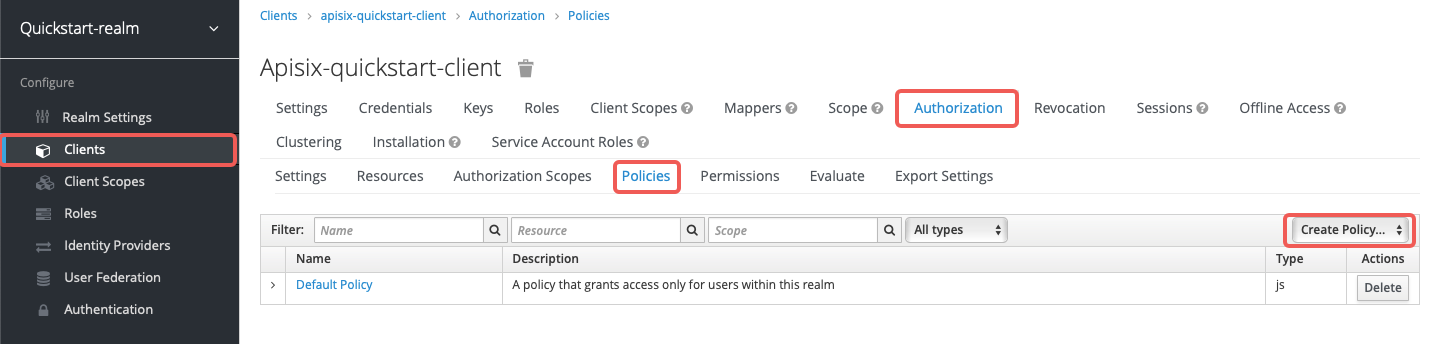
Create the client scope policy access-client-scope-policy that requires httpbin-access:
Create the scope-based permission access-scope-perm that uses the access scope and access-client-scope-policy:

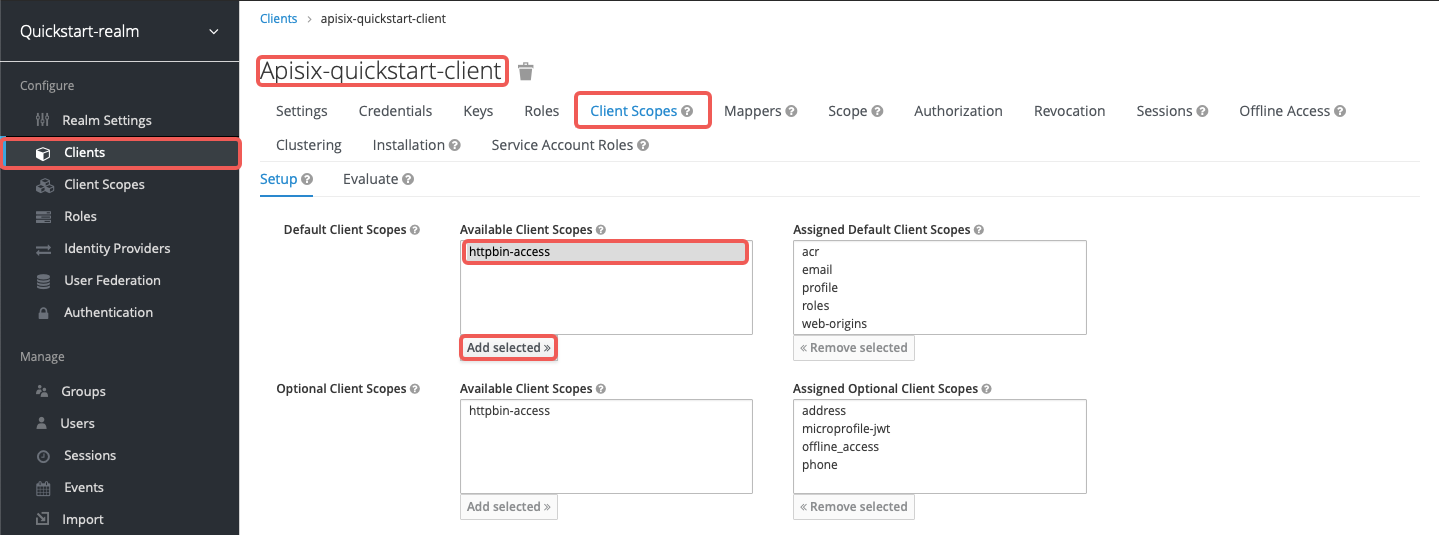
Add httpbin-access to the default client scopes of apisix-quickstart-client:
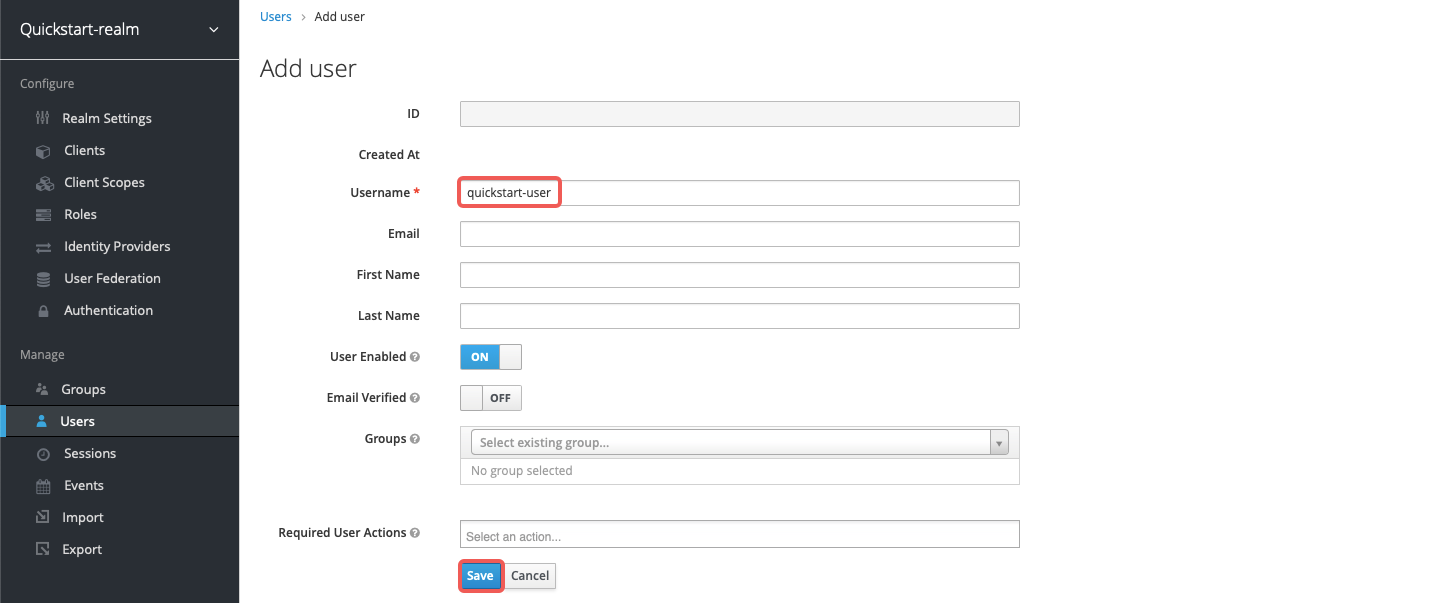
Create a user named quickstart-user:
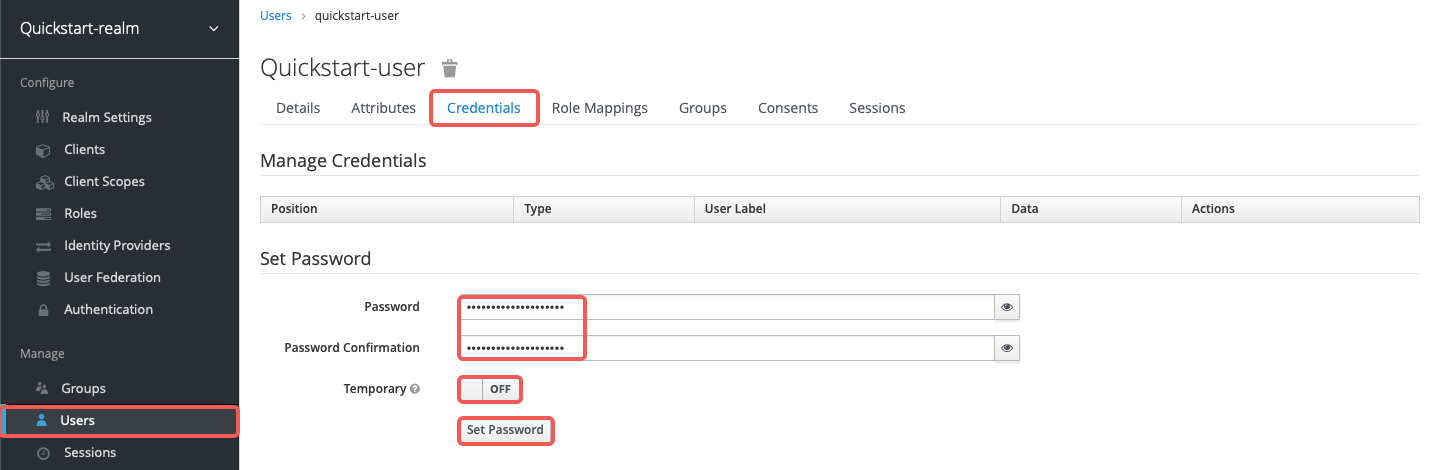
Set the password to quickstart-user-pass and turn off Temporary:
Save the client secret from Clients > apisix-quickstart-client > Credentials:
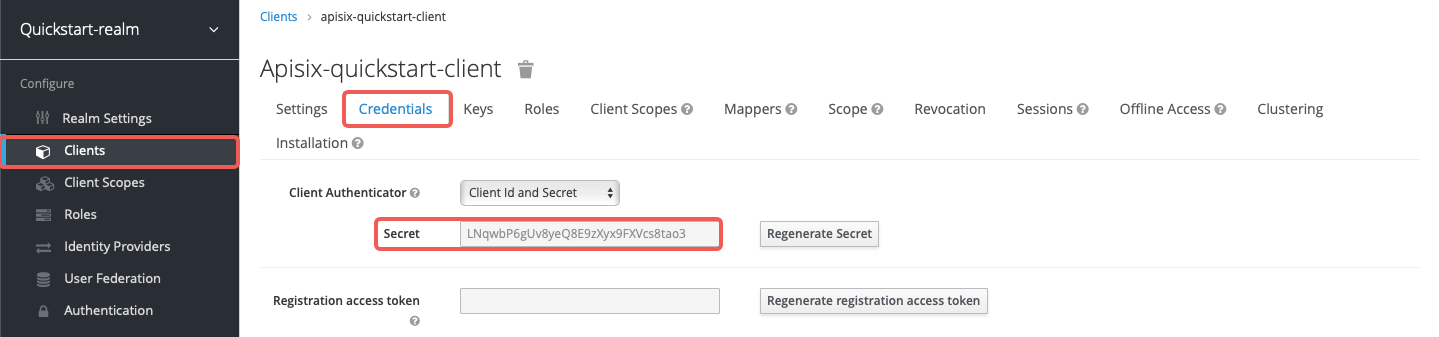
Save the OIDC client ID and secret to environment variables:
OIDC_CLIENT_ID=apisix-quickstart-client
OIDC_CLIENT_SECRET=bSaIN3MV1YynmtXvU8lKkfeY0iwpr9cH  # replace with your value
tip
If APISIX runs in Kubernetes, use the same Keycloak hostname consistently in both the Plugin configuration and the token request. Otherwise, Keycloak may reject the bearer token because the token issuer does not match the configured authorization endpoints.
Request Access Token#
Request an access token from Keycloak and save it to ACCESS_TOKEN:
- Docker
- Kubernetes
ACCESS_TOKEN=$(curl -sS "$KEYCLOAK_URL/realms/quickstart-realm/protocol/openid-connect/token" \
  -d 'grant_type=client_credentials' \
  -d 'client_id='$OIDC_CLIENT_ID'' \
  -d 'client_secret='$OIDC_CLIENT_SECRET'' | jq -r '.access_token')
Run the token request inside the Keycloak pod and save the result to ACCESS_TOKEN:
ACCESS_TOKEN=$(kubectl exec -n aic deploy/keycloak -- env OIDC_CLIENT_SECRET="$OIDC_CLIENT_SECRET" sh -lc 'curl -sS "http://keycloak.aic.svc.cluster.local:8080/realms/quickstart-realm/protocol/openid-connect/token" \
  -d grant_type=client_credentials \
  -d client_id=apisix-quickstart-client \
  -d client_secret="$OIDC_CLIENT_SECRET"' | jq -r '.access_token')
Use Lazy Load Path and Resource Registration Endpoint#
The examples below demonstrate how you can configure authz-keycloak to dynamically resolve the request URI to one or more resources using the resource registration endpoint instead of static permissions.
- Admin API
- ADC
- Ingress Controller
Create a Route with authz-keycloak-route as follows:
curl "http://127.0.0.1:9180/apisix/admin/routes" -X PUT \
  -H "X-API-KEY: ${admin_key}" \
  -d '{
    "id": "authz-keycloak-route",
    "uri": "/anything",
    "plugins": {
      "authz-keycloak": {
        "lazy_load_paths": true,
        "resource_registration_endpoint": "'"$KEYCLOAK_URL"'/realms/quickstart-realm/authz/protection/resource_set",
        "discovery": "'"$KEYCLOAK_URL"'/realms/quickstart-realm/.well-known/uma2-configuration",
        "client_id": "'"$OIDC_CLIENT_ID"'",
        "client_secret": "'"$OIDC_CLIENT_SECRET"'"
      }
    },
    "upstream": {
      "type": "roundrobin",
      "nodes": {
        "httpbin.org:80": 1
      }
    }
  }'
Create a Route with authz-keycloak configured in ADC:
services:
  - name: authz-keycloak-service
    routes:
      - name: authz-keycloak-route
        uris:
          - /anything
        plugins:
          authz-keycloak:
            lazy_load_paths: true
            resource_registration_endpoint: ${KEYCLOAK_URL}/realms/quickstart-realm/authz/protection/resource_set
            discovery: ${KEYCLOAK_URL}/realms/quickstart-realm/.well-known/uma2-configuration
            client_id: ${OIDC_CLIENT_ID}
            client_secret: ${OIDC_CLIENT_SECRET}
    upstream:
      type: roundrobin
      nodes:
        - host: httpbin.org
          port: 80
          weight: 1
Synchronize the configuration to the gateway:
adc sync -f adc.yaml
Configure authz-keycloak on the Route:
- Gateway API
- APISIX CRD
apiVersion: v1
kind: Service
metadata:
  namespace: aic
  name: httpbin-external-domain
spec:
  type: ExternalName
  externalName: httpbin.org
---
apiVersion: apisix.apache.org/v1alpha1
kind: PluginConfig
metadata:
  namespace: aic
  name: authz-keycloak-plugin-config
spec:
  plugins:
    - name: authz-keycloak
      config:
        lazy_load_paths: true
        resource_registration_endpoint: http://keycloak.aic.svc.cluster.local:8080/realms/quickstart-realm/authz/protection/resource_set
        discovery: http://keycloak.aic.svc.cluster.local:8080/realms/quickstart-realm/.well-known/uma2-configuration
        client_id: apisix-quickstart-client
        client_secret: replace-with-your-client-secret
---
apiVersion: gateway.networking.k8s.io/v1
kind: HTTPRoute
metadata:
  namespace: aic
  name: authz-keycloak-route
spec:
  parentRefs:
    - name: apisix
  rules:
    - matches:
        - path:
            type: Exact
            value: /anything
      filters:
        - type: ExtensionRef
          extensionRef:
            group: apisix.apache.org
            kind: PluginConfig
            name: authz-keycloak-plugin-config
      backendRefs:
        - name: httpbin-external-domain
          port: 80
Apply the configuration to your cluster:
kubectl apply -f authz-keycloak-ic.yaml
apiVersion: apisix.apache.org/v2
kind: ApisixUpstream
metadata:
  namespace: aic
  name: httpbin-external-domain
spec:
  ingressClassName: apisix
  externalNodes:
    - type: Domain
      name: httpbin.org
---
apiVersion: apisix.apache.org/v2
kind: ApisixPluginConfig
metadata:
  namespace: aic
  name: authz-keycloak-plugin-config
spec:
  ingressClassName: apisix
  plugins:
    - name: authz-keycloak
      enable: true
      config:
        lazy_load_paths: true
        resource_registration_endpoint: http://keycloak.aic.svc.cluster.local:8080/realms/quickstart-realm/authz/protection/resource_set
        discovery: http://keycloak.aic.svc.cluster.local:8080/realms/quickstart-realm/.well-known/uma2-configuration
        client_id: apisix-quickstart-client
        client_secret: replace-with-your-client-secret
---
apiVersion: apisix.apache.org/v2
kind: ApisixRoute
metadata:
  namespace: aic
  name: authz-keycloak-route
spec:
  ingressClassName: apisix
  http:
    - name: authz-keycloak-route
      match:
        paths:
          - /anything
        methods:
          - GET
      upstreams:
        - name: httpbin-external-domain
      plugin_config_name: authz-keycloak-plugin-config
Apply the configuration to your cluster:
kubectl apply -f authz-keycloak-ic.yaml
Send a request to the Route:
curl "http://127.0.0.1:9080/anything" -H "Authorization: Bearer $ACCESS_TOKEN"
You should see an HTTP/1.1 200 OK response similar to the following:
{
  "args": {},
  "data": "",
  "files": {},
  "form": {},
  "headers": {
    "Accept": "*/*",
    "Authorization": "Bearer eyJhbGciOiJSU..."
  },
  "json": null,
  "method": "GET",
  "url": "http://127.0.0.1/anything"
}
Use Static Permissions#
The examples below demonstrate how you can configure authz-keycloak to use the static permission httpbin-anything#access.
- Admin API
- ADC
- Ingress Controller
Create a Route with authz-keycloak-route as follows:
curl "http://127.0.0.1:9180/apisix/admin/routes" -X PUT \
  -H "X-API-KEY: ${admin_key}" \
  -d '{
    "id": "authz-keycloak-route",
    "uri": "/anything",
    "plugins": {
      "authz-keycloak": {
        "lazy_load_paths": false,
        "discovery": "'"$KEYCLOAK_URL"'/realms/quickstart-realm/.well-known/uma2-configuration",
        "permissions": ["httpbin-anything#access"],
        "client_id": "'"$OIDC_CLIENT_ID"'"
      }
    },
    "upstream": {
      "type": "roundrobin",
      "nodes": {
        "httpbin.org:80": 1
      }
    }
  }'
Create a Route with authz-keycloak configured in ADC:
services:
  - name: authz-keycloak-service
    routes:
      - name: authz-keycloak-route
        uris:
          - /anything
        plugins:
          authz-keycloak:
            lazy_load_paths: false
            discovery: ${KEYCLOAK_URL}/realms/quickstart-realm/.well-known/uma2-configuration
            permissions:
              - "httpbin-anything#access"
            client_id: ${OIDC_CLIENT_ID}
    upstream:
      type: roundrobin
      nodes:
        - host: httpbin.org
          port: 80
          weight: 1
Synchronize the configuration to the gateway:
adc sync -f adc.yaml
Configure authz-keycloak on the Route:
- Gateway API
- APISIX CRD
apiVersion: v1
kind: Service
metadata:
  namespace: aic
  name: httpbin-external-domain
spec:
  type: ExternalName
  externalName: httpbin.org
---
apiVersion: apisix.apache.org/v1alpha1
kind: PluginConfig
metadata:
  namespace: aic
  name: authz-keycloak-plugin-config
spec:
  plugins:
    - name: authz-keycloak
      config:
        lazy_load_paths: false
        discovery: http://keycloak.aic.svc.cluster.local:8080/realms/quickstart-realm/.well-known/uma2-configuration
        permissions:
          - "httpbin-anything#access"
        client_id: apisix-quickstart-client
---
apiVersion: gateway.networking.k8s.io/v1
kind: HTTPRoute
metadata:
  namespace: aic
  name: authz-keycloak-route
spec:
  parentRefs:
    - name: apisix
  rules:
    - matches:
        - path:
            type: Exact
            value: /anything
      filters:
        - type: ExtensionRef
          extensionRef:
            group: apisix.apache.org
            kind: PluginConfig
            name: authz-keycloak-plugin-config
      backendRefs:
        - name: httpbin-external-domain
          port: 80
Apply the configuration to your cluster:
kubectl apply -f authz-keycloak-ic.yaml
apiVersion: apisix.apache.org/v2
kind: ApisixUpstream
metadata:
  namespace: aic
  name: httpbin-external-domain
spec:
  ingressClassName: apisix
  externalNodes:
    - type: Domain
      name: httpbin.org
---
apiVersion: apisix.apache.org/v2
kind: ApisixPluginConfig
metadata:
  namespace: aic
  name: authz-keycloak-plugin-config
spec:
  ingressClassName: apisix
  plugins:
    - name: authz-keycloak
      enable: true
      config:
        lazy_load_paths: false
        discovery: http://keycloak.aic.svc.cluster.local:8080/realms/quickstart-realm/.well-known/uma2-configuration
        permissions:
          - "httpbin-anything#access"
        client_id: apisix-quickstart-client
---
apiVersion: apisix.apache.org/v2
kind: ApisixRoute
metadata:
  namespace: aic
  name: authz-keycloak-route
spec:
  ingressClassName: apisix
  http:
    - name: authz-keycloak-route
      match:
        paths:
          - /anything
        methods:
          - GET
      upstreams:
        - name: httpbin-external-domain
      plugin_config_name: authz-keycloak-plugin-config
Apply the configuration to your cluster:
kubectl apply -f authz-keycloak-ic.yaml
Send a request to the Route:
curl "http://127.0.0.1:9080/anything" -H "Authorization: Bearer $ACCESS_TOKEN"
You should see an HTTP/1.1 200 OK response.
If you remove the client scope httpbin-access from apisix-quickstart-client, you should receive a 401 Unauthorized response when requesting the resource.
Generate Token with Password Grant at Custom Token Endpoint#
The examples below demonstrate how you can configure authz-keycloak to request a token with the password grant at a custom endpoint.
- Admin API
- ADC
- Ingress Controller
Create a Route with authz-keycloak-route as follows:
curl "http://127.0.0.1:9180/apisix/admin/routes" -X PUT \
  -H "X-API-KEY: ${admin_key}" \
  -d '{
    "id": "authz-keycloak-route",
    "uri": "/api/*",
    "plugins": {
      "authz-keycloak": {
        "lazy_load_paths": true,
        "resource_registration_endpoint": "'"$KEYCLOAK_URL"'/realms/quickstart-realm/authz/protection/resource_set",
        "client_id": "'"$OIDC_CLIENT_ID"'",
        "client_secret": "'"$OIDC_CLIENT_SECRET"'",
        "token_endpoint": "'"$KEYCLOAK_URL"'/realms/quickstart-realm/protocol/openid-connect/token",
        "password_grant_token_generation_incoming_uri": "/api/token"
      }
    },
    "upstream": {
      "type": "roundrobin",
      "nodes": {
        "httpbin.org:80": 1
      }
    }
  }'
Create a Route with authz-keycloak configured in ADC:
services:
  - name: authz-keycloak-service
    routes:
      - name: authz-keycloak-route
        uris:
          - /api/*
        plugins:
          authz-keycloak:
            lazy_load_paths: true
            resource_registration_endpoint: ${KEYCLOAK_URL}/realms/quickstart-realm/authz/protection/resource_set
            client_id: ${OIDC_CLIENT_ID}
            client_secret: ${OIDC_CLIENT_SECRET}
            token_endpoint: ${KEYCLOAK_URL}/realms/quickstart-realm/protocol/openid-connect/token
            password_grant_token_generation_incoming_uri: /api/token
    upstream:
      type: roundrobin
      nodes:
        - host: httpbin.org
          port: 80
          weight: 1
Synchronize the configuration to the gateway:
adc sync -f adc.yaml
Configure authz-keycloak on the Route:
- Gateway API
- APISIX CRD
apiVersion: v1
kind: Service
metadata:
  namespace: aic
  name: httpbin-external-domain
spec:
  type: ExternalName
  externalName: httpbin.org
---
apiVersion: apisix.apache.org/v1alpha1
kind: PluginConfig
metadata:
  namespace: aic
  name: authz-keycloak-plugin-config
spec:
  plugins:
    - name: authz-keycloak
      config:
        lazy_load_paths: true
        resource_registration_endpoint: http://keycloak.aic.svc.cluster.local:8080/realms/quickstart-realm/authz/protection/resource_set
        client_id: apisix-quickstart-client
        client_secret: replace-with-your-client-secret
        token_endpoint: http://keycloak.aic.svc.cluster.local:8080/realms/quickstart-realm/protocol/openid-connect/token
        password_grant_token_generation_incoming_uri: /api/token
---
apiVersion: gateway.networking.k8s.io/v1
kind: HTTPRoute
metadata:
  namespace: aic
  name: authz-keycloak-route
spec:
  parentRefs:
    - name: apisix
  rules:
    - matches:
        - path:
            type: PathPrefix
            value: /api/
      filters:
        - type: ExtensionRef
          extensionRef:
            group: apisix.apache.org
            kind: PluginConfig
            name: authz-keycloak-plugin-config
      backendRefs:
        - name: httpbin-external-domain
          port: 80
Apply the configuration to your cluster:
kubectl apply -f authz-keycloak-ic.yaml
apiVersion: apisix.apache.org/v2
kind: ApisixUpstream
metadata:
  namespace: aic
  name: httpbin-external-domain
spec:
  ingressClassName: apisix
  externalNodes:
    - type: Domain
      name: httpbin.org
---
apiVersion: apisix.apache.org/v2
kind: ApisixPluginConfig
metadata:
  namespace: aic
  name: authz-keycloak-plugin-config
spec:
  ingressClassName: apisix
  plugins:
    - name: authz-keycloak
      enable: true
      config:
        lazy_load_paths: true
        resource_registration_endpoint: http://keycloak.aic.svc.cluster.local:8080/realms/quickstart-realm/authz/protection/resource_set
        client_id: apisix-quickstart-client
        client_secret: replace-with-your-client-secret
        token_endpoint: http://keycloak.aic.svc.cluster.local:8080/realms/quickstart-realm/protocol/openid-connect/token
        password_grant_token_generation_incoming_uri: /api/token
---
apiVersion: apisix.apache.org/v2
kind: ApisixRoute
metadata:
  namespace: aic
  name: authz-keycloak-route
spec:
  ingressClassName: apisix
  http:
    - name: authz-keycloak-route
      match:
        paths:
          - /api/*
        methods:
          - GET
          - POST
      upstreams:
        - name: httpbin-external-domain
      plugin_config_name: authz-keycloak-plugin-config
Apply the configuration to your cluster:
kubectl apply -f authz-keycloak-ic.yaml
Send a request to the configured token endpoint. The request should use the POST method and application/x-www-form-urlencoded as the Content-Type:
OIDC_USER=quickstart-user
OIDC_PASSWORD=quickstart-user-pass

curl "http://127.0.0.1:9080/api/token" -X POST \
  -H "Content-Type: application/x-www-form-urlencoded" \
  -H "Accept: application/json" \
  -d 'username='$OIDC_USER'' \
  -d 'password='$OIDC_PASSWORD''
You should see a JSON response with an access token similar to the following:
{
  "access_token": "eyJhbGciOiJSUzI1NiIsInR5cCIgOiAiSldUIi...",
  "expires_in": 300,
  "refresh_expires_in": 1800,
  "token_type": "Bearer",
  "scope": "profile email httpbin-access"
}