Use APISIX and Authing to implement authentication
On this page
- Introduction
- About Apache APISIX
- About Authing
- What is Centralized Authentication
- Traditional Authentication Mode
- Centralized Identity Authentication Mode
- Advantages of Centralized Identity Authentication Mode
- How to implement Centralized Identity Authentication using Apache APISIX and Authing
- Step 1: Configure Authing
- Step 2: Install Apache APISIX
- Step 3: Start Apache APISIX and configure route
- Step 4: Access Apache APISIX
- Summary
This article shows the details of centralized authentication and how to use Authing in Apache APISIX.
Introduction
About Apache APISIX
Apache APISIX is a dynamic, real-time, high-performance API gateway that provides rich traffic management features such as load balancing, dynamic upstream, canary release, service meltdown, authentication, observability, etc. Apache APISIX not only supports dynamic plug-in changes and hot-plugging, but also has a number of useful plug-ins.OpenID Connect Plug-in for Apache APISIX With support for the OpenID Connect protocol, users can use this plug-in to enable Apache APISIX to interface with Authing services and be deployed as a centralized authentication gateway in the enterprise.
About Authing
Authing is the first developer-centered full-scene identity cloud product in China, integrating all mainstream identity protocols and providing complete and secure user authentication and access management services for enterprises and developers. With “API First” as the cornerstone of the product, all common functions in the identity field are modularly encapsulated, and all capabilities are APIed to developers through a full-scene programming language SDK. At the same time, users can flexibly use Authing’s open RESTful APIs for functional expansion to meet the identity management needs of different enterprises in different business scenarios.
What is Centralized Authentication
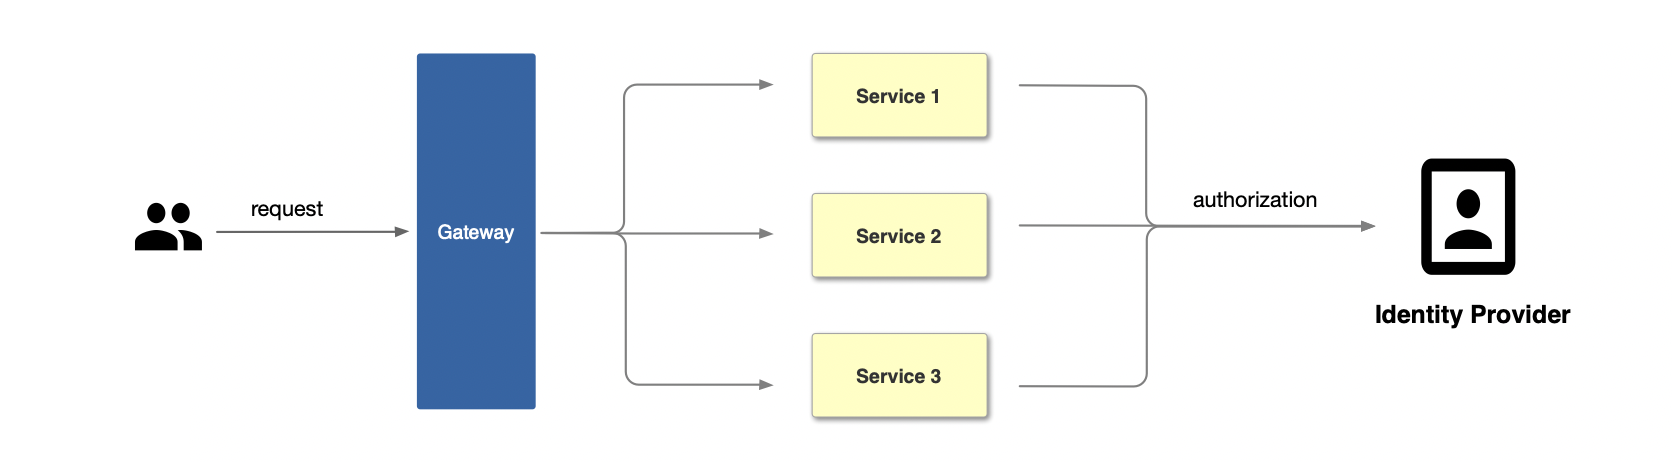
Traditional Authentication Mode
In the traditional authentication mode, each back-end application service needs to develop separate functions to support the authentication function, such as interacting with the identity provider and obtaining the user’s identity information.
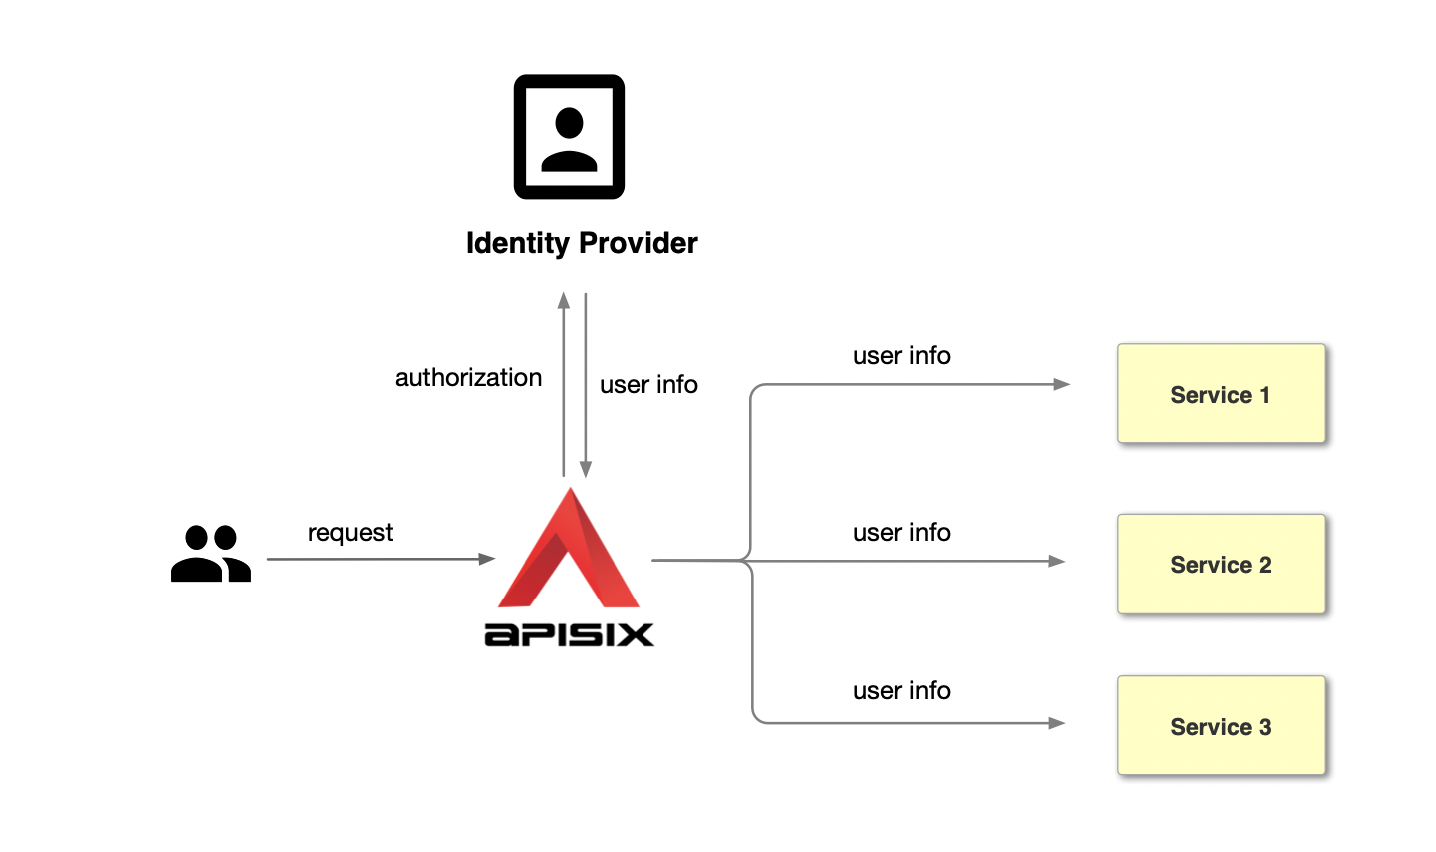
Centralized Identity Authentication Mode
Unlike the traditional authentication mode, the centralized authentication mode takes the user authentication out of the application service. Take Apache APISIX as an example, the process of centralized authentication is shown in the figure above: first, the user initiates a request, and then the front gateway is responsible for the user authentication process, interfacing with the identity provider and sending an authorization request to the identity provider. The identity provider returns the user information. After the gateway completes user identification, it forwards the user identity information to the back-end application in the form of a request header.
Advantages of Centralized Identity Authentication Mode
Compared with the traditional authentication mode, the centralized authentication mode has the following advantages.
- Simplify the application development process, reduce the development of application workload and maintenance costs, and avoid repeated development of authentication logic for each application.
- Improve business security, centralized authentication mode at the gateway level can intercept unauthenticated requests in time to protect back-end applications.
At the same time, combined with Authing’s powerful authentication management functions, the following functions can be achieved.
- Lifecycle management of authentication services through the console, including creation, enablement, disablement, etc.
- Real-time, visual application monitoring, including: the number of interface requests, interface call latency and interface error information, and real-time alarm notification.
- Centralized logging to easily view user login, logout, and information about adjustments and modifications to the application.
More details can be found in Authing Access Gateway.
How to implement Centralized Identity Authentication using Apache APISIX and Authing
Step 1: Configure Authing
-
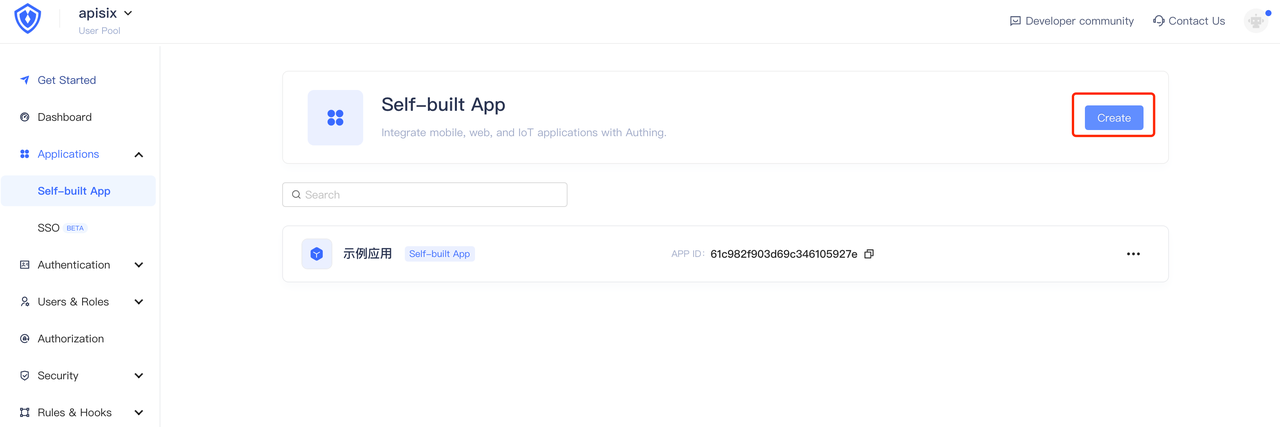
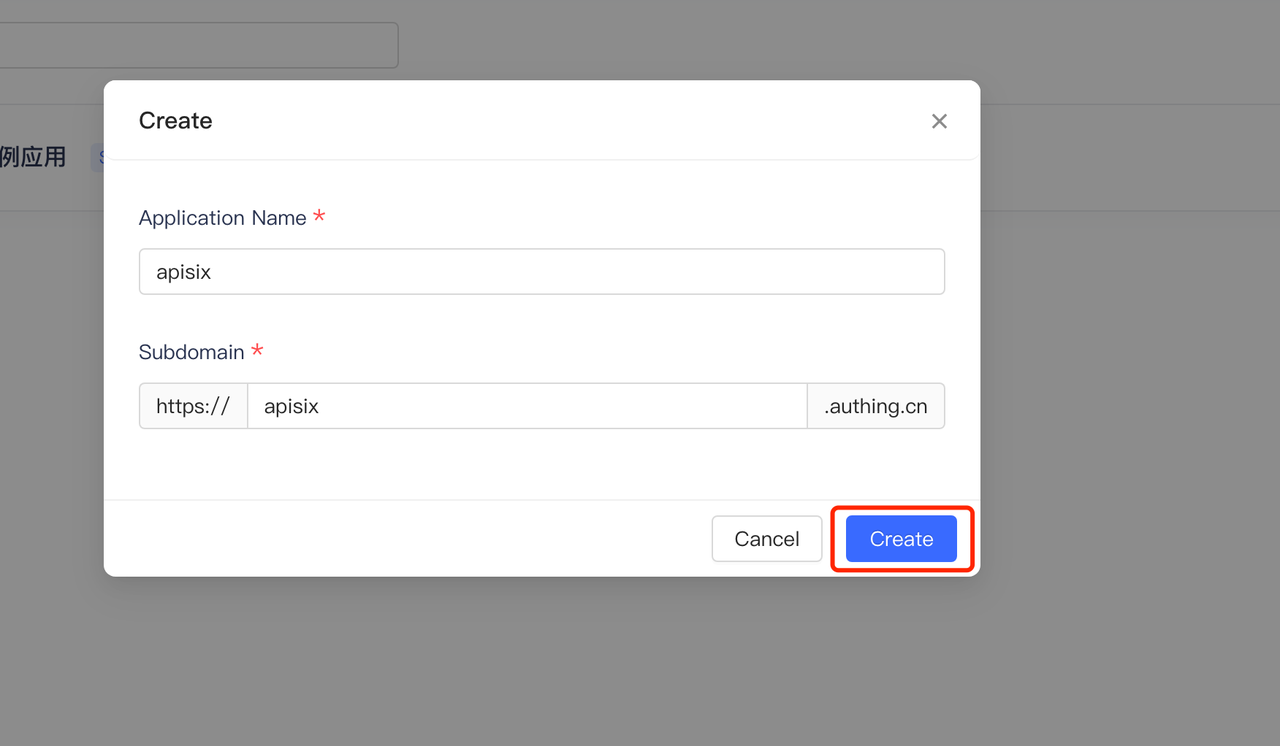
Login to your Authing account, select Build your own app and fill in the app name and authentication address. If you do not have an Authing account, please visit Authing, click on “Login/Register” in the upper right corner to register an Authing account.
-
Click Create to create an Authing application.
-
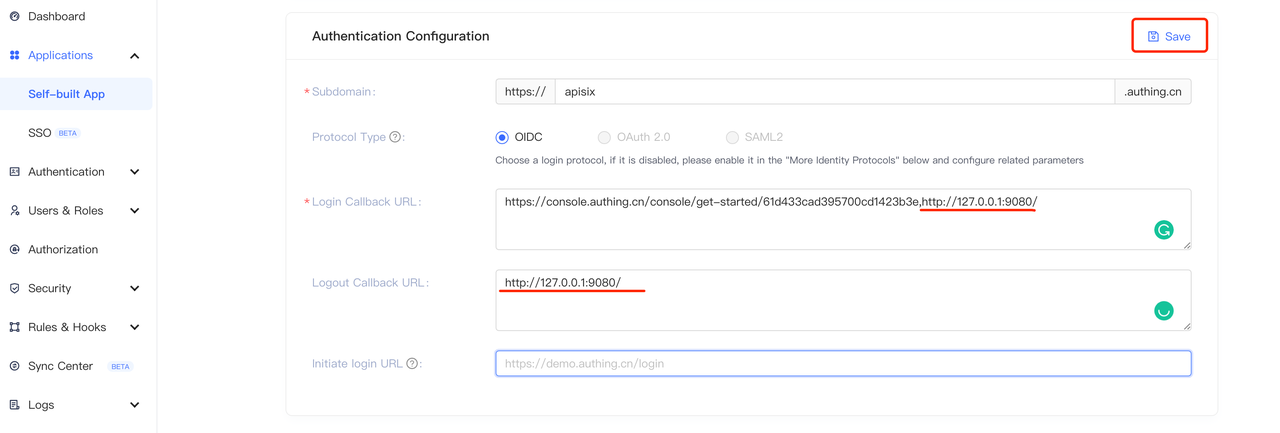
During the authentication process, Authing will reject callback URLs other than the configured ones. Since this is a local test, the login callback URL and the logout callback URL are both set to the APISIX access address http://127.0.0.1:9080/.
-
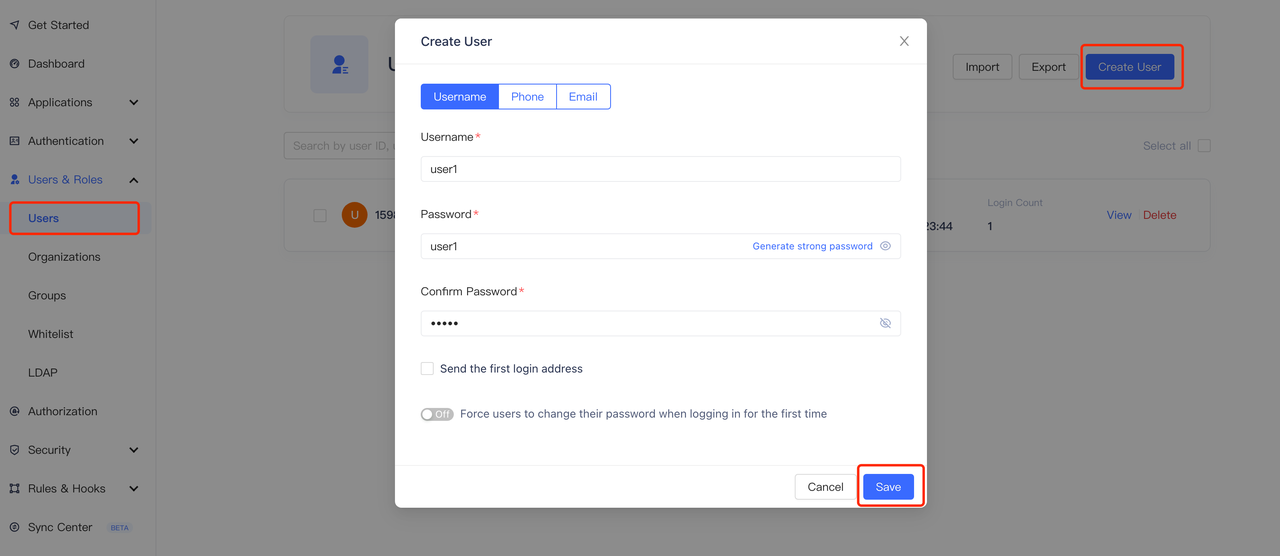
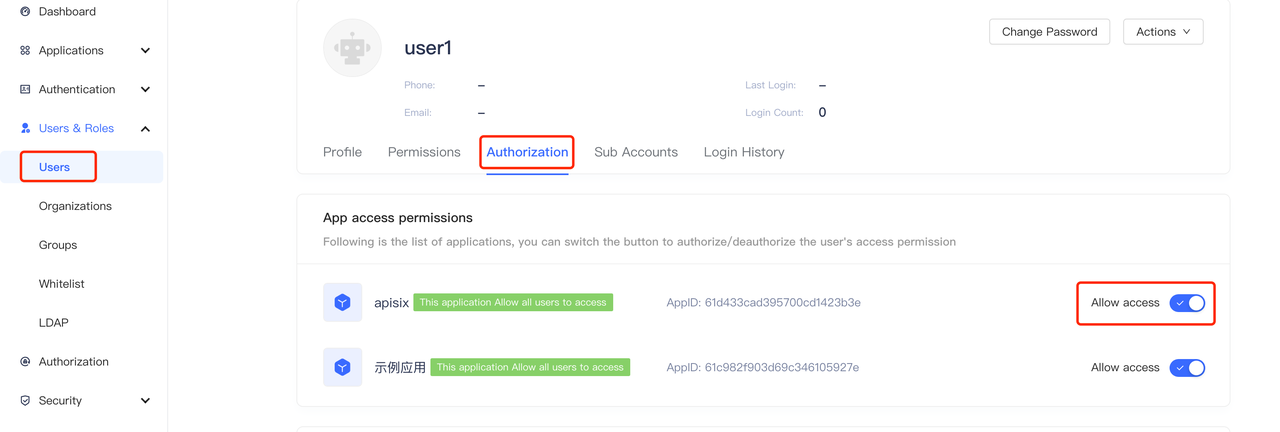
Create user (optional). On the user list page, create a user with the account password user1/user1, and you can set whether to allow access to the application in the “User Information - Authorization Management” page (the default is to allow).
-
Visit the application page for the following configuration, which is required when configuring Apache APISIX OpenID Connect.
- App ID: OAuth client ID, i.e. the ID of the application, corresponding to
client_idand{YOUR_CLIENT_ID}below. - App secret: OAuth client secret, i.e. the application key. Corresponds to
client_secretand{YOUR_CLIENT_SECRET}below. - Service_discovery_address: The address of the application service discovery. Corresponds to
{YOUR_DISCOVERY}below.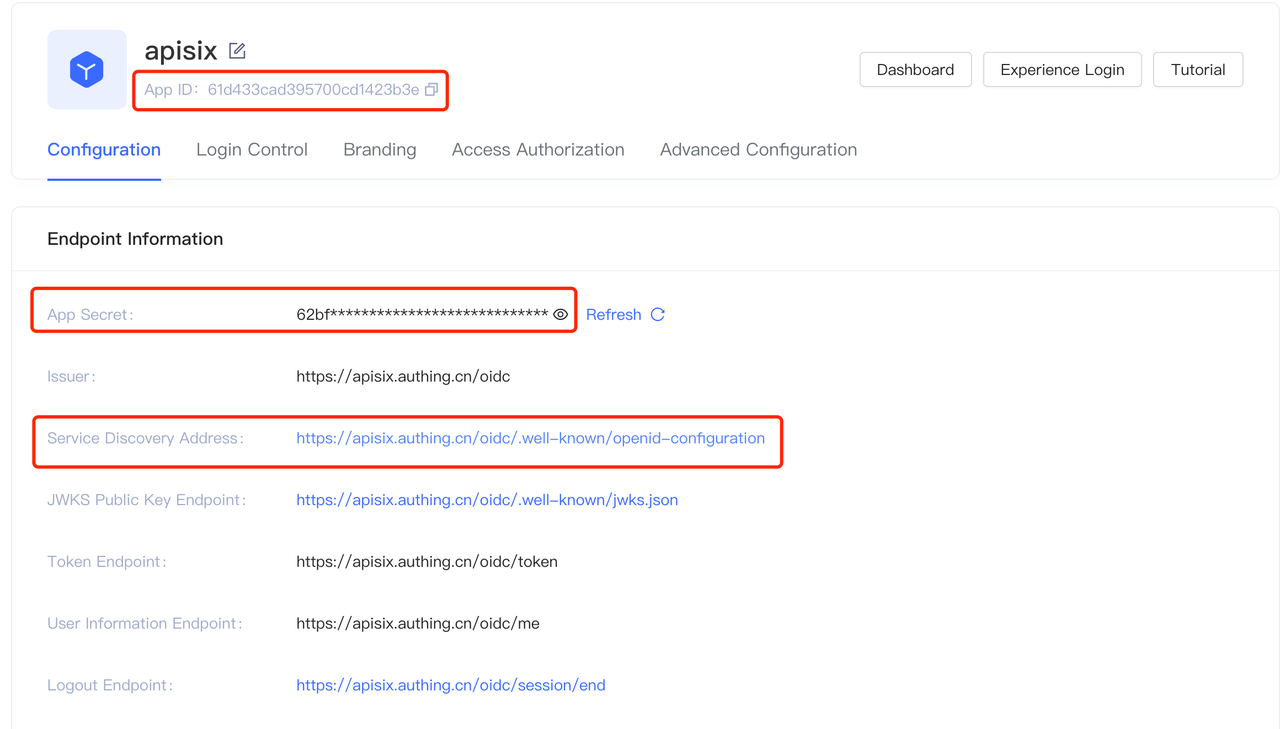
- App ID: OAuth client ID, i.e. the ID of the application, corresponding to
Step 2: Install Apache APISIX
You can install Apache APISIX in a variety of ways including source packages, Docker, Helm Chart, etc.
Install dependencies
The Apache APISIX runtime environment requires dependencies on NGINX and etcd.
Before installing Apache APISIX, please install dependencies according to the operating system you are using. We provide the dependencies installation instructions for CentOS7, Fedora 31 and 32, Ubuntu 16.04 and 18.04, Debian 9 and 10, and macOS. Please refer to Install Dependencies for more details.
Installation via RPM Package (CentOS 7)
This installation method is suitable for CentOS 7; please run the following command to install Apache APISIX.
sudo yum install -y https://github.com/apache/apisix/releases/download/2.7/apisix-2.7-0.x86_64.rpmInstallation via Docker
Please refer to Installing Apache APISIX with Docker.
Installation via Helm Chart
Please refer to Installing Apache APISIX with Helm Chart.
Installation via source release
- Create a directory named
apisix-2.7.
mkdir apisix-2.7- Download Apache APISIX Release source package.
wget https://downloads.apache.org/apisix/2.7/apache-apisix-2.7-src.tgzYou can also download the Apache APISIX release source package from the Apache APISIX website. The Apache APISIX Official Website - Download Page also provides source packages for Apache APISIX, APISIX Dashboard, and APISIX Ingress Controller.
- Unzip the Apache APISIX Release source package.
tar zxvf apache-apisix-2.7-src.tgz -C apisix-2.7- Install the runtime-dependent Lua libraries.
# Switch to the apisix-2.7 directory
cd apisix-2.7
# Create dependencies
make deps
Initializing Dependencies
Run the following command to initialize the NGINX configuration file and etcd.
# initialize NGINX config file and etcd
make init
Step 3: Start Apache APISIX and configure route
-
Run the following command to start Apache APISIX.
apisix start -
Create routes and configure the OpenID Connect plug-in. the OpenID Connect configuration list is as follows.
| Field | Default Value | Description |
|---|---|---|
| client_id | N/A | OAuth client ID |
| client_secret | N/A | OAuth client secret key |
| discovery | N/A | Service discovery endpoints for identity providers |
| scope | openid | Need to access resource scope |
| relm | apisix | Specify the WWW-Authenticate response header authentication information |
| bearer_only | false | Whether to check the token in the request header |
| logout_path | /logout | Logout URI |
| redirect_uri | request_uri | The URI that the identity provider bounces back to, defaulting to the request address |
| timeout | 3 | Request timeout time in seconds |
| ssl_verify | false | Whether the identity provider’s checksum ssl certificate |
| introspection_endpoint | N/A | The URL of the identity provider’s token authentication endpoint, which will be extracted from the discovery response if left blank. |
| introspection_endpoint_auth_method | client_secret_basic | Name of the authentication method for token introspection |
| public_key | N/A | Public key for authentication token |
| token_signing_alg_values_expected | N/A | Algorithm for authentication tokens |
| set_access_token_header | true | Whether to carry the access token in the request header |
| access_token_in_authorization_header | false | The access token is placed in the Authorization header when true, and in the X-Access-Token header when false. |
| set_id_token_header | false | No to carry the ID token to the X-ID-Token request header |
| set_userinfo_header | false | Whether to carry user information in the X-Userinfo request header |
The following code example creates a route through the Apache APISIX Admin API, setting the route upstream to httpbin.org. httpbin.org is a simple backend service for receiving and responding to requests, the get page of httpbin.org will be used below, refer to http bin get.
For specific configuration items, please refer to Apache APISIX OpenID Connect Plugin.
curl  -XPOST 127.0.0.1:9080/apisix/admin/routes -H "X-Api-Key: edd1c9f034335f136f87ad84b625c8f1" -d '{
    "uri":"/*",
    "plugins":{
        "openid-connect":{
            "client_id":"{YOUR_CLIENT_ID}",
            "client_secret":"{YOUR_CLIENT_SECRET}",
            "discovery":"https://{YOUR_DISCOVERY}",
            "scope":"openid profile",
            "bearer_only":false,
            "realm":"apisix",
            "introspection_endpoint_auth_method":"client_secret_post",
            "redirect_uri":"http://127.0.0.1:9080/"
        }
    },
    "upstream":{
        "type":"roundrobin",
        "nodes":{
            "httpbin.org:80":1
        }
    }
}'
Step 4: Access Apache APISIX
-
Visit “http://127.0.0.1:9080/get” and the page is redirected to the Authing login page as the OpenID Connect plugin is already enabled (this page can be customized in the Authing console under “Applications - Branding”).

-
Enter the password for the user’s account registered with Authing, or the user user1/user1 created in Step 1, and click Login to log in to the Authing account.
-
After a successful login, you can successfully access the get page in httpbin.org. The httpbin.org/get page will return the requested data as follows.
... "X-Access-Token": "eyJhbGciOiJSUzI1NiIsInR5cCI6IkpXVCIsImtpZCI6InFqeU55aVdVd2NhbUFxdEdVRUNCeFNsTWxQSWtTR2N1NmkyZzhEUk1OSGsifQ.eyJqdGkiOiJjTy16a0pCS0NSRFlHR2kyWkJhY0oiLCJzdWIiOiI2MWM5OGFmOTg0MjI4YWU0OTYyMDU4NTIiLCJpYXQiOjE2NDA1OTg4NTgsImV4cCI6MTY0MTgwODQ1OCwic2NvcGUiOiJvcGVuaWQgcHJvZmlsZSIsImlzcyI6Imh0dHBzOi8vYXBpc2l4LmF1dGhpbmcuY24vb2lkYyIsImF1ZCI6IjYxYzk4M2M0YjI4NzdkNDg2OWRkOGFjYiJ9.l2V8vDWcCObB1LjIhKs2ARG4J7WuB-0c-bnYZG2GP2zcpl6PMAPcId2B76CaXCU58ajGcfRmOlWJ67UaHrfWKv8IM4vcYN1gwhKdokSyrhEM31gQE-MzNEsEbPaVIGXdpR1N2JnAJK5-tKIjopDAXSwArfO6fQKTpjLhCi3COIA169WGRR4CKCwNzzpFAYP2ilNc18D_HRTBLS6UjxZSNUtWE5dbx7uBjblhwIwn5e1fxiEQcknVK8Dxf8NUliFECvr02HX2hNvmuCECkvA_mZYlshAeqidK8tSEXirAWsWS5jlXFqLiBJkhSHFrbxRyqeOSfJCJR_YcCwk9AzgZGg", "X-Id-Token": "eyJhdF9oYXNoIjoiRl8tRjZaUVgtWVRDNEh0TldmcHJmUSIsImJpcnRoZGF0ZSI6bnVsbCwiZmFtaWx5X25hbWUiOm51bGwsImdlbmRlciI6IlUiLCJnaXZlbl9uYW1lIjpudWxsLCJpc3MiOiJodHRwczpcL1wvYXBpc2l4LmF1dGhpbmcuY25cL29pZGMiLCJwaWN0dXJlIjoiaHR0cHM6XC9cL2ZpbGVzLmF1dGhpbmcuY29cL2F1dGhpbmctY29uc29sZVwvZGVmYXVsdC11c2VyLWF2YXRhci5wbmciLCJwcmVmZXJyZWRfdXNlcm5hbWUiOm51bGwsInVwZGF0ZWRfYXQiOiIyMDIxLTEyLTI3VDA5OjU0OjE3Ljc3M1oiLCJ3ZWJzaXRlIjpudWxsLCJ6b25laW5mbyI6bnVsbCwibmFtZSI6bnVsbCwiaWF0IjoxNjQwNTk4ODU4LCJuaWNrbmFtZSI6bnVsbCwibm9uY2UiOiJmMTlmZjhjODM5NzdmZjNlMDczMzZmMzg3Y2QxM2EzMSIsIm1pZGRsZV9uYW1lIjpudWxsLCJleHAiOjE2NDE4MDg0NTgsInN1YiI6IjYxYzk4YWY5ODQyMjhhZTQ5NjIwNTg1MiIsImxvY2FsZSI6bnVsbCwiYXVkIjoiNjFjOTgzYzRiMjg3N2Q0ODY5ZGQ4YWNiIiwicHJvZmlsZSI6bnVsbH0=", "X-Userinfo": "eyJ3ZWJzaXRlIjpudWxsLCJ6b25laW5mbyI6bnVsbCwibmFtZSI6bnVsbCwicHJvZmlsZSI6bnVsbCwibmlja25hbWUiOm51bGwsInN1YiI6IjYxYzk4YWY5ODQyMjhhZTQ5NjIwNTg1MiIsImxvY2FsZSI6bnVsbCwiYmlydGhkYXRlIjpudWxsLCJmYW1pbHlfbmFtZSI6bnVsbCwiZ2VuZGVyIjoiVSIsImdpdmVuX25hbWUiOm51bGwsIm1pZGRsZV9uYW1lIjpudWxsLCJwaWN0dXJlIjoiaHR0cHM6XC9cL2ZpbGVzLmF1dGhpbmcuY29cL2F1dGhpbmctY29uc29sZVwvZGVmYXVsdC11c2VyLWF2YXRhci5wbmciLCJwcmVmZXJyZWRfdXNlcm5hbWUiOm51bGwsInVwZGF0ZWRfYXQiOiIyMDIxLTEyLTI3VDA5OjU0OjE3Ljc3M1oifQ==" ...X-Access-Token: Apache APISIX puts the access token obtained from the user provider into the
X-Access-Tokenrequest header, optionally in the Authorization request header viaaccess_token_in_authorization_headerin the plugin configuration.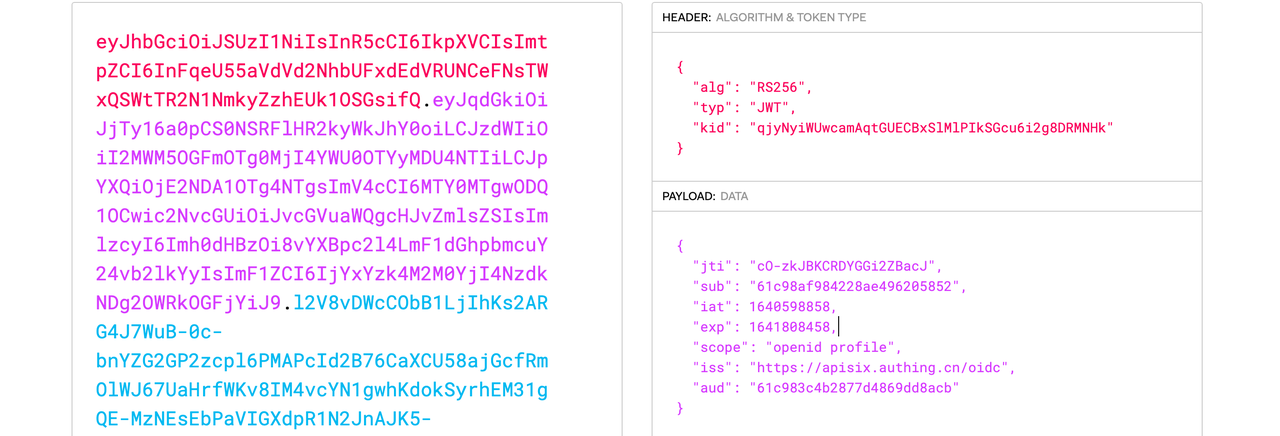
X-Id-Token: Apache APISIX puts the ID token obtained from the user provider into the X-Id-Token request header after base64 encoding, which can be enabled or disabled by
set_id_token_headerin the plugin configuration.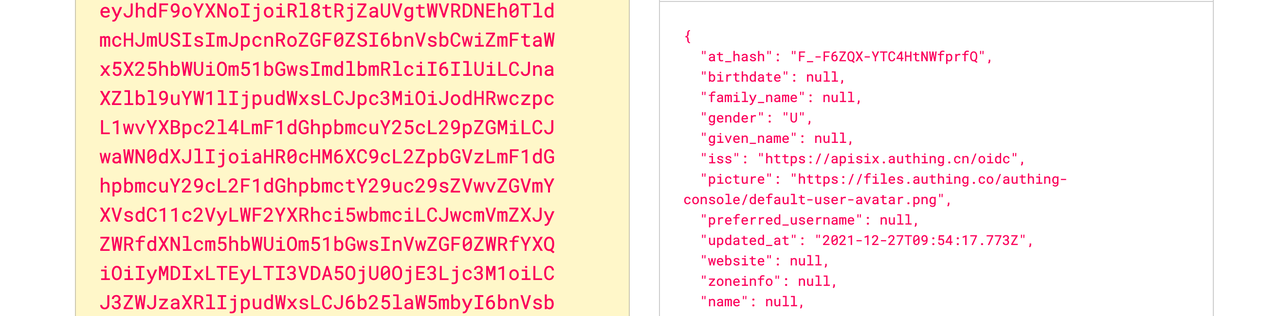
X-Userinfo: Apache APISIX puts the user information obtained from the user provider into X-Userinfo after encoding it in base64. You can choose whether to enable this feature by using
set_userinfo_headerin the plugin configuration.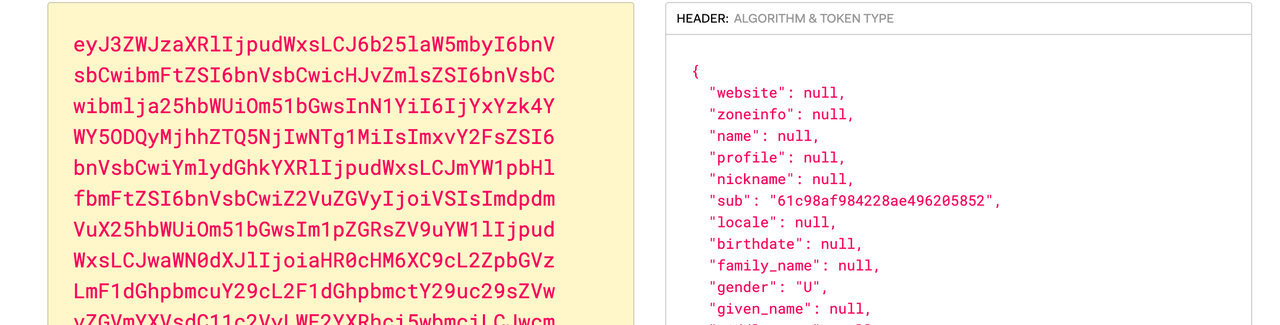
As you can see, Apache APISIX will carry
X-Access-Token,X-Id-TokenandX-Userinforequest headers to the upstream. The upstream can parse these headers to get the user ID information and the user metadata. -
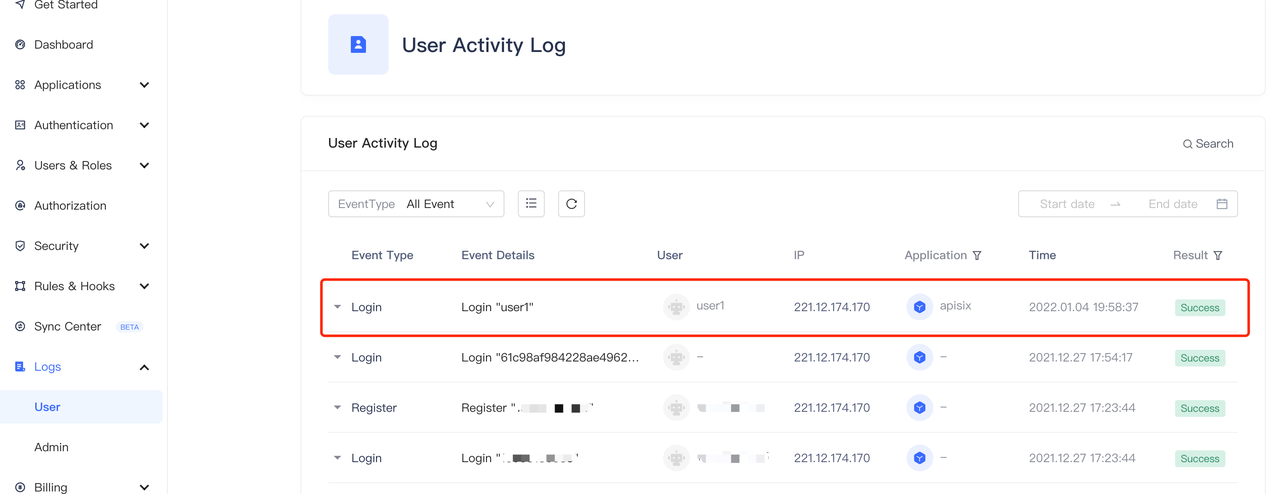
In the “Audit Log - User Behavior Log” in the Authing console, you can observe that user1 login information.
Summary
This article describes the detailed steps for interfacing Apache APISIX with Authing.
Apache APISIX is not only committed to maintaining its own high performance, but also has always attached great importance to the construction of open source ecology. At present, Apache APISIX has 10+ authentication authorization-related plug-ins that support interfacing with mainstream authentication authorization services in the industry.
If you have a need to interface to other authentication authorities, visit Apache APISIX’s GitHub and leave your suggestions via issue; or subscribe to Apache APISIX’s mailing list to express your thoughts via email.