Getting Started with APISIX Test Cases

This article introduces the test case of APISIX and how to write the test case, and shows the actual operation effect from the local and GitHub.
Background
Apache APISIX is a dynamic, real-time, high-performance API Gateway, it provides rich traffic management features such as load balancing, dynamic upstream, canary release, circuit breaking, authentication, observability, and more. You can use APISIX API Gateway to handle traditional north-south traffic, as well as east-west traffic between services.
Under normal circumstances, to ensure the normal operation of the software, we generally use various techniques and methods to check the functions of the software manually or automatically to ensure that it is running normally before the software goes online. We call this operation QA (testing). Testing is generally divided into unit testing, E2E testing and chaos testing.
Unit testing is used to check the correctness of a single module (such as checking whether the serialization/deserialization of a certain RPC, data encryption and decryption are normal), but the test lacks a global perspective on the system. The E2E test (ie end-to-end test) can make up for the insufficiency of the unit test. The test runs the entire system and external dependent services, and checks the integration of the system and other systems through real software calls; the chaos test passes the test. Create unexpected situations between various components of the system, such as OOM Kill, network interruption, etc., to test the tolerance and capability of the entire system for errors and errors. The testing of APISIX is more inclined to E2E testing to ensure the correctness of its own functions and integration with other systems.
APISIX Test Case Introduction
APISIX is the world’s most active API gateway, and its stability and service robustness need to be guaranteed to a certain extent, so how to avoid potential errors in APISIX? This needs to be achieved through test cases.
A test script is not just a program file executed by the machine under test. For developers, the test script can be used to test all functions of the software, including the running status of the program under different configurations and different input parameters. For the user, the test provides a specific example of the use of a function module, such as: the configuration and input that the program can accept, and what kind of output results are expected to be obtained. If the user encounters something they do not understand when referring to the documentation, they can refer to the existing test cases to find out whether there are similar usage scenarios.
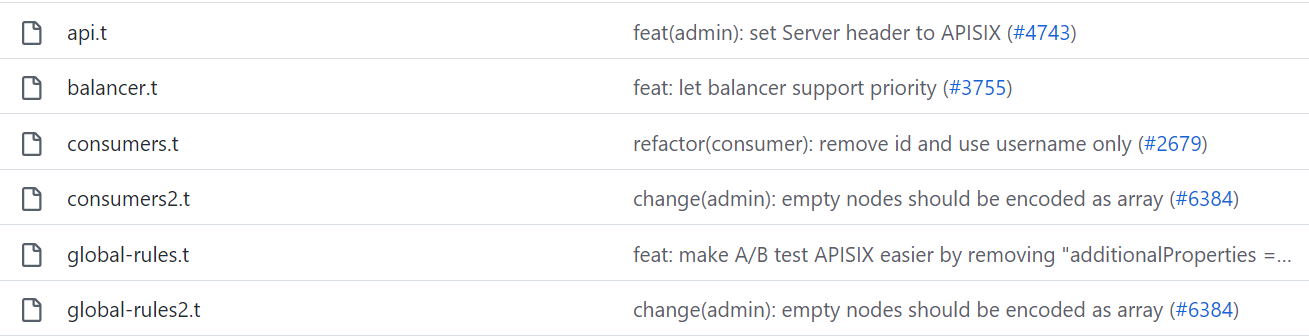
In the APISIX project, Github Action is usually used to run CI tests and execute the test scripts shown in the following figure. Many APISIX developers encounter a variety of problems when writing test cases. Hope this article will help you write APISIX test cases.
Write test cases
The test cases of APISIX are written based on the Test::NGINX test framework, which is a test environment implemented on the basis of the Perl language, which can provide script-based automated testing capabilities, and provides a large-scale test and quality assurance work for APISIX. support. Of course, it doesn’t matter if you don’t use Perl, because in most scenarios, you don’t need to write Perl code, you only need to use the ability of TEST::NGINX encapsulation. If you have special needs, you can combine it with Lua code to enhance it.
The test cases of APISIX are stored in the ./apisix/t directory. Next, we will introduce you to how to write test cases by adding the opa plugin as an example.
-
You need to create a test file ending with
.t, eg./t/plugin/opa.t. If you are adding features to existing functions, you can directly add test cases to the corresponding test file, and add the fixed-formatASF 2.0protocol to the file. -
The main function of this part is to automatically add
no_error_logto all test cases in theopa.tfile, so that you don’t need to adderror_logrelated code under each code, you can copy and use this code directly. segment code. In this way, some duplication of code can be reduced.
add_block_preprocessor(sub {
    my ($block) = @_;

    if ((!defined $block->error_log) && (!defined $block->no_error_log)) {
        $block->set_value("no_error_log", "[error]");
    }

    if (!defined $block->request) {
        $block->set_value("request", "GET /t");
    }
});

run_tests();

DATA- Each test case has a fixed beginning, and the general format is as follows.
=== TEST 1: sanity=== is a fixed syntax structure at the beginning of a test case, and TEST 1 represents the first test case in this file. sanity is the name of the test. Usually named after the specific purpose of the test case.
- Next is the body of the test case. Almost every plugin in APISIX defines some parameters and properties, and pre-defines JSON schema, so we need to check whether the input parameters of the plugin can be properly verified. In this way, we can check whether the data we input can be properly verified by the rules of JSON schema.
--- config
    location /t {
        content_by_lua_block {
            local test_cases = {
                {host = "http://127.0.0.1:8181", policy = "example/allow"},
                {host = "http://127.0.0.1:8181"},
                {host = 3233, policy = "example/allow"},
            }
            local plugin = require("apisix.plugins.opa")
            for _, case in ipairs(test_cases) do
                local ok, err = plugin.check_schema(case)
                ngx.say(ok and "done" or err)
            end
        }
    }
--- response_body
done
property "policy" is required
property "host" validation failed: wrong type: expected string, got number
By reading the source code of the opa plugin, you can see that the opa plugin requires both host and policy to exist, so three rules need to be defined here.
- Enter the correct parameters, including
hostandpolicy. So the return result will bedone; - Enter only the
hostparameter. Does not meet the requirements ofhostandpolicyat the same time, so the expected return result of this test will beproperty "policy" is required; - A
hostvalue of the wrong type (integer) was entered. Because thehostparameter must be a string type set in the source code, the return result will beproperty "host" validation failed: wrong type: expected string, got number.
--- config
    location /t {
        content_by_lua_block {
...
                ngx.say(ok and "done" or err)
            end
        }
    }
--- response_body
done
...
In general, each test case needs to use the /t function, for example, you need to call Lua code, define location. You can use the content_by_lua_block method to call some code-assisted tests, and finally print the response information in the ngx.say method, and then use the --- response_body method to check whether the above program runs correctly. There is no need to enter request and error manually, because you have already added them automatically through the script.
    local plugin = require("apisix.plugins.opa")
    for _, case in ipairs(test_cases) do
        local ok, err = plugin.check_schema(case)
        ngx.say(ok and "done" or err)
The above code represents a module that imports the APISIX Plugin opa plugin and calls the plugin.check_schema function. Then pass the for loop to call the parameters and return the corresponding results according to the test situation.
- Next, we need to set up an environment for testing. For plugins, it is to create a route, and then associate the plugin to this route. After the setup is complete, we can verify whether the internal logic of the plugin is implemented correctly by sending a request.
=== TEST 2: setup route with plugin
--- config
    location /t {
        content_by_lua_block {
            local t = require("lib.test_admin").test
            local code, body = t('/apisix/admin/routes/1',
                 ngx.HTTP_PUT,
                 [[{
                        "plugins": {
                            "opa": {
                                "host": "http://127.0.0.1:8181",
                                "policy": "example"
                            }
                        },
                        "upstream": {
                            "nodes": {
                                "127.0.0.1:1980": 1
                            },
                            "type": "roundrobin"
                        },
                        "uris": ["/hello", "/test"]
                }]]
                )
            if code >= 300 then
                ngx.status = code
            end
            ngx.say(body)
        }
    }
--- response_body
passed
In the above example, lib_test_admin is used to import into the t function, create a route with id of 1, and then use the PUT method to pass in the data. In this test, we did not check the data format, because the test case only needs to ensure that the route can be created normally using the Admin API. Of course, we also need to judge the exception. If the status code is greater than or equal to 300, then The specific information will be printed.
In APISIX’s test cases, you will find that many of the tests include the following code:
local t = require("lib.test_admin").test
local code, body = t('/apisix/admin/routes/1', ngx.HTTP_PUT)
The above code means importing the lib.test_admin module and encapsulating it with the test function to send the request. It reduces the repetitive code when we call HTTP interfaces such as APISIX Admin API, and only needs to simply call and check the returned result.
- In the third test, we don’t need to repeat the creation of the route since it was already created in the second test.
=== TEST 3: hit route (with correct request)
--- request
GET /hello?test=1234&user=none
--- more_headers
test-header: only-for-test
--- response_body
hello world
The above example defines request. Since we defined /hello and /test paths in the previous test, we can send a GET request to /hello and it will then send a test=1234 and user=none for the query parameter. You can also add response headers via more_headers, such as adding a test-header response header to a request sent to hello.
The above test is to test whether adding the correct request header can be successful. You can also add error headers in subsequent test examples and verify the results. If you need to use POST request, you can also change GET /hello in the above code to POST /hello.
In some tests, you may need to create multiple upstreams or routes. In this case, you can define an array, then define these corresponding values in the array, and use the for method to call the t function in a loop, and then Let it call the Admin API interface of APISIX through put to create a route or upstream normally. This method is also a more common method of testing, called: Table driving test, which is a method of driving tests through tables, which reduces some repetitive codes. For details, please refer to the APISIX test case quick start video and the opa2.t test case.
Run the test case
The test case requires the source code to install APISIX. For the specific installation method, please refer to Building APISIX from source. Next, we will focus on how to run test cases and error checking.
Running locally
Typically, you can run a test case locally using the following command:
PATH=/usr/local/openresty/nginx/sbin:/usr/bin PERL5LIB=.:$PERL5LIB FLUSH_ETCD=1 prove -Itest-nginx/lib -r t/adminThe above commands are interpreted as follows:
PATHspecifies the directory whereopenresty/nginxis located, which can avoid conflicts caused by incorrect configuration of some environments. If OpenResty in the environment is installed in other locations, it can also be specified through this command.PERL5LIBspecifies importing locally usingPerl. Import the PERL library that exists in this path and some of the PERL libraries attached via environment variables.FLUSH_ETCDspecifies that after each test file is executed, all data is cleared. It needs to call theetcdctlfunction, and it needs to ensure that theetcdctlexecutable file can be found in thePATH.proveinvokes the test program to start the test execution.-Itest-nginx/libmeans import theItest-nginx/liblibrary.-rmeans to automatically find test files. If a path is specified, all test files under this path will be searched.t/adminmeans to specify the test case search path, and it can also be specified to a unique.tfile for qualification.
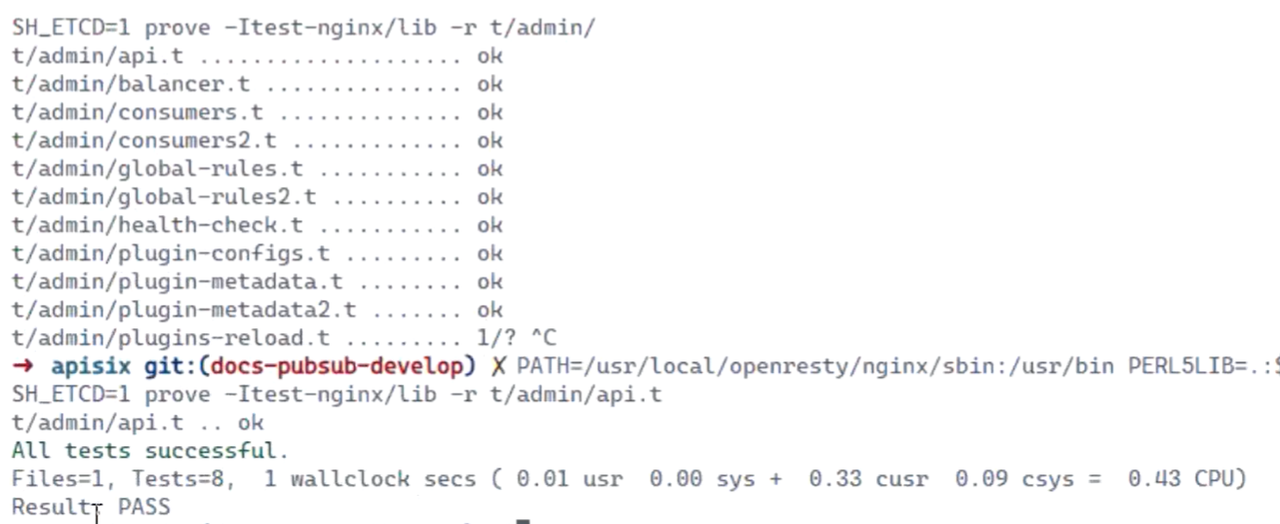
The following is the normal return result.
If the test fails, the following message appears:
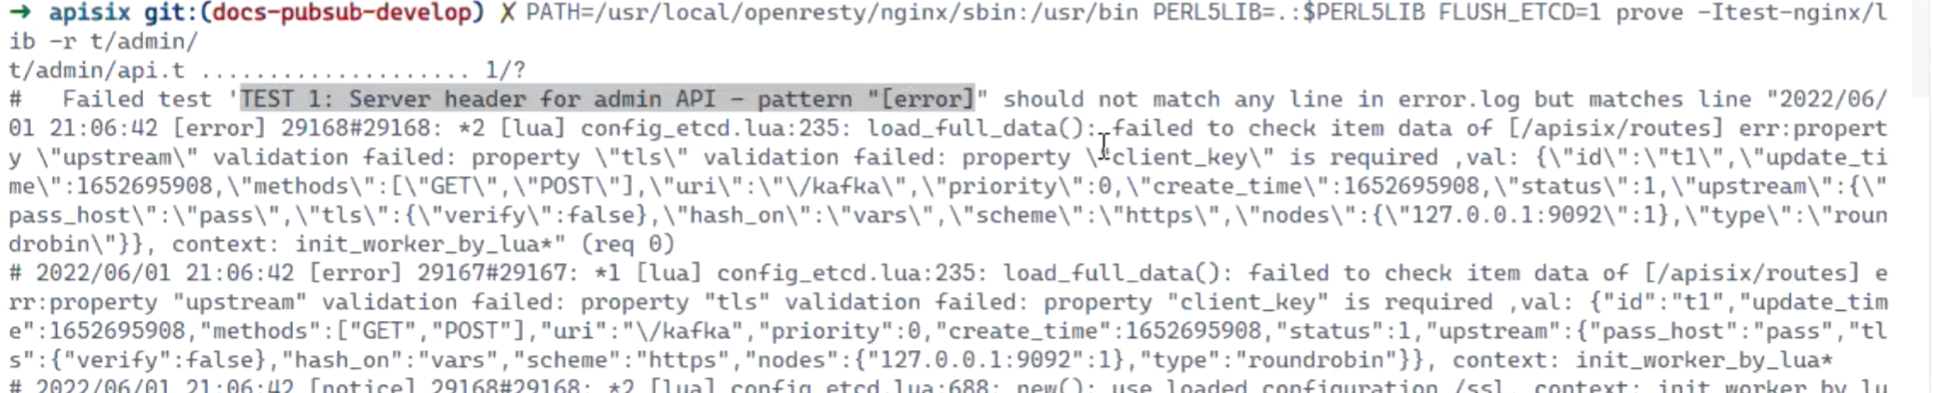
The above information will tell you which test case in which test file failed.
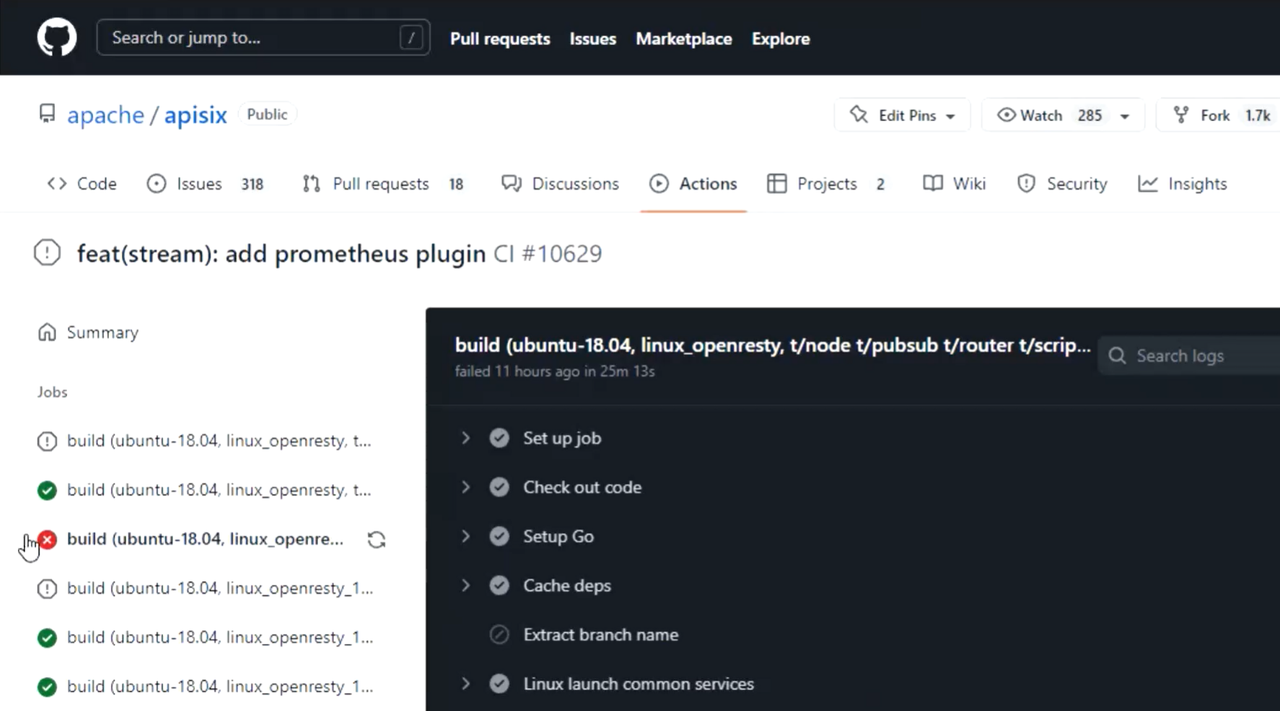
Running Github
In general, when submitting code in Github, the output results are similar to those of local testing.
First select the wrong execution workflow, the main test cases are in the build series CI.
We can see that, in this example, line 416 is reporting an error. Through the error information, we can get that there is an error in a test case in a certain test file, and the developer can look for the correction in direction. It should be noted that there may be some strange errors in CI, which may be caused by temporary abnormalities in the CI environment. If the code in the corresponding module has not been modified, these errors can be ignored.

Summary
This article mainly introduces the relevant process of testing, as well as the composition of APISIX test cases and how to write test cases. I hope you can have a general understanding of APISIX test cases through this article.
However, the text only mentions some core content in the APISIX test framework, and fails to cover all the content in the TEST::NGINX framework. In fact, there are many powerful capabilities in TEST::NGINX. We can use Test::Nginx::Socket documentation for more usage. If you want to learn more about writing test cases, you can also watch the APISIX Test Cases Quick Start video.