
In this article, we will look at examples of how we can use the rate limiting plugins in APISIX.
Setting up rate limits is a solid way to improve the reliability of your services.
You can ensure your services are not overloaded by setting up rate limits, providing consistent performance for the end users. It can also help enhance security by preventing denial-of-service (DoS) attacks which can take down your services.
Rate limiting can also be part of your business requirement where you want separate quotas for different tiers of users. For example, you can have a free version of your API where users can only make a small number of API calls and a paid version that allows ample API usage.
If you are using Apache APISIX as your API gateway, you can leverage the rate limiting plugins, limit-req, limit-conn, and limit-count to achieve this.
You can always set this up in your services directly without configuring it in APISIX. But as the number of your services increases, with each service having different constraints, setting up and managing different rate limits and updating them in each of these services becomes a pain point for development teams.
In this article, we will look at examples of how we can use the rate limiting plugins in APISIX. You can find the complete configuration files and instructions to deploy for this article in this repository.
Rate Limit All Requests
Setting up a rate limit for all your requests is a good place to start.
APISIX allows configuring global rules that are applied on all requests to APISIX. We can configure a global rule with the limit-req plugin, as shown below:
curl localhost:9180/apisix/admin/global_rules/rate_limit_all -X PUT -d '
{
  "plugins": {
    "limit-req": {
      "rate": 30,
      "burst": 30,
      "key_type": "var",
      "key": "remote_addr",
      "rejected_code": 429,
      "rejected_msg": "rate limit exceeded!"
    }
  }
}'
The configuration above will allow 30 requests per second (rate) to your upstream services. When the number of requests exceeds 30 but is under 60 (burst), the additional requests are delayed to match the 30 requests per second limit. If the number of requests exceeds 60, the additional requests are rejected. In short, the upstream services will always have a maximum of 30 requests per second.
A global rate limit can be helpful when you want to set hard limits on the number of requests your upstream should receive in a second. But sometimes, you might want to rate limit the requests to a particular route instead of all requests.
To do this, you can configure the plugin on a specific route. The example below shows how you can configure the limit-count plugin on a particular route:
curl localhost:9180/apisix/admin/routes/rate_limit_route -X PUT -d '
{
  "uri": "/api",
  "upstream": {
    "type": "roundrobin",
    "nodes": {
      "upstream:80": 1
    }
  },
  "plugins": {
    "limit-count": {
      "count": 10,
      "time_window": 60,
      "key_type": "var",
      "key": "remote_addr",
      "policy": "local",
      "rejected_code": 429,
      "rejected_msg": "rate limit exceeded!"
    }
  }
}'
This will allow only ten requests in a minute, and this will be reset every minute.
A global and route level limit combo can be used to set hard limits on top of use case-specific limits, which is particularly helpful in many practical scenarios. For example, you can configure the limit-rate plugin in a global rule based on how much traffic your upstream services can handle and then configure limt-count plugins on specific routes to handle business specific rate limits.
If the same plugin is configured globally and at a route level, the lower of the two is used by APISIX.
Limits for Consumers
Rate limiting all requests is cool, but most of you readers might want to be more granular with your limits. A typical scenario is configuring different limits for different consumers of your API. And APISIX achieves this through the aptly-named consumer object.
For this example, we can create a consumer and use the basic key authentication provided by APISIX. We will then add the limit-conn plugin to this consumer. To create the consumer, send a request to the Admin API as shown:
curl localhost:9180/apisix/admin/consumers -X PUT -d '
{
  "username": "alice",
  "plugins": {
    "key-auth": {
      "key": "beautifulalice"
    },
    "limit-conn": {
      "conn": 5,
      "burst": 3,
      "default_conn_delay": 0.1,
      "key_type": "var",
      "key": "remote_addr",
      "rejected_code": 429,
      "rejected_msg": "too many concurrent requests!"
    }
  }
}'
In the route, we will just enable the key-auth plugin:
curl localhost:9180/apisix/admin/routes/rate_limit_consumer -X PUT -d '
{
  "uri": "/api",
  "upstream": {
    "type": "roundrobin",
    "nodes": {
      "upstream:80": 1
    }
  },
  "plugins": {
    "key-auth": {}
  }
}'
We can create a different consumer and set up a different rate limit as well:
curl localhost:9180/apisix/admin/consumers -X PUT -d '
{
  "username": "bob",
  "plugins": {
    "key-auth": {
      "key": "bobisawesome"
    },
    "limit-conn": {
      "conn": 2,
      "burst": 1,
      "default_conn_delay": 0.1,
      "key_type": "var",
      "key": "remote_addr",
      "rejected_code": 429,
      "rejected_msg": "too many concurrent requests! please upgrade to increase this limit."
    }
  }
}'
Now APISIX will limit the number of concurrent requests these consumers can make independently as desired.
Grouping Consumers
Configuring each consumer individually can be a tedious process. In addition to supporting third-party authentication providers like Keycloak and Casdoor, APISIX has a consumer group object that lets you group individual consumers and apply configurations to the group.
So to apply rate limits to a group of consumers, we can create a consumer group object and add the limit-count plugin to it, as shown below:
curl localhost:9180/apisix/admin/consumer_groups/team_acme -X PUT -d '
{
  "plugins": {
    "limit-count": {
      "count": 10,
      "time_window": 60,
      "key_type": "var",
      "key": "remote_addr",
      "policy": "local",
      "rejected_code": 429,
      "group": "team_acme"
    }
  }
}'
We can also create a consumer group for consumers who are from another team on a different plan:
curl localhost:9180/apisix/admin/consumer_groups/team_rocket -X PUT -d '
{
  "plugins": {
    "limit-count": {
      "count": 100,
      "time_window": 60,
      "key_type": "var",
      "key": "remote_addr",
      "policy": "local",
      "rejected_code": 429,
      "group": "team_rocket"
    }
  }
}'
We can add consumers to these groups to attach the rate limit configuration:
curl localhost:9180/apisix/admin/consumers -X PUT -d '
{
  "username": "eva",
  "plugins": {
    "key-auth": {
      "key": "everydayeva"
    }
  },
  "group_id": "team_acme"
}'
Now consumers in the team_acme group can only send ten requests per minute to your API, while consumers in the team_rocket group can send 100. So when alice from team_acme sends nine requests in a minute another user in the team, bob can only send one more request before the rate-limit quota is met.
Multi-Node Rate Limits
In many practical scenarios, you will have multiple instances of APISIX deployed for high availability. This could mean that a consumer of your API might be routed to different instances of APISIX for each request by the load balancer in front. In the context of rate limiting, what could go wrong here?
Well, generally, APISIX tracks the rate limit in memory. And this could be problematic when using the limit-count plugin, where a consumer might be able to bypass the limit when there is a large enough number of APISIX nodes.
A trivial solution here might be to set up sticky sessions in the load balancer so that each request gets sent to exactly a single node (on a side note, this article is excellent for learning how to set up sticky sessions with APISIX). But this could limit the scalability we are trying to achieve.
A better way is to store the counter in a central location and have all APISIX nodes access it. So even if the load balancer routes to different nodes in each request, the same counter would be incremented each time. APISIX does this through Redis.
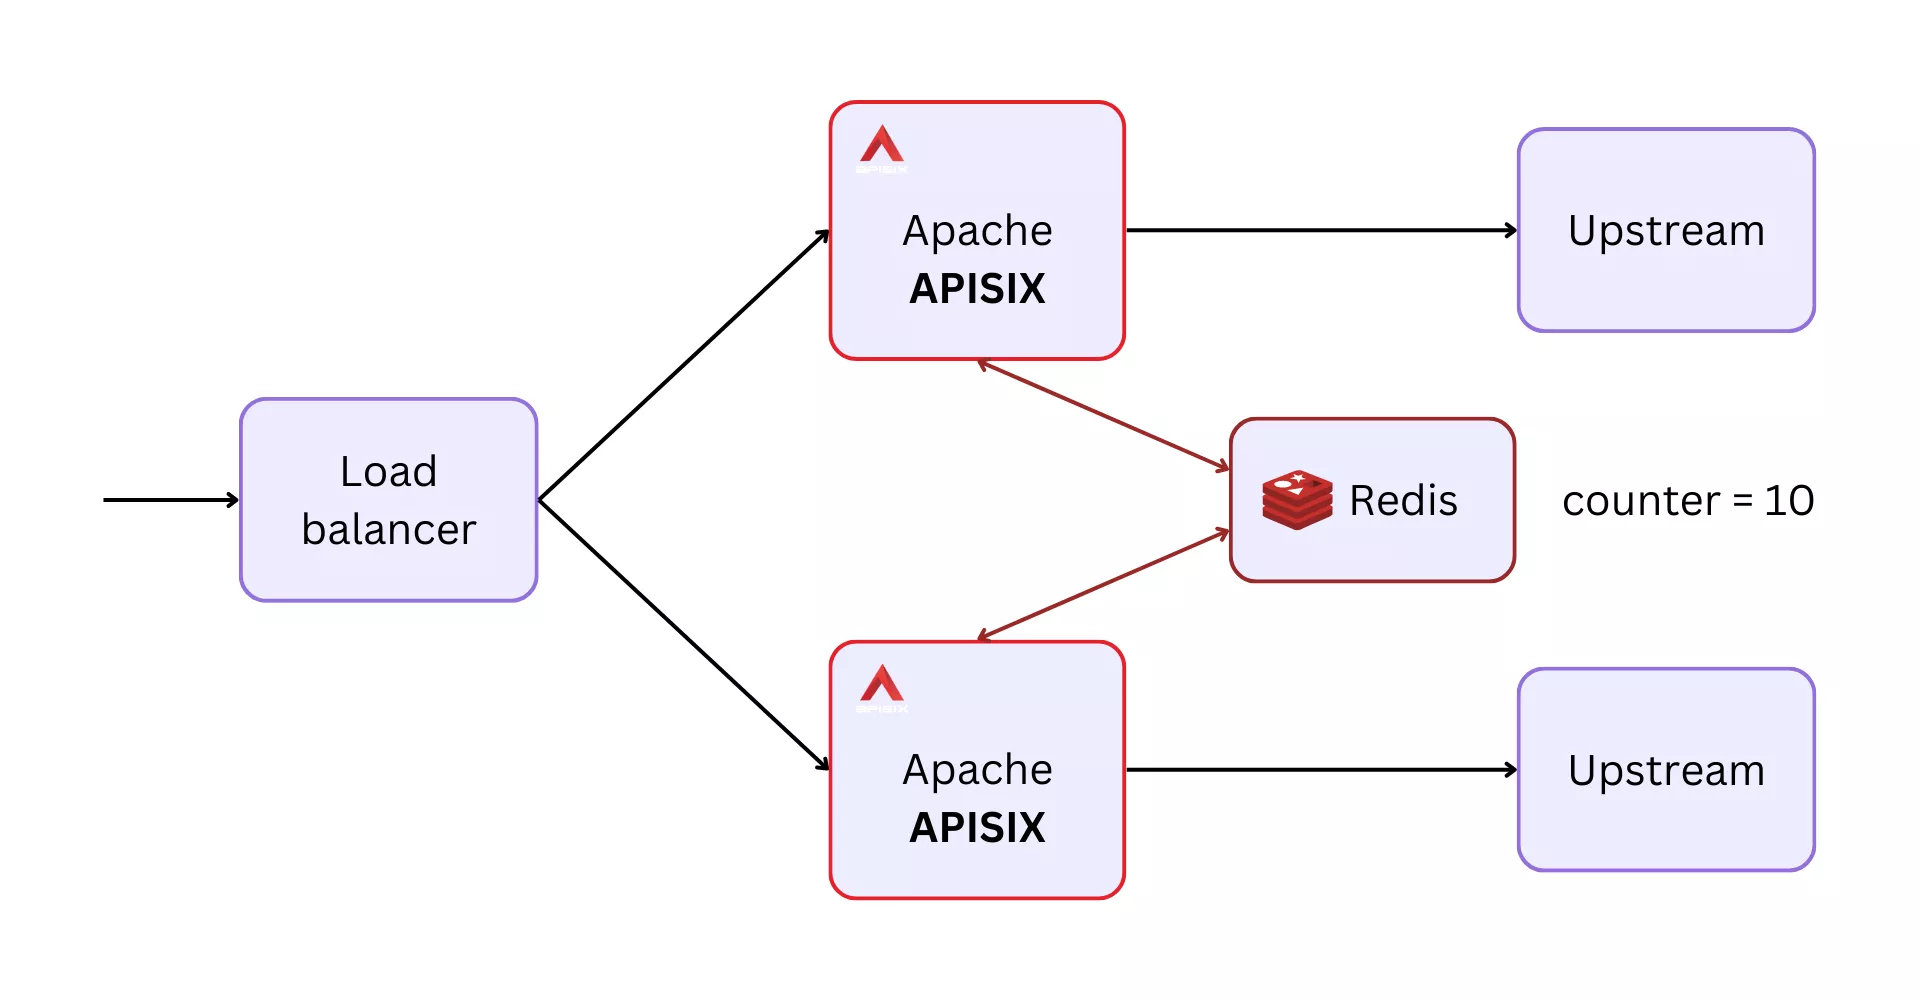
The example below shows how you can configure this in a consumer group object:
curl localhost:9180/apisix/admin/consumer_groups/team_edward -X PUT -d '
{
  "plugins": {
    "limit-count": {
      "count": 10,
      "time_window": 60,
      "key_type": "var",
      "key": "remote_addr",
      "policy": "redis",
      "redis_host": "redis",
      "redis_port": 6379,
      "redis_password": "password",
      "redis_database": 1,
      "redis_timeout": 1001,
      "rejected_code": 429,
      "group": "team_edward"
    }
  }
}'
You can also use a Redis cluster instead of a single Redis service to make this more fault-tolerant:
curl localhost:9180/apisix/admin/consumer_groups/team_edward -X PUT -d '
{
  "plugins": {
    "limit-count": {
      "count": 10,
      "time_window": 60,
      "key_type": "var",
      "key": "remote_addr",
      "policy": "redis-cluster",
      "redis_cluster_nodes": ["127.0.0.1:5000", "127.0.0.1:5001"],
      "redis_password": "password",
      "redis_cluster_name": "redis-cluster-1",
      "redis_timeout": 1001,
      "rejected_code": 429,
      "group": "team_edward"
    }
  }
}'
That's a lot for this article! In the upcoming article, we will examine how APISIX implements rate limiting under the hood and its implications. To learn more about the rate limit plugins, see the documentation at apisix.apache.org.